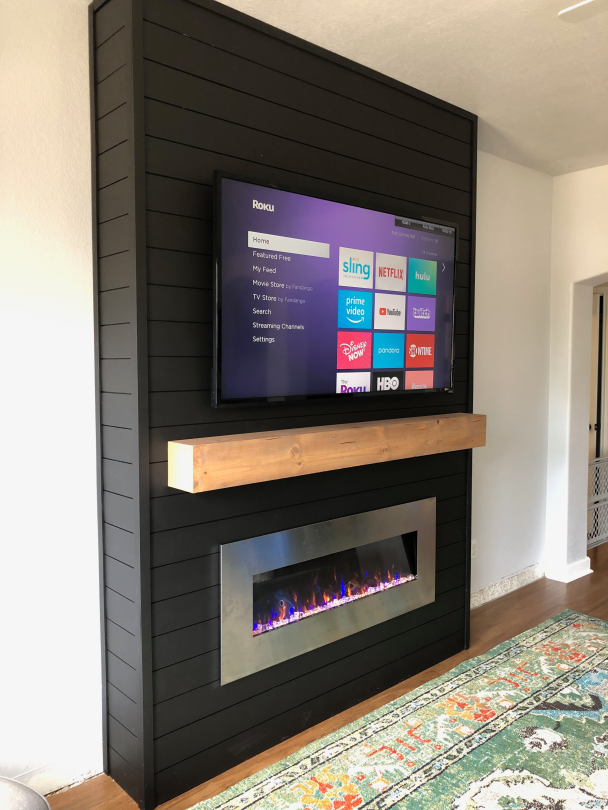
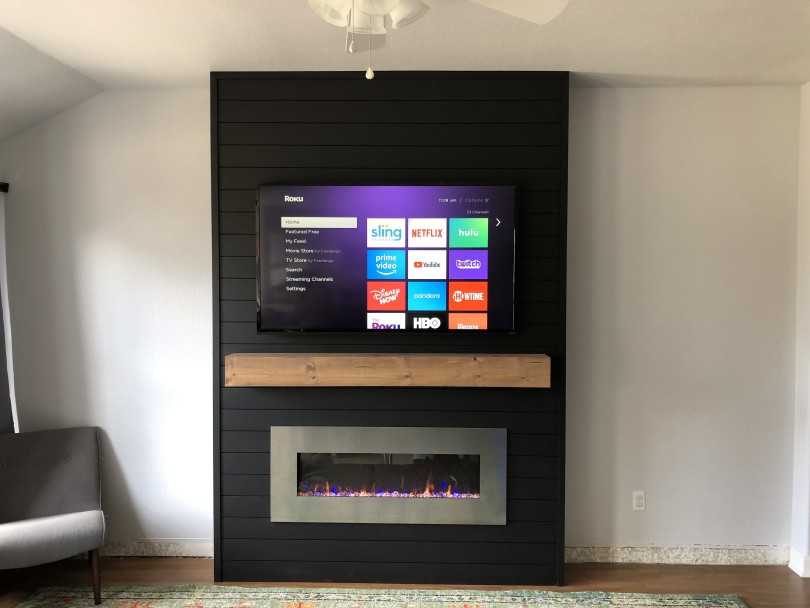
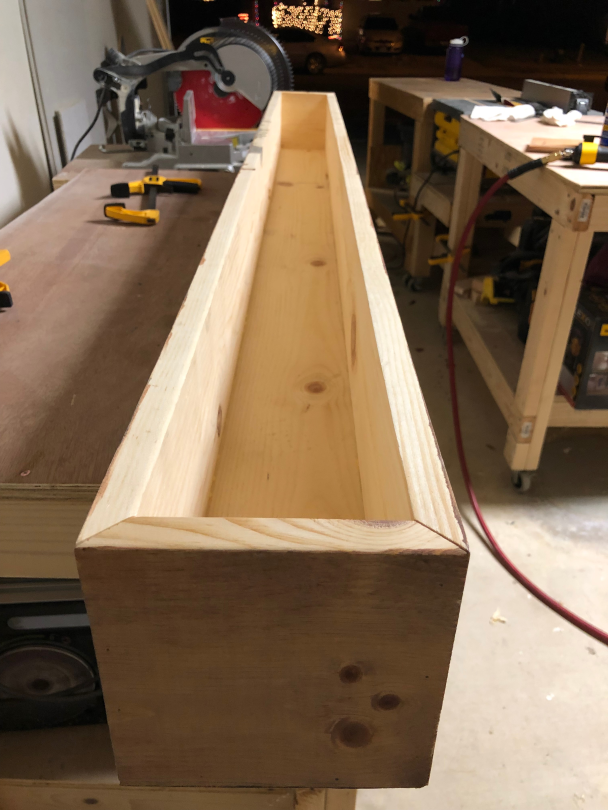
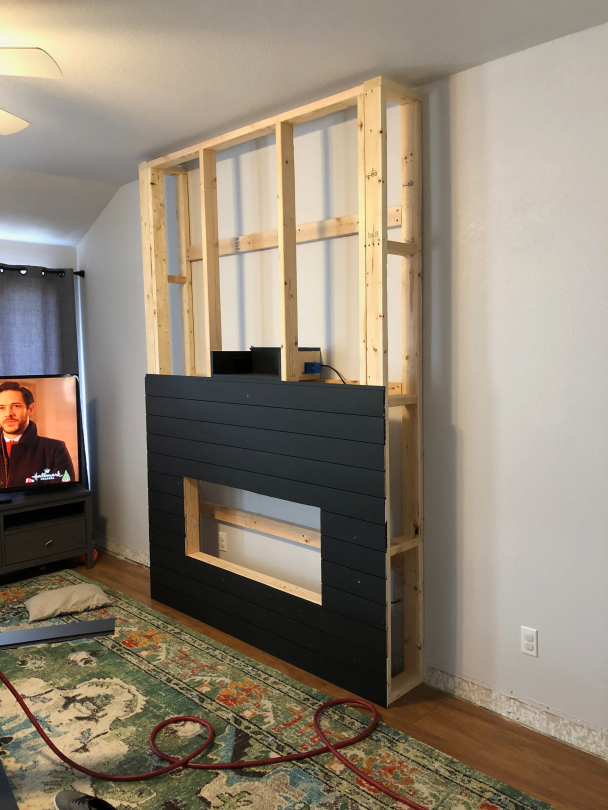
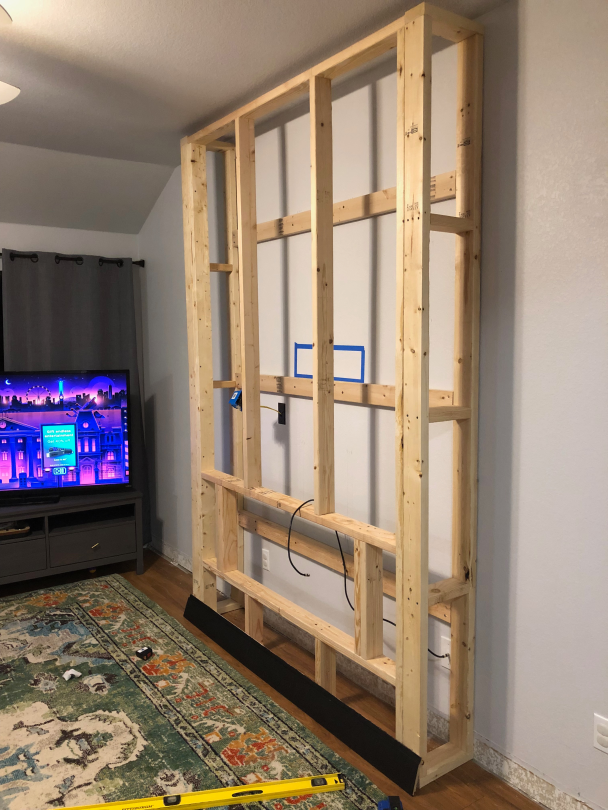
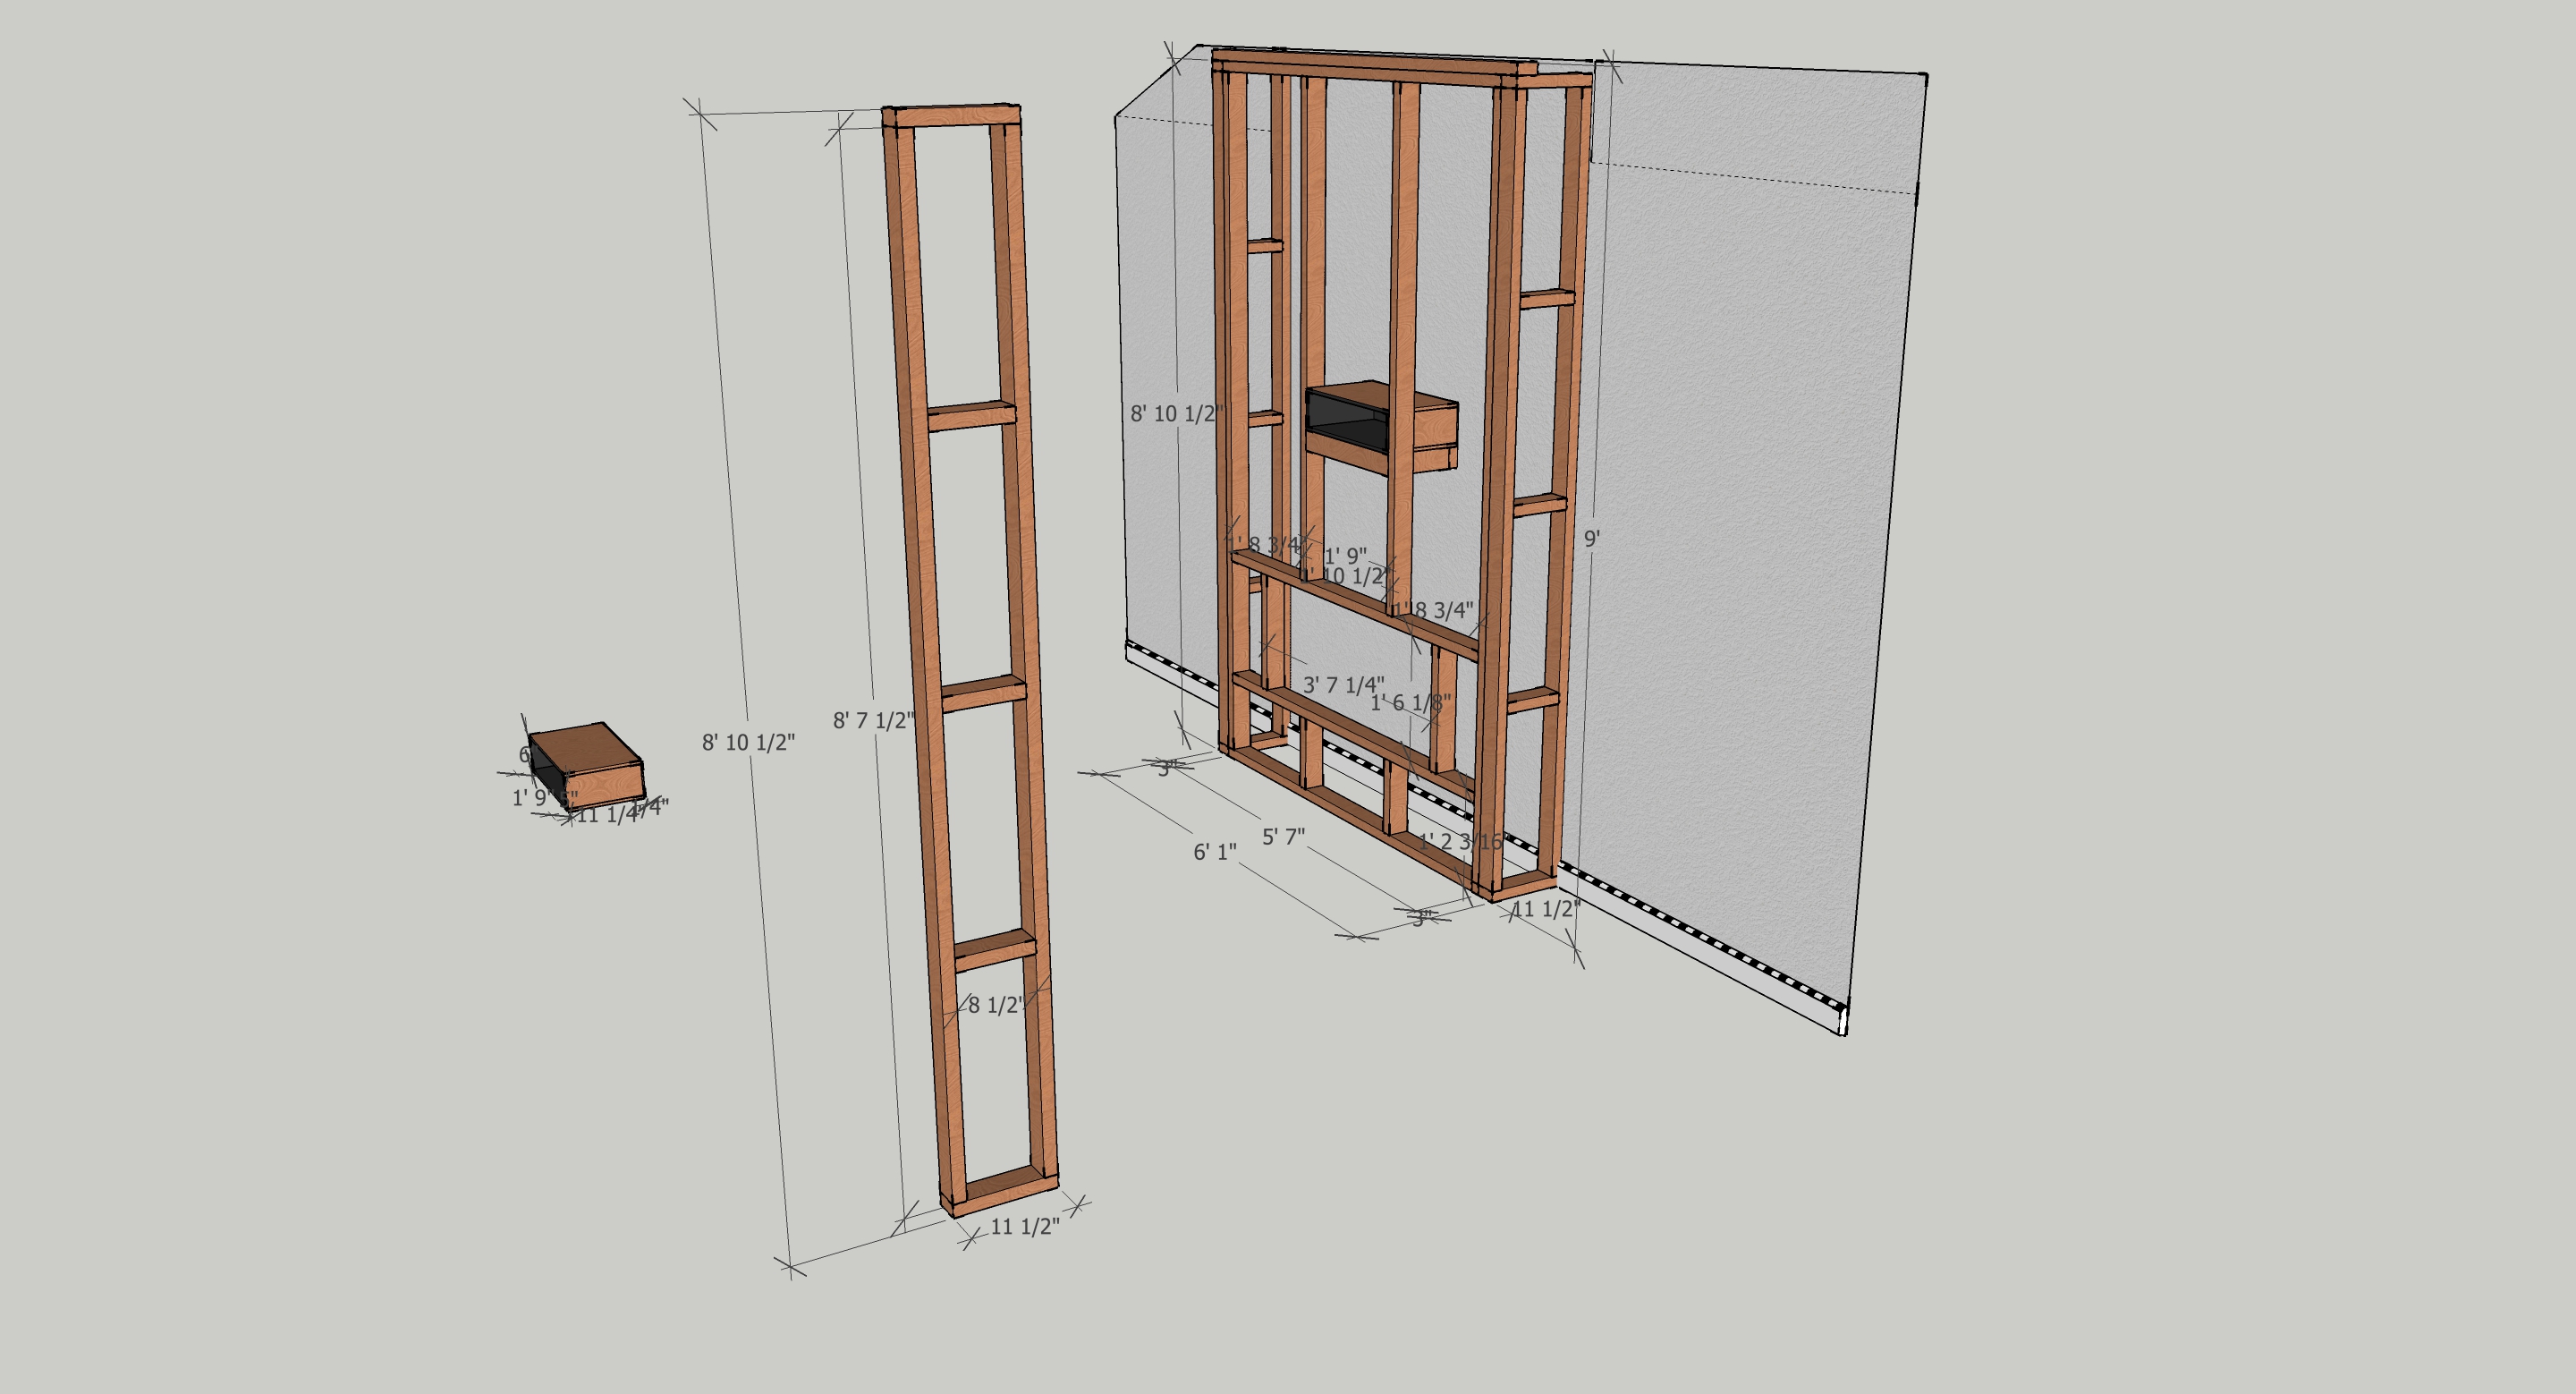
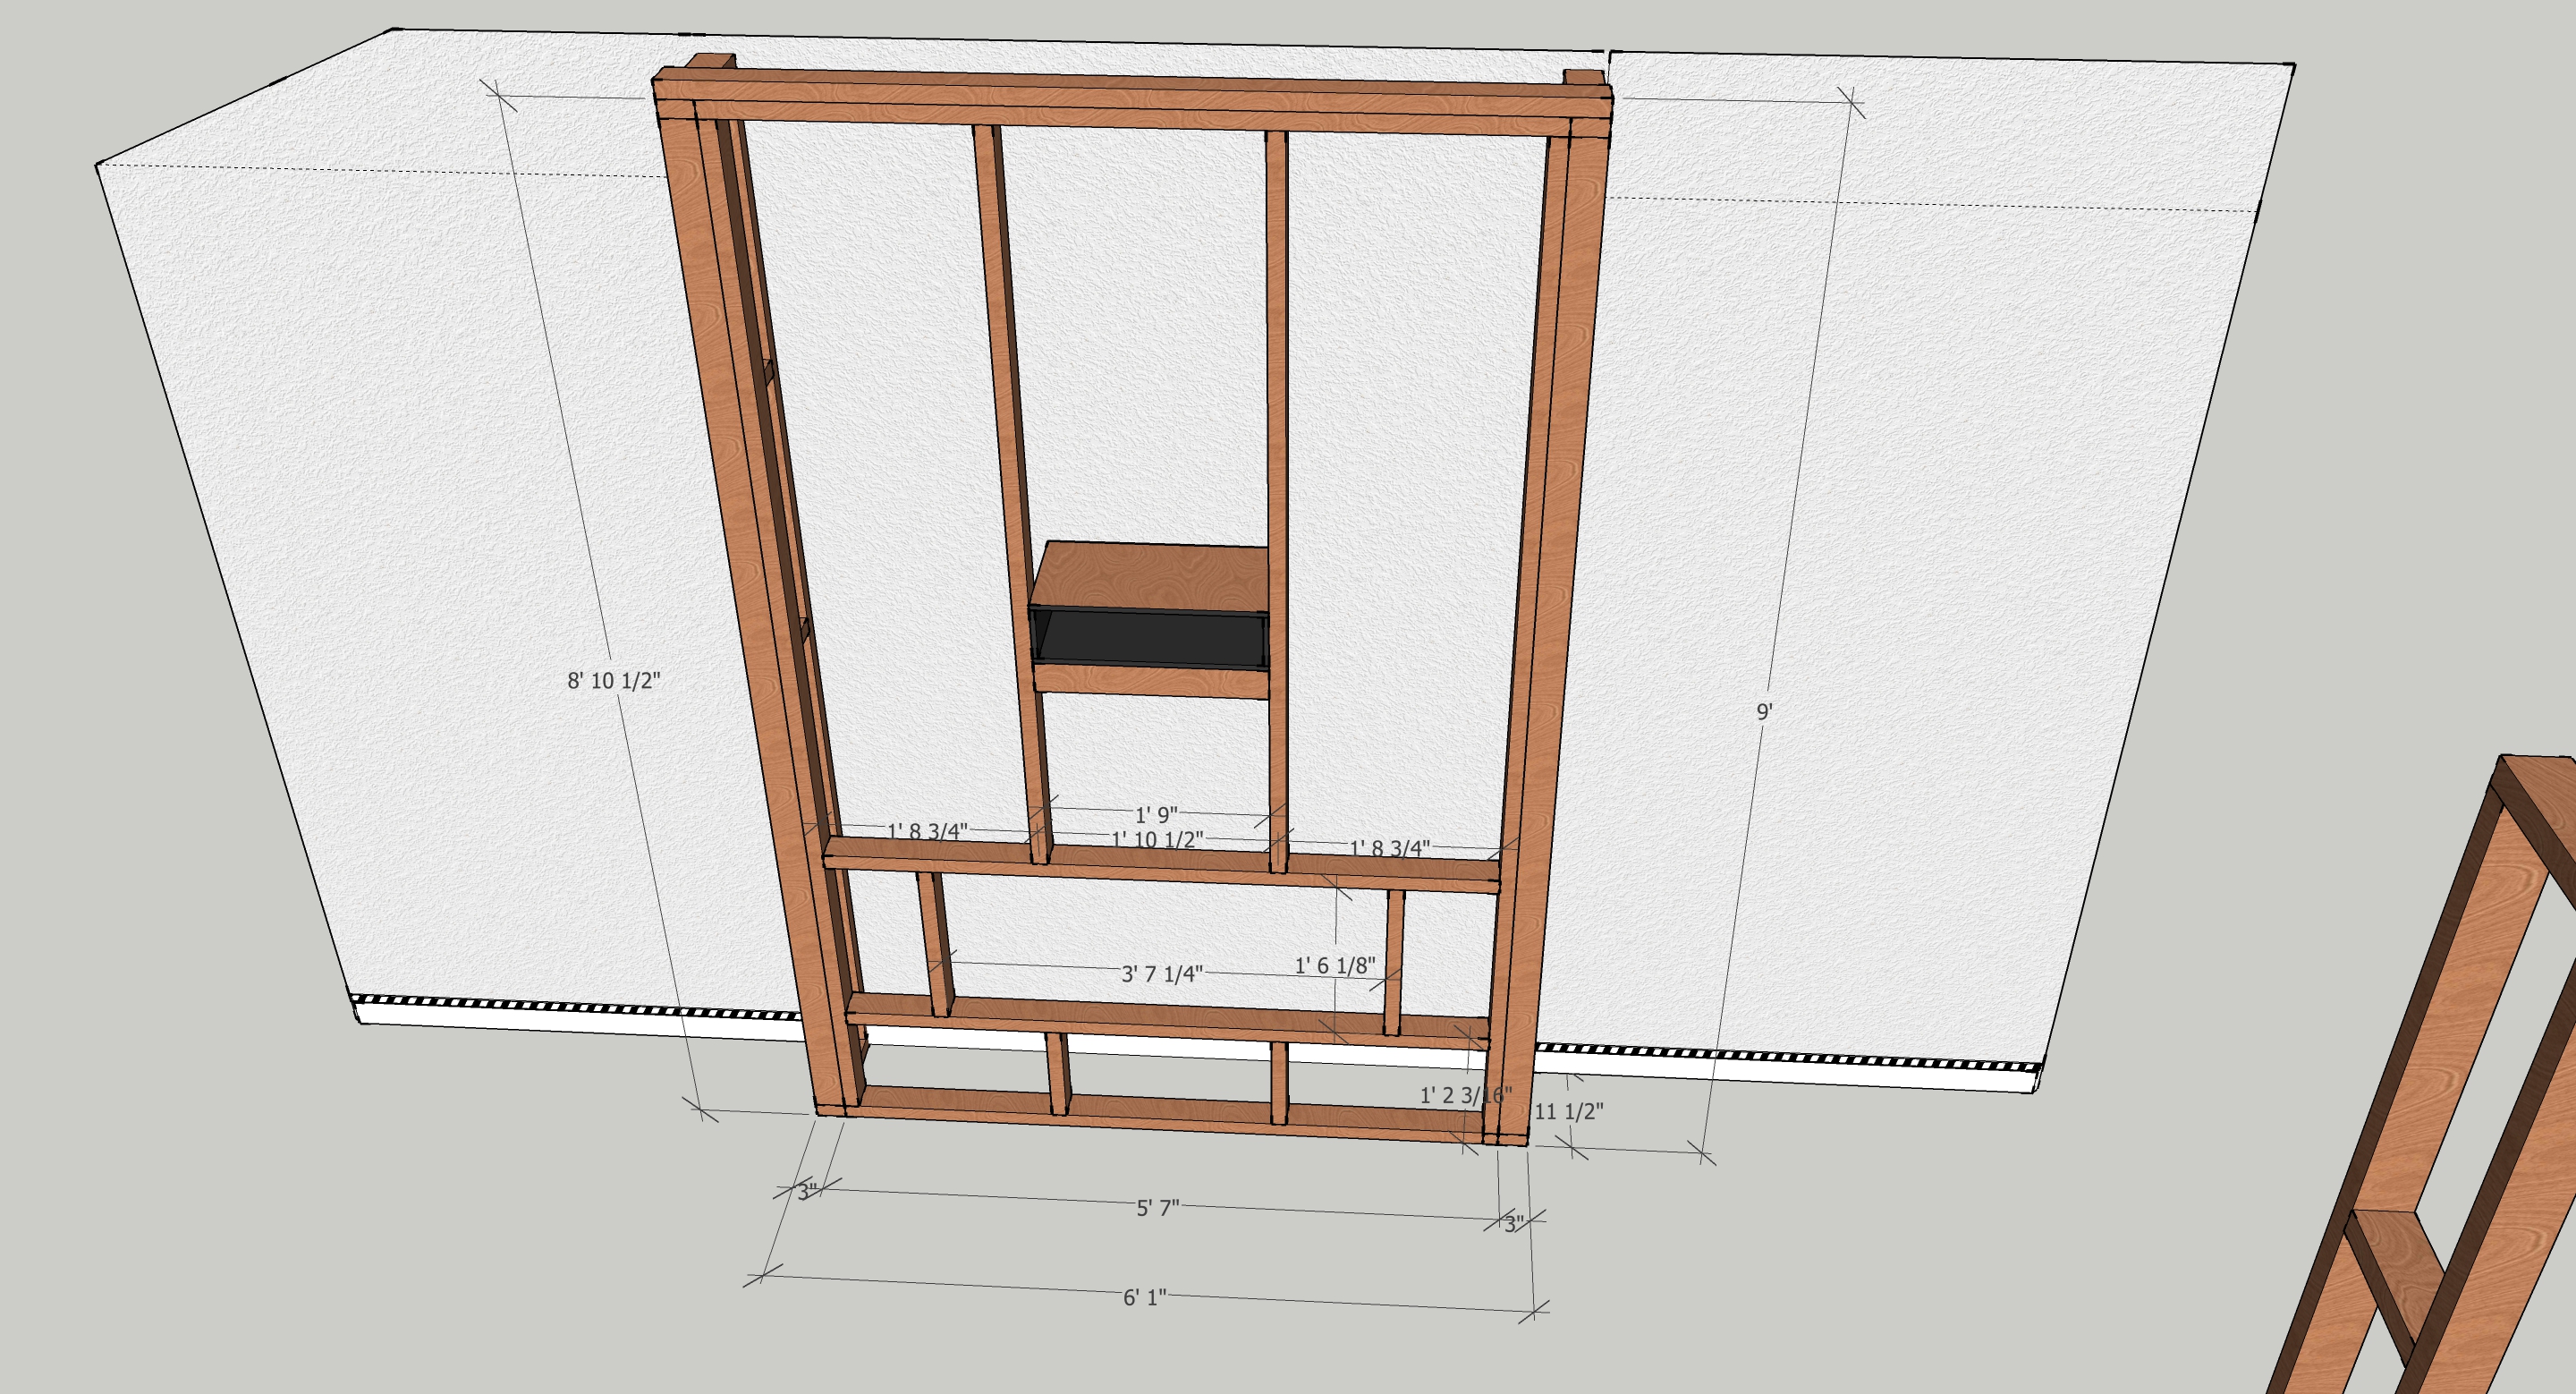
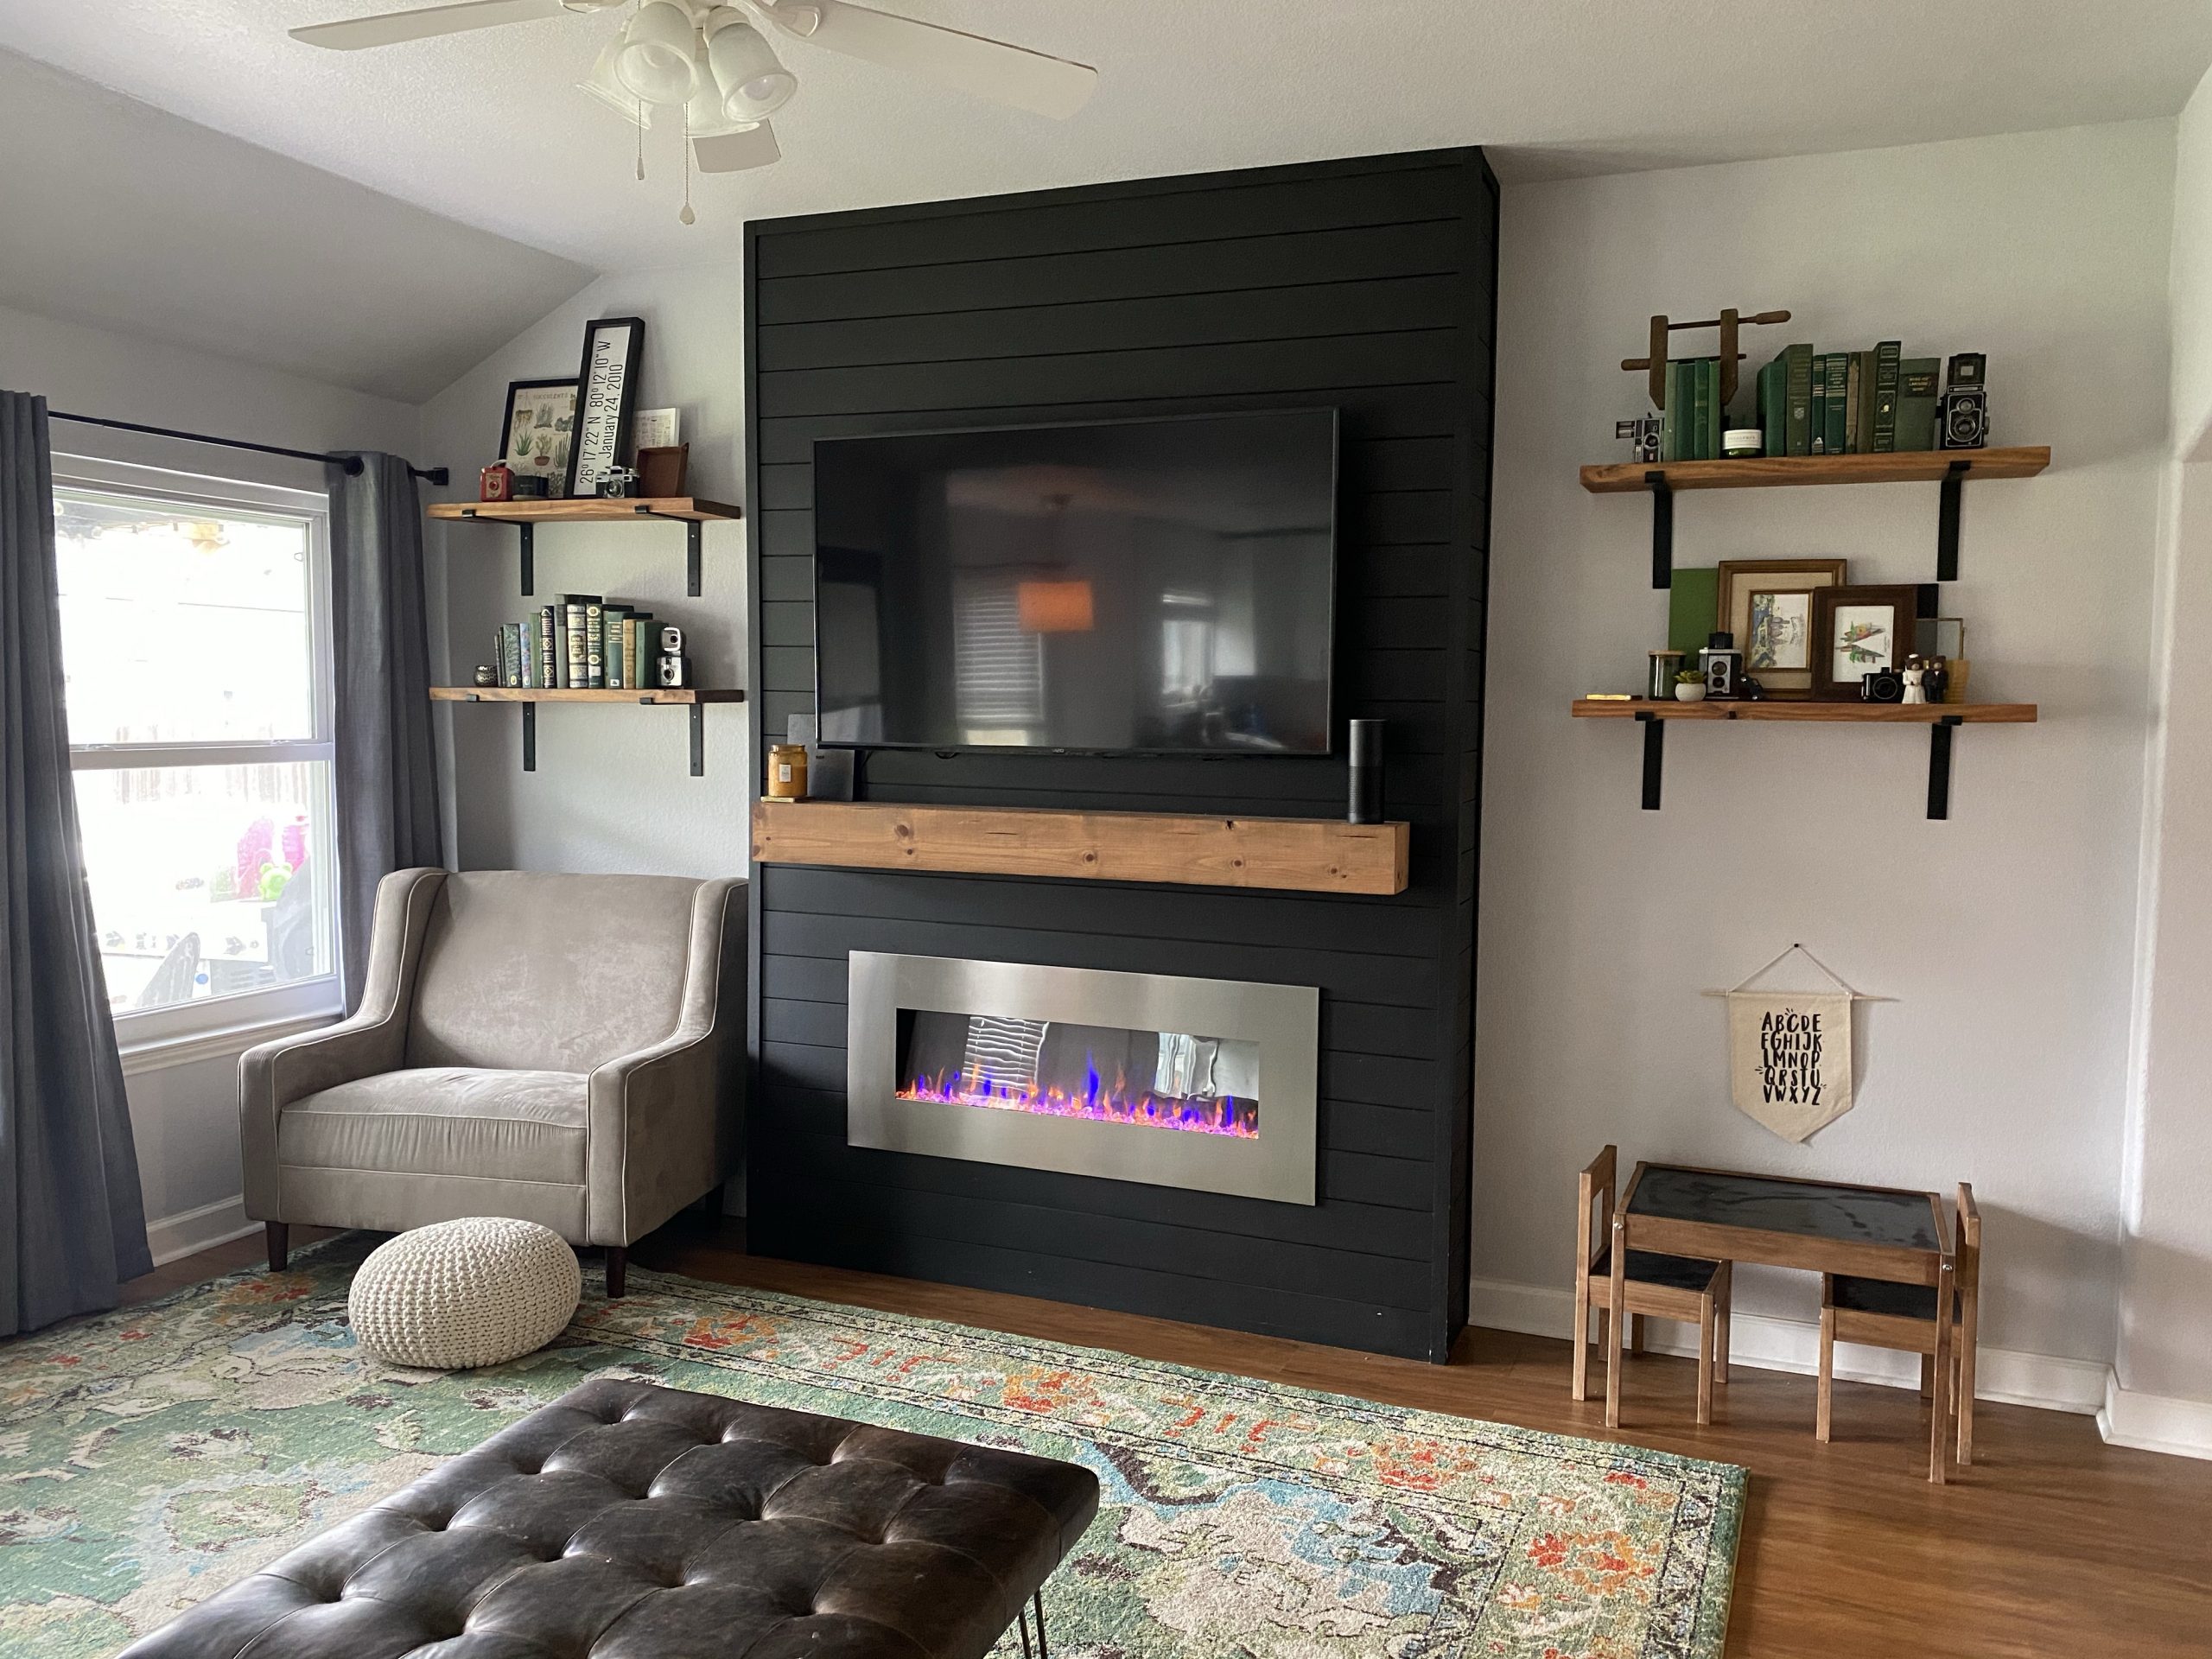
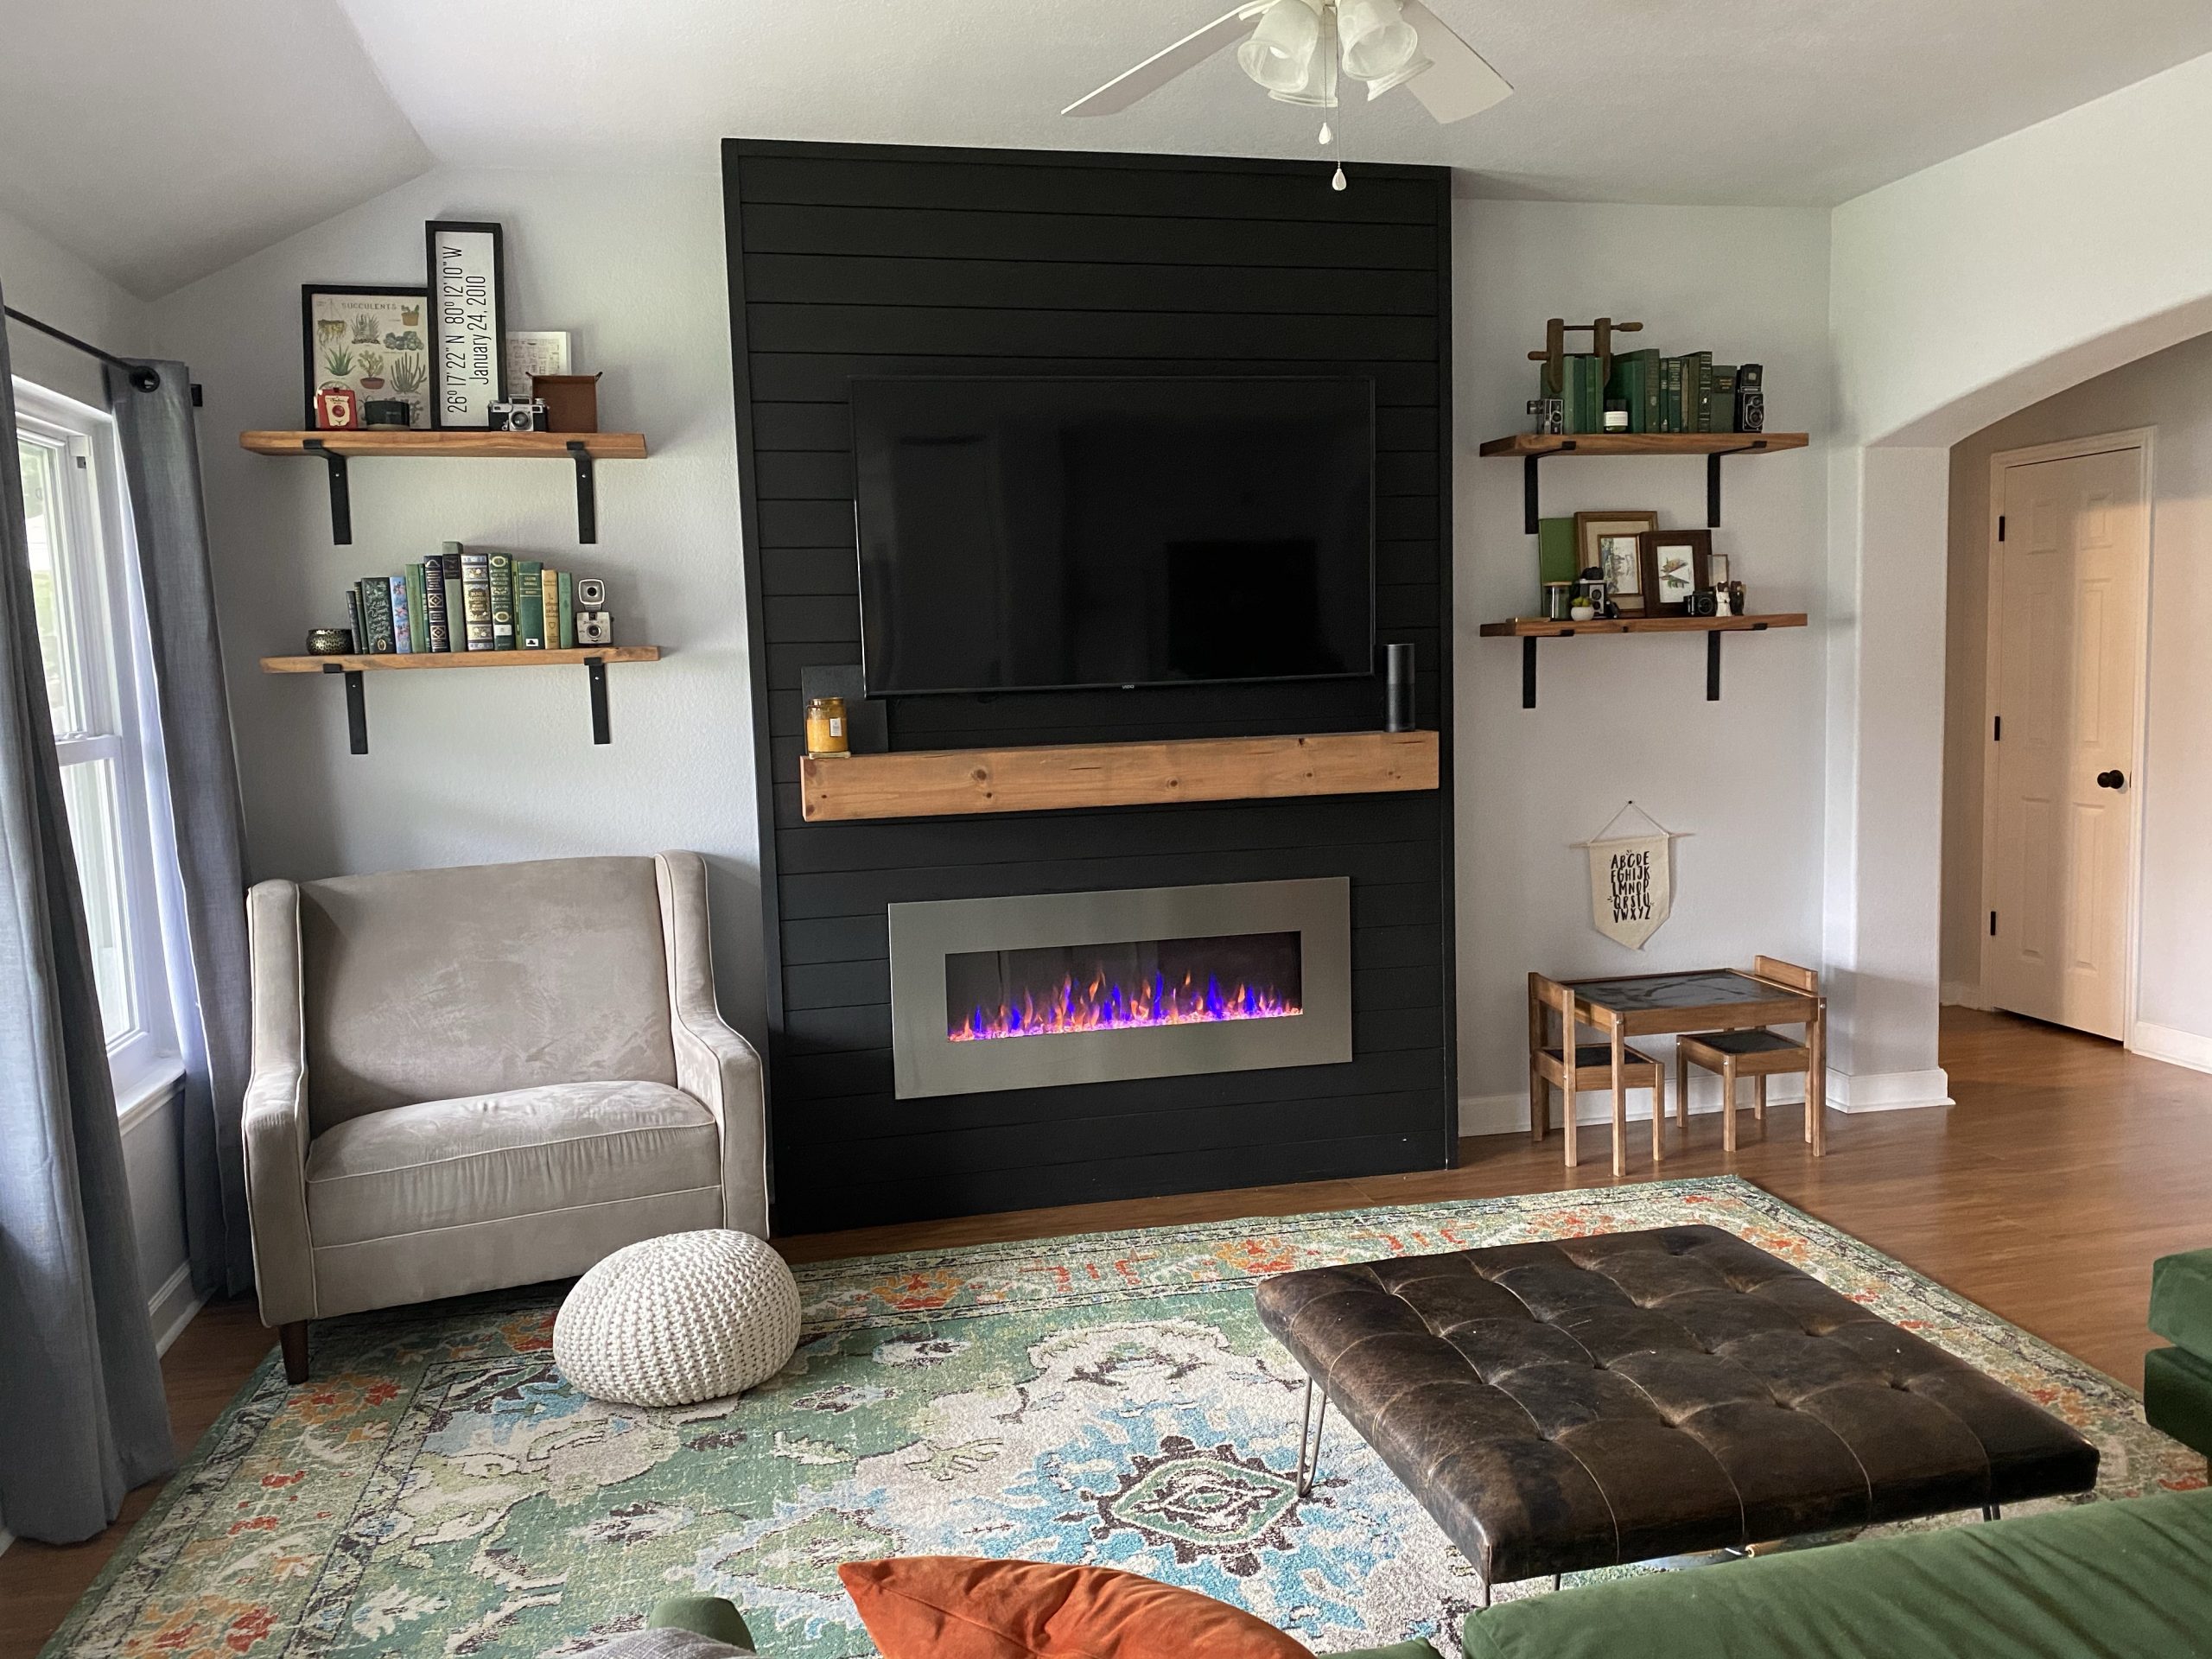
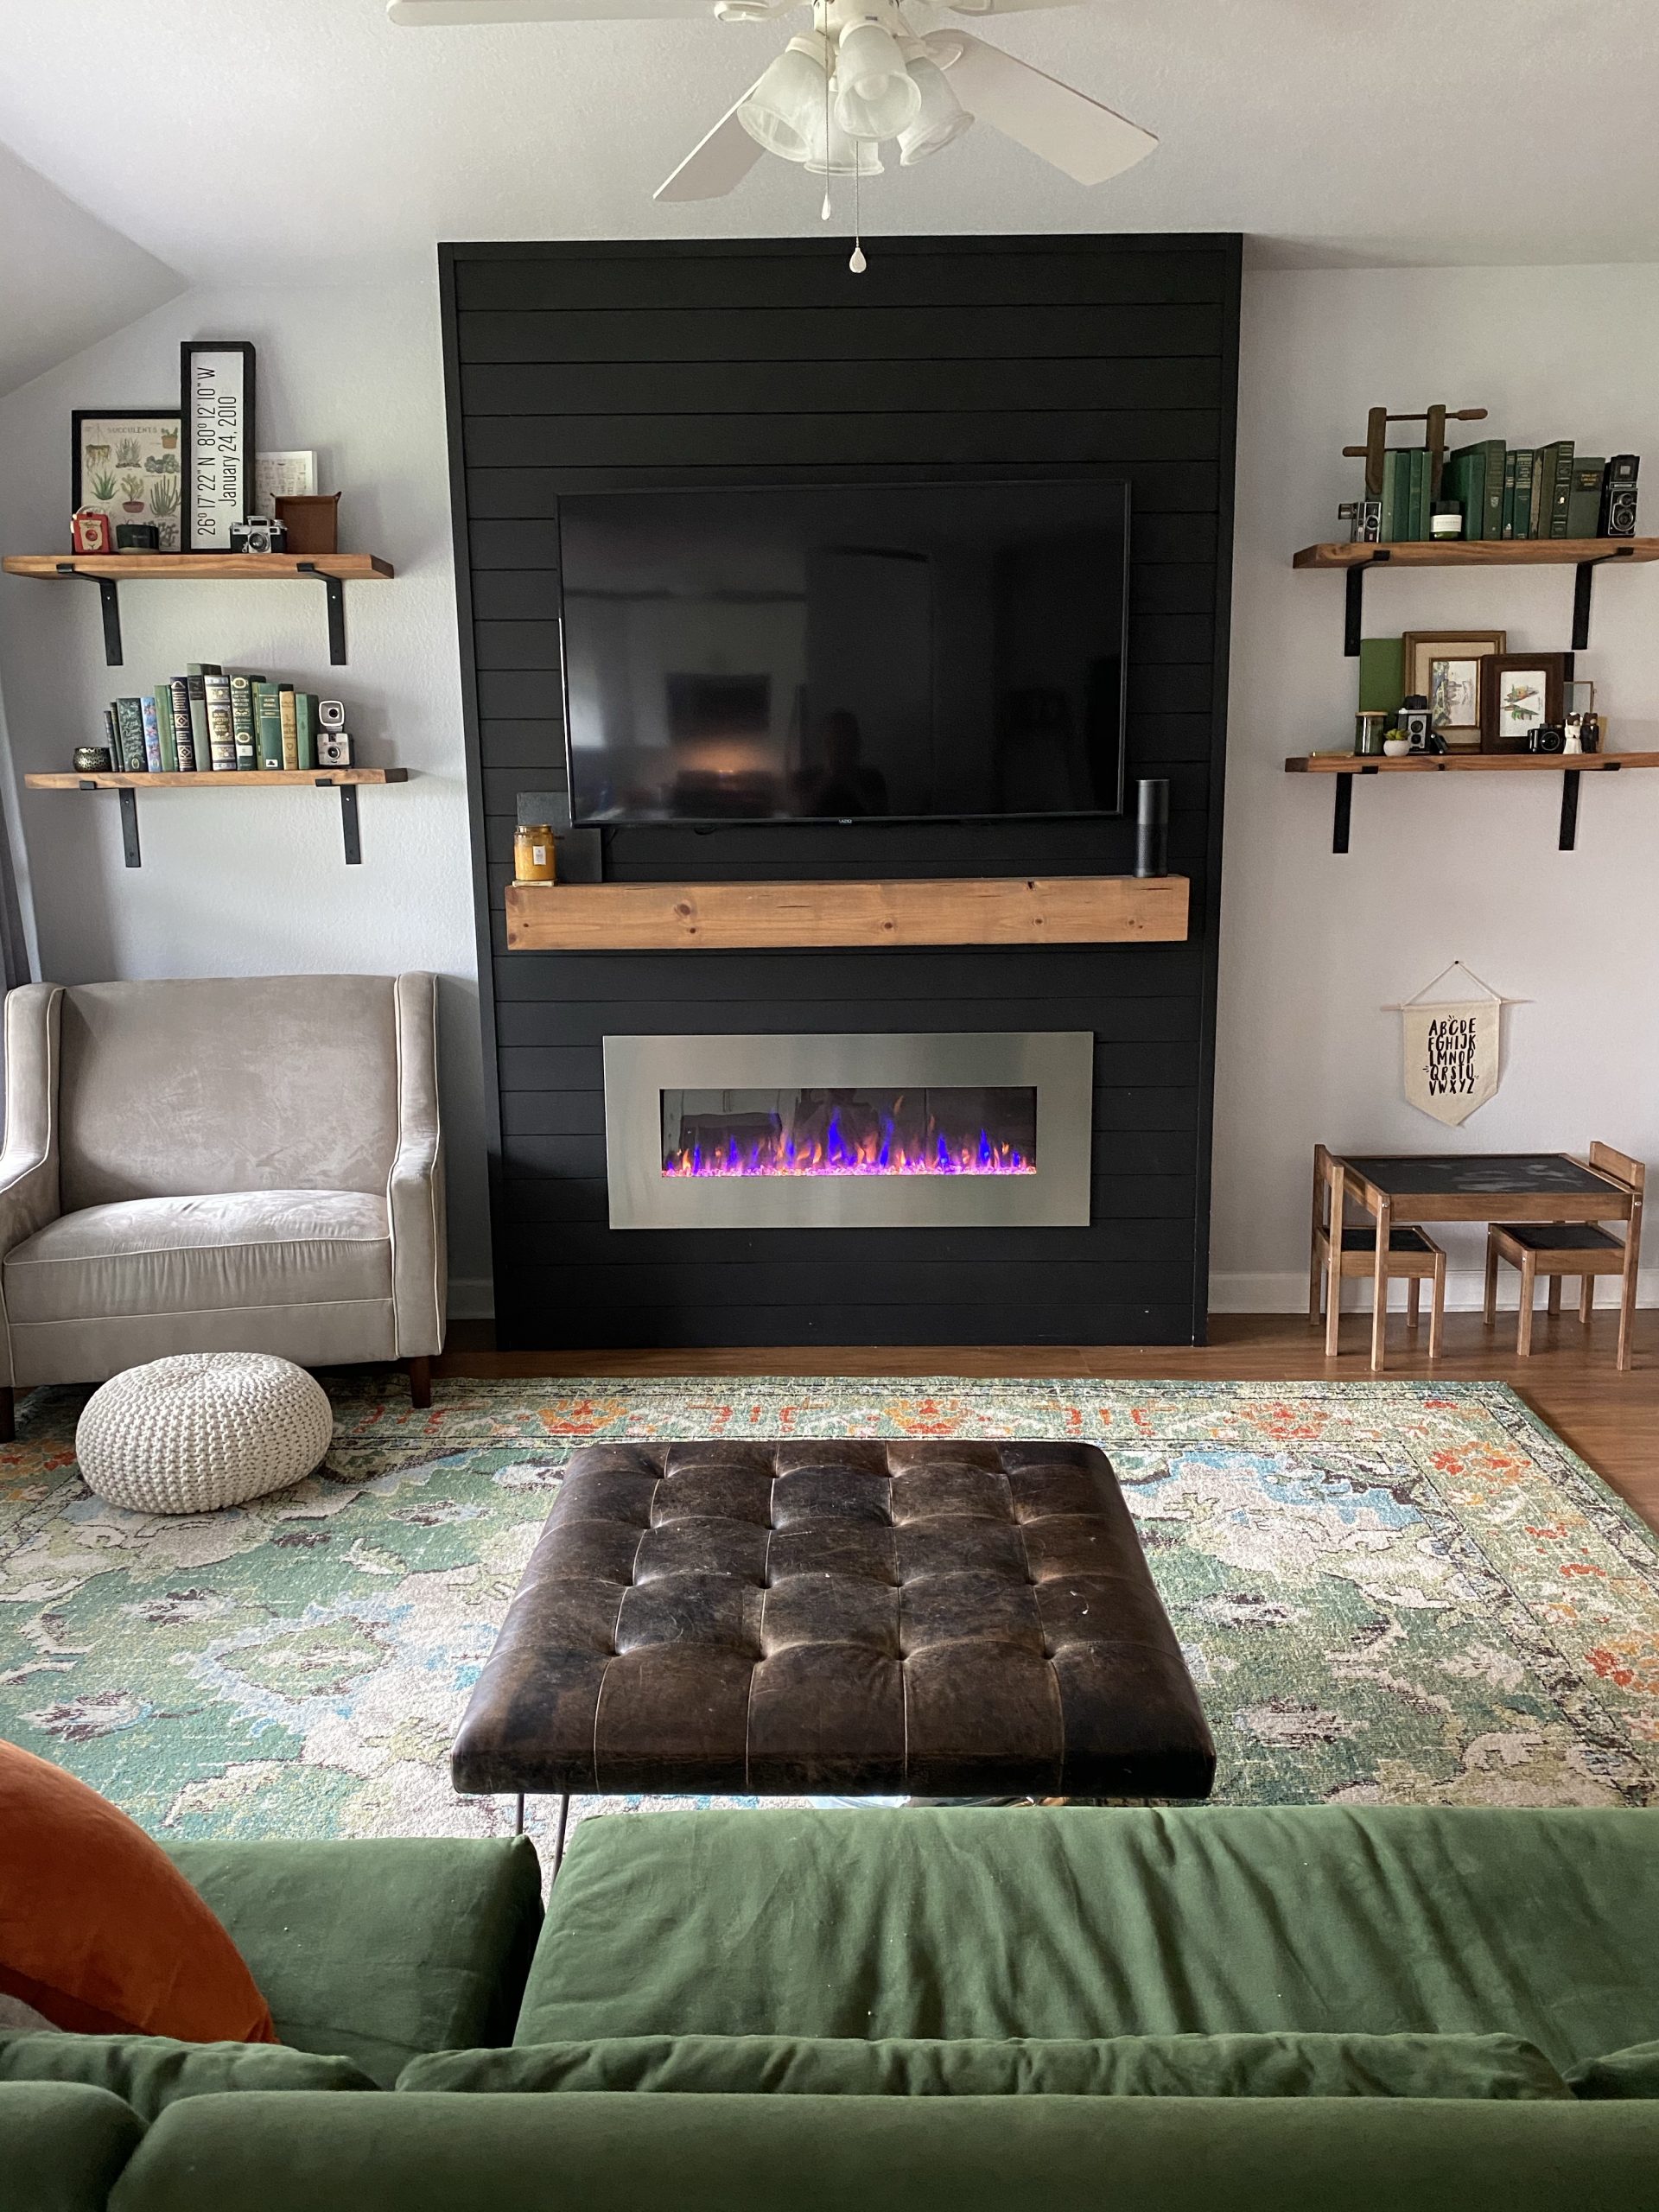
I dreamed up this project a little under a year ago when we moved into our new space. This giant blank wall needed a statement piece and since our renters requested the pipe shelf entertainment center that Josh built stay with the old house, we didn’t have anything. Back then, there was really only one tutorial on how to do something like this, but dang it was a good one. Search for the “Whitney Hansen how to build a fireplace in one weekend” series on YouTube. But it’s a big project and a lot to think through. Over our nearly 7 years of marriage, I’ve learned that the more tutorials I send Josh, the more confident he is to start a project; but there really was only that one good tutorial for a long time. Thankfully for some reason, in the last few months, it seems like EVERYONE has been building out electric fireplaces, and I was able to send him three bloggers posts detailing their builds. Chris Loves Julia, Nesting with Grace, and The Blooming Nest. All three have excellent detailed posts about how to do this, so I’m not really going into a detailed “how to” here on this blog, just sharing our journey. Six months ago Josh took several of my chicken scratch drawings into sketch up, confirmed it was something we could pull off, and then we waited to save up for this project and finish a few others. But… then Jett learned how to (and learned that he LOVED to) turn the volume all the way down and the TV off several dozen times a day; because he realized he could reach the buttons and that sort of sped up our timeline. So, our thanksgiving break was spent with bit of time at Home Depot and a lot of time in the garage, but alas, it’s done. I love it even more than I thought I would.
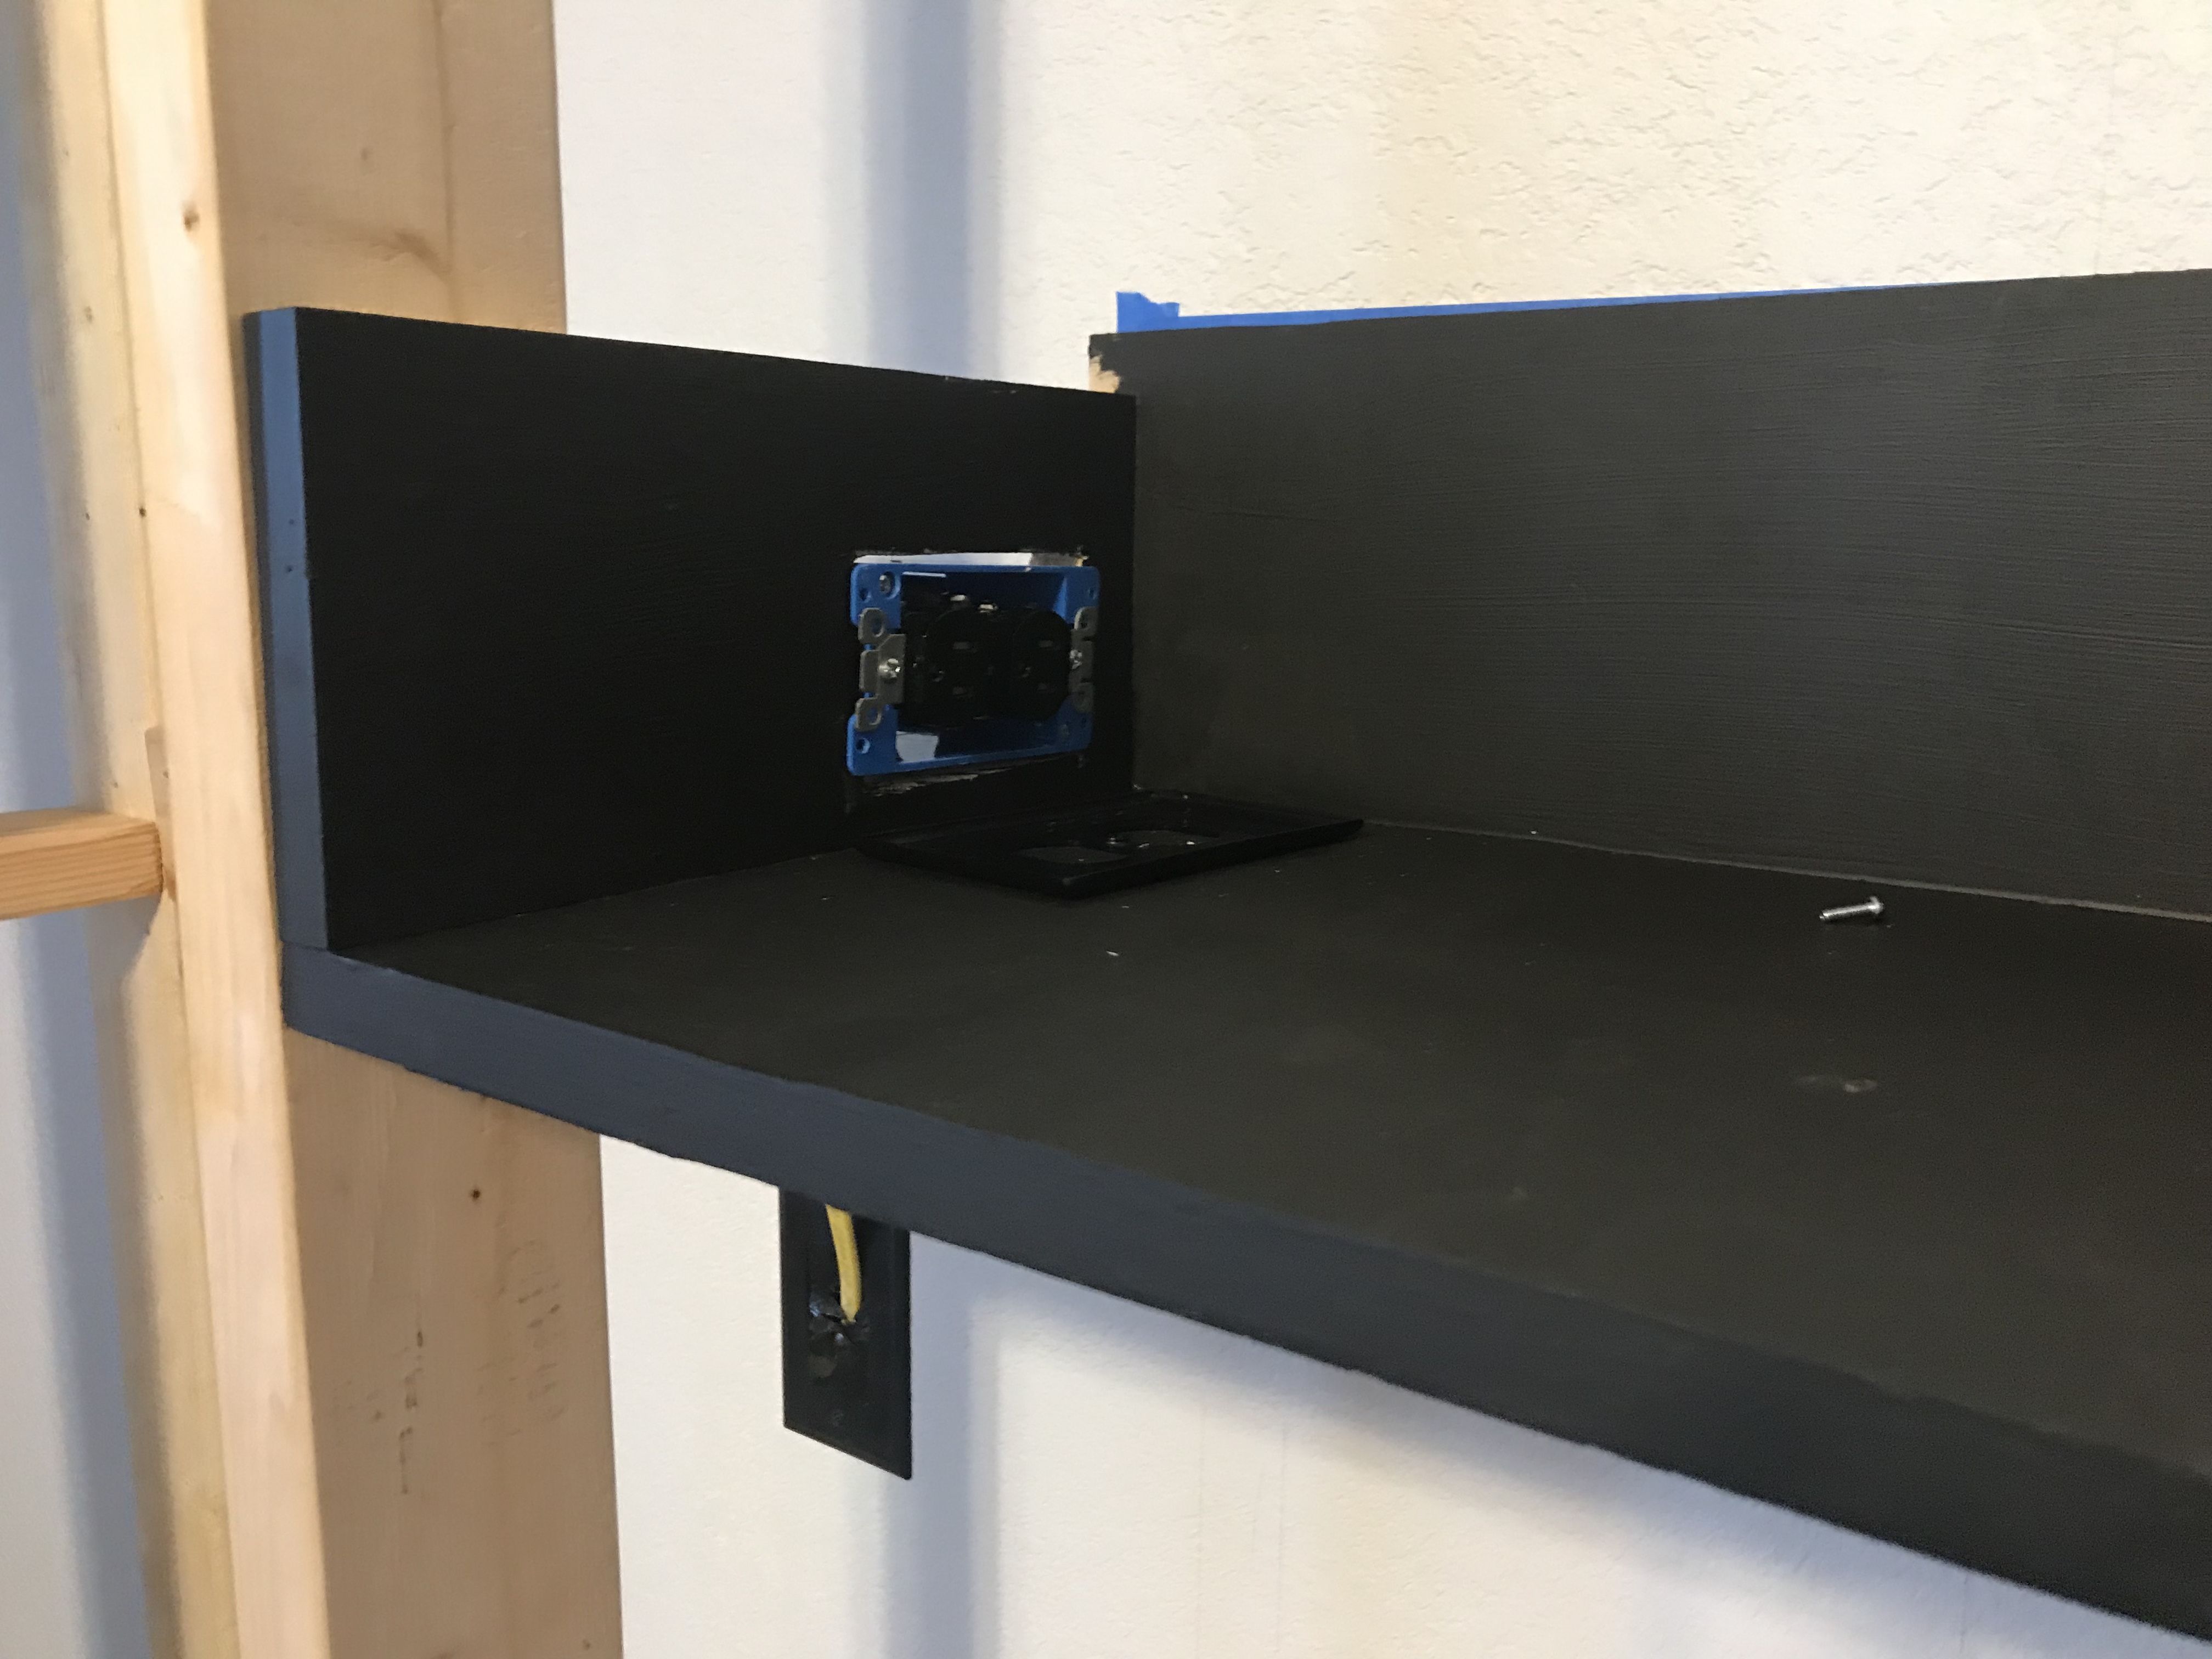
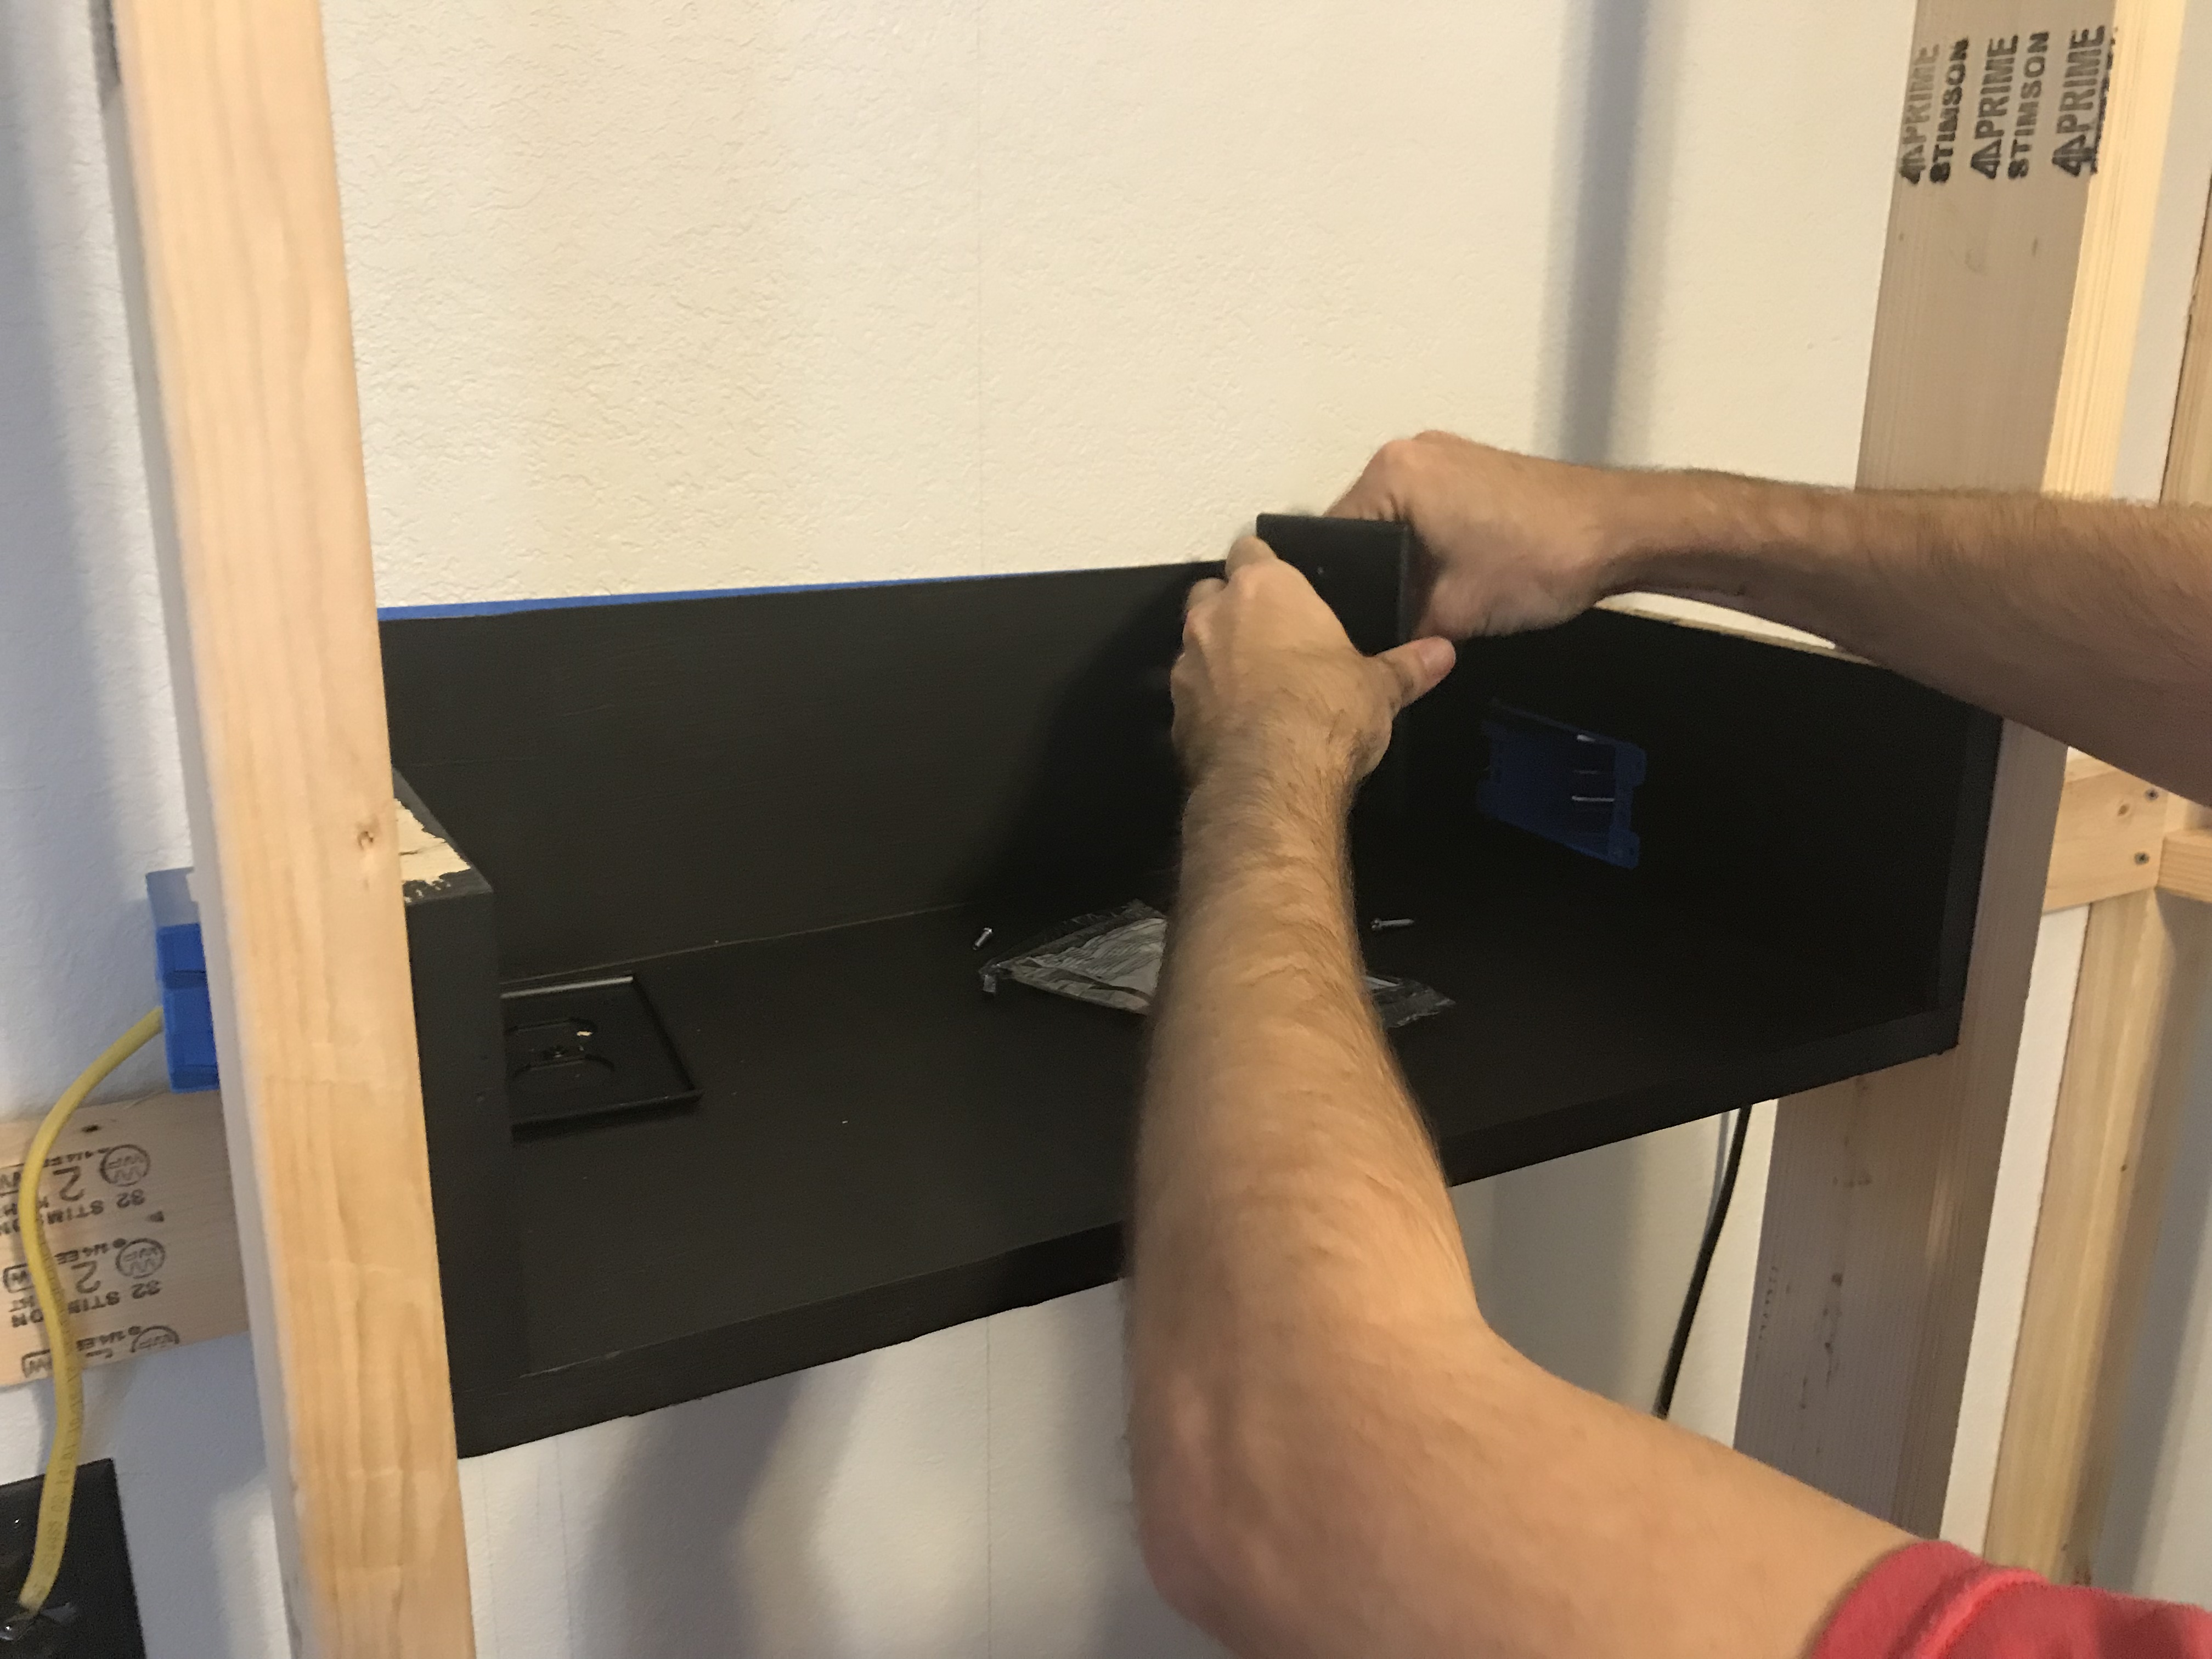
In order to allow for a cable box (something we don’t plan on having, but doesn’t hurt to prepare for) or an XBOX1X (which the handy builder is getting for Christmas) we added an open box behind the tv that has power and cable run to it. It wouldn’t work well for something that you need access to frequently like a dvd player, but works great for what we have planned. Also, the baseboards were put back, I’m just impatient when it comes to taking pictures.
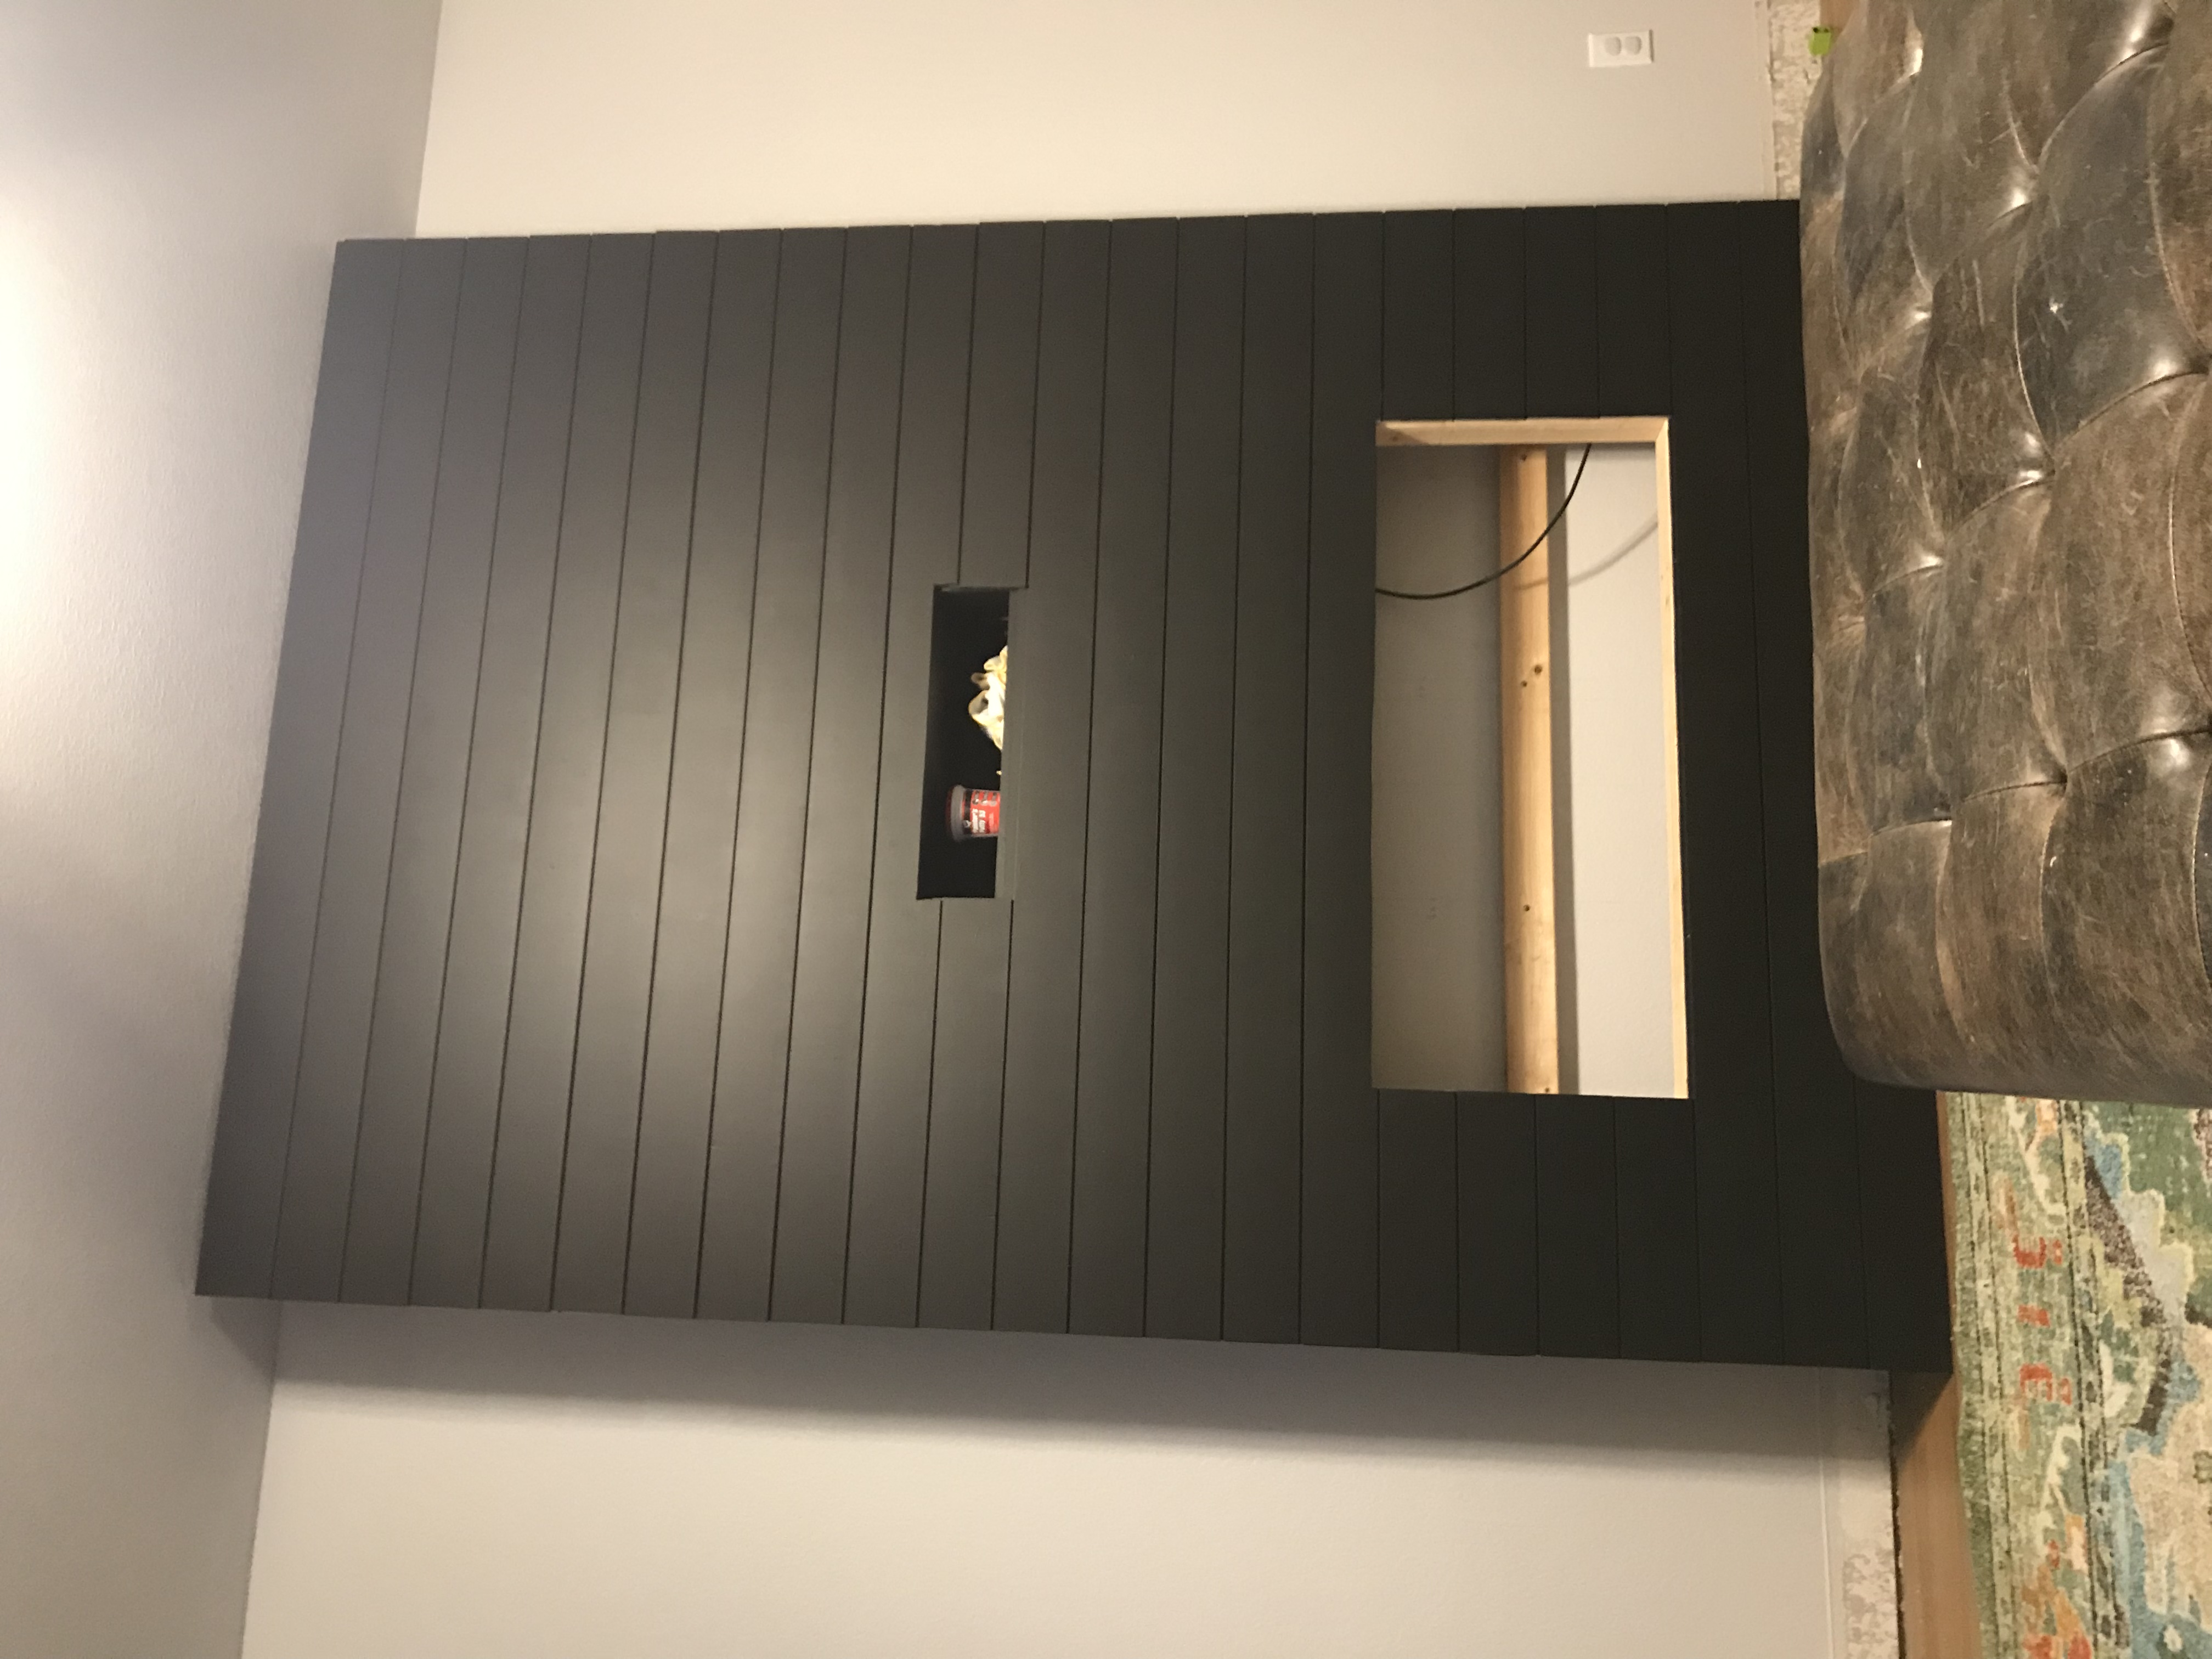
This is the fireplace that we ordered on Amazon, it’s really the expensive part of the whole project. The lumber, shiplap, lattice trim, and wood for the mantle is all from home depot. The whole project including the $600 fireplace came out to just around $1,000. It helped that we had all the tools we needed: Finish nail gun and air compressor, miter saw, table saw, etc.
xoxo,
Adora
Edit: Added pictures of the inset Box for commenter, Michael. Electrical is pigtailed off of an outlet below, hidden behind the fireplace structure the cable line is continued from below as well.
P.S. If you do end up building something like this, I would love to see it! Please tag me on Instagram: @adoramae
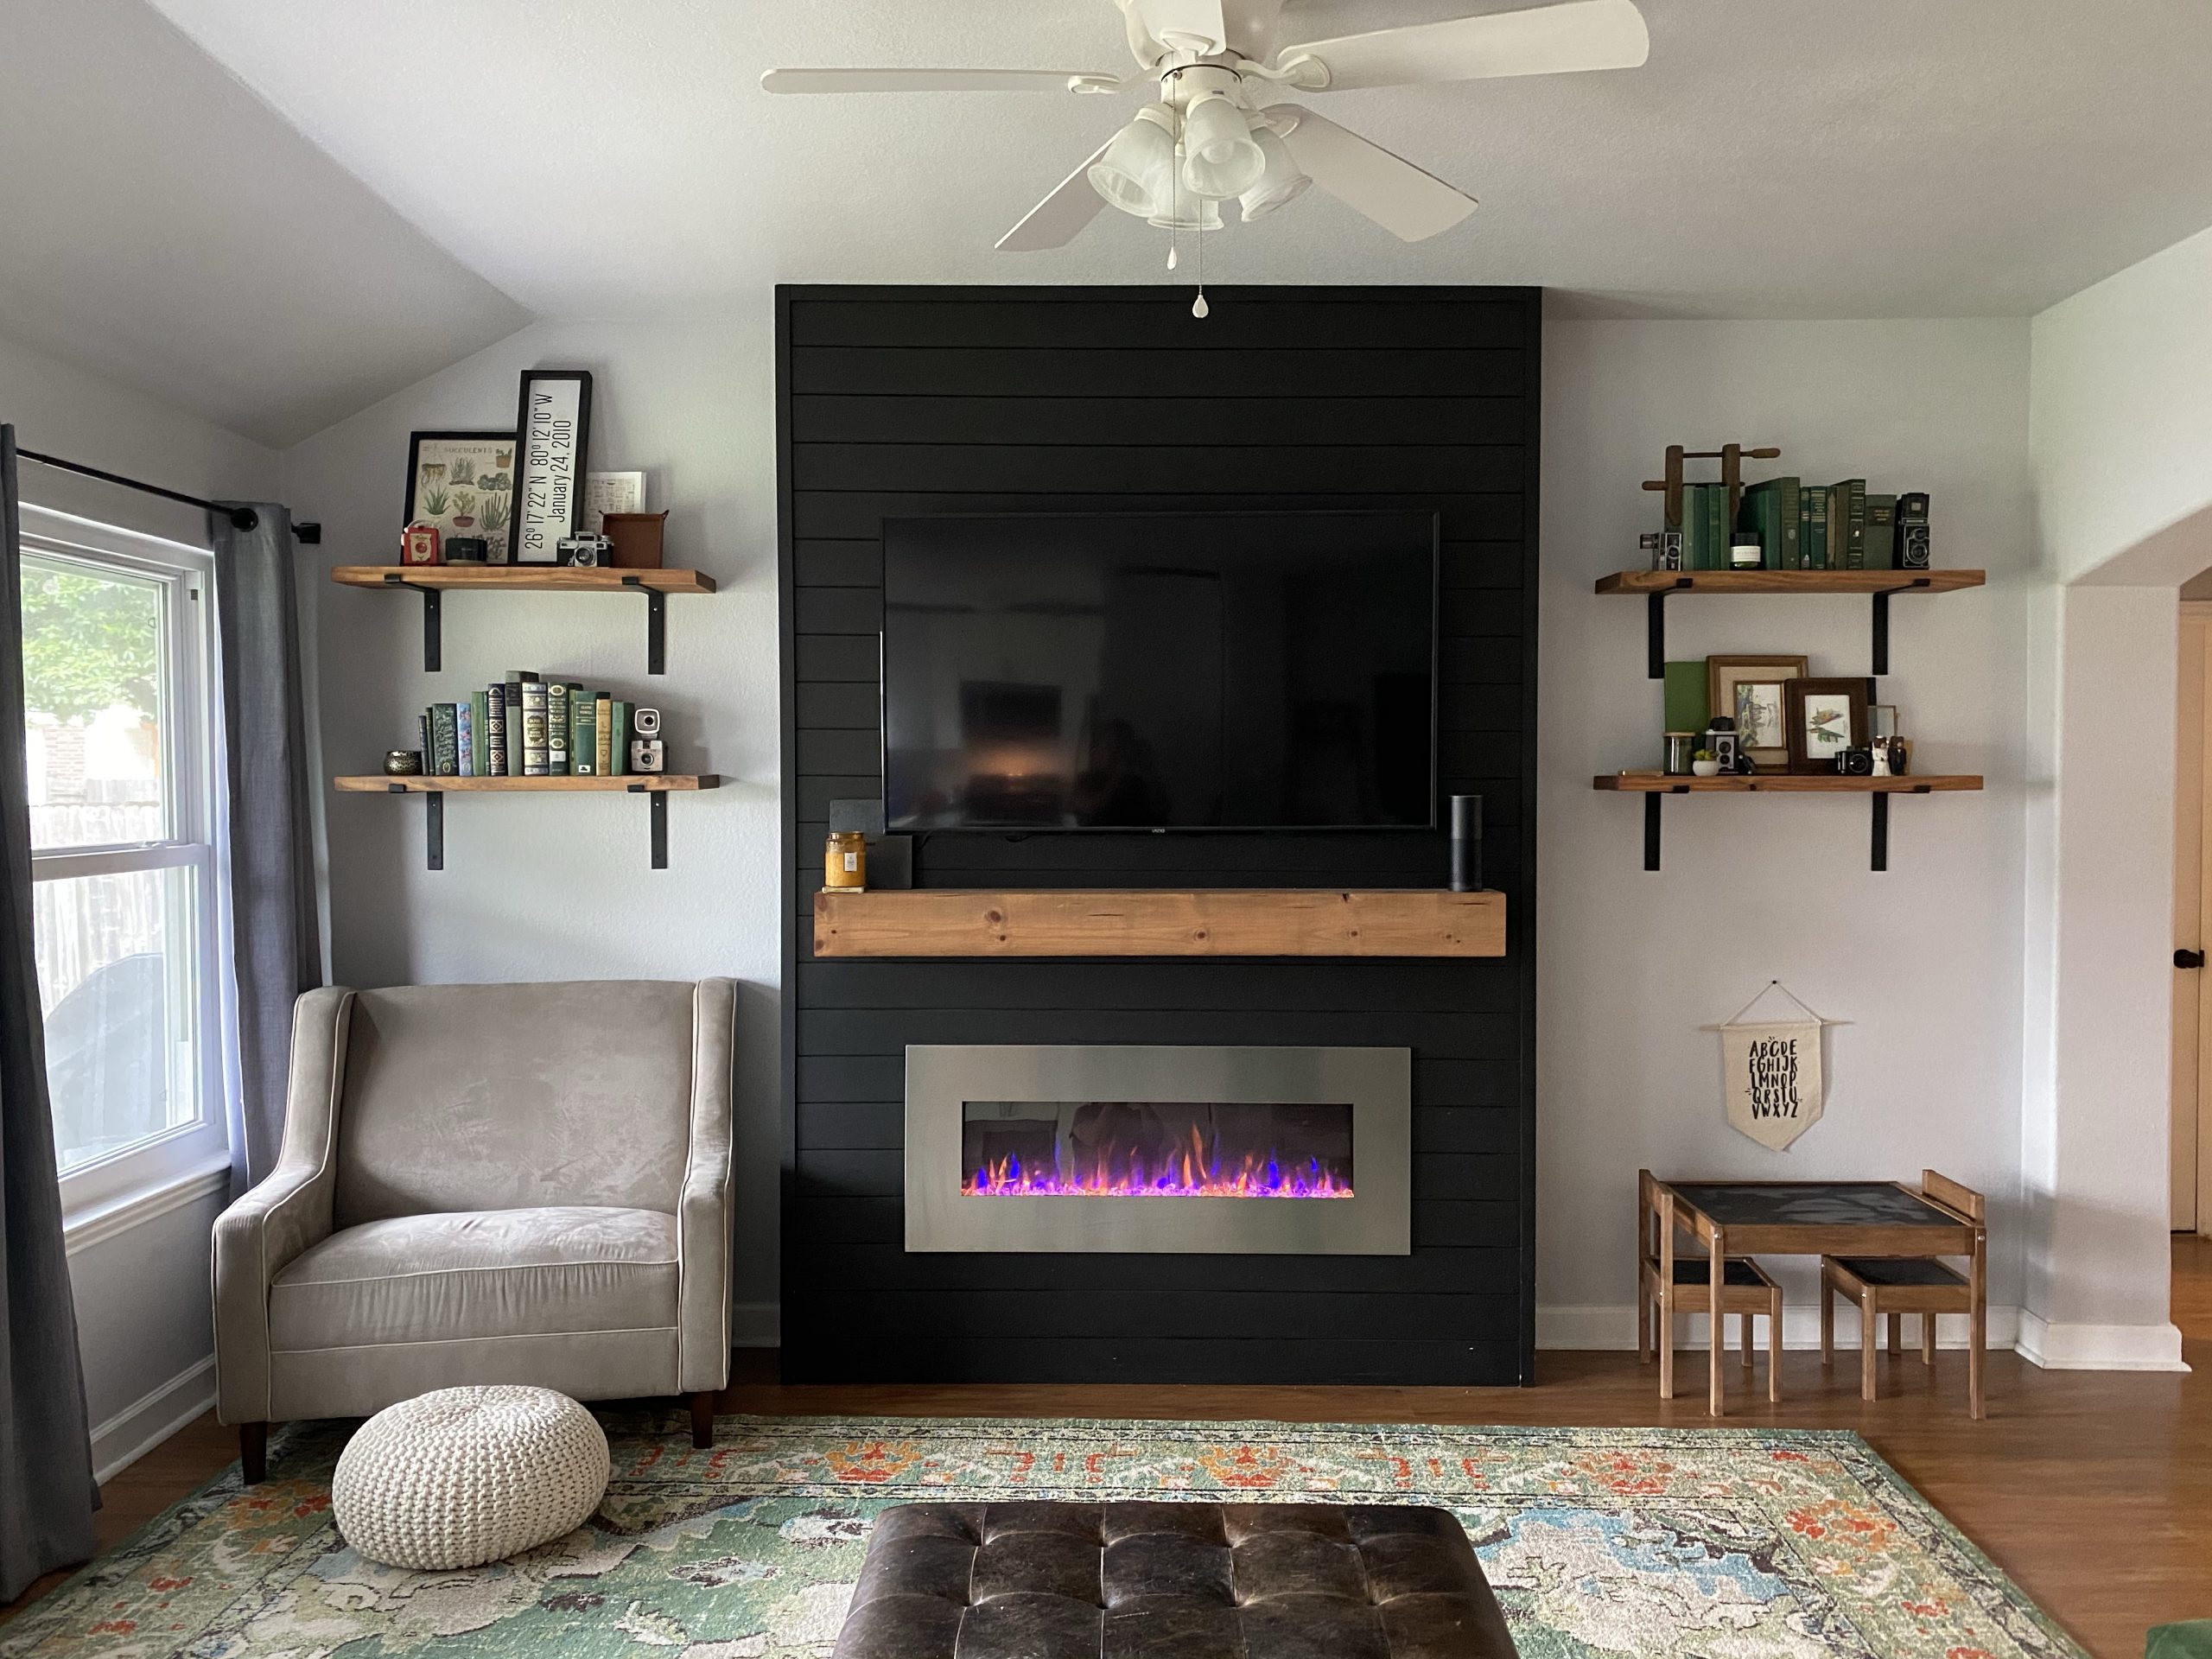
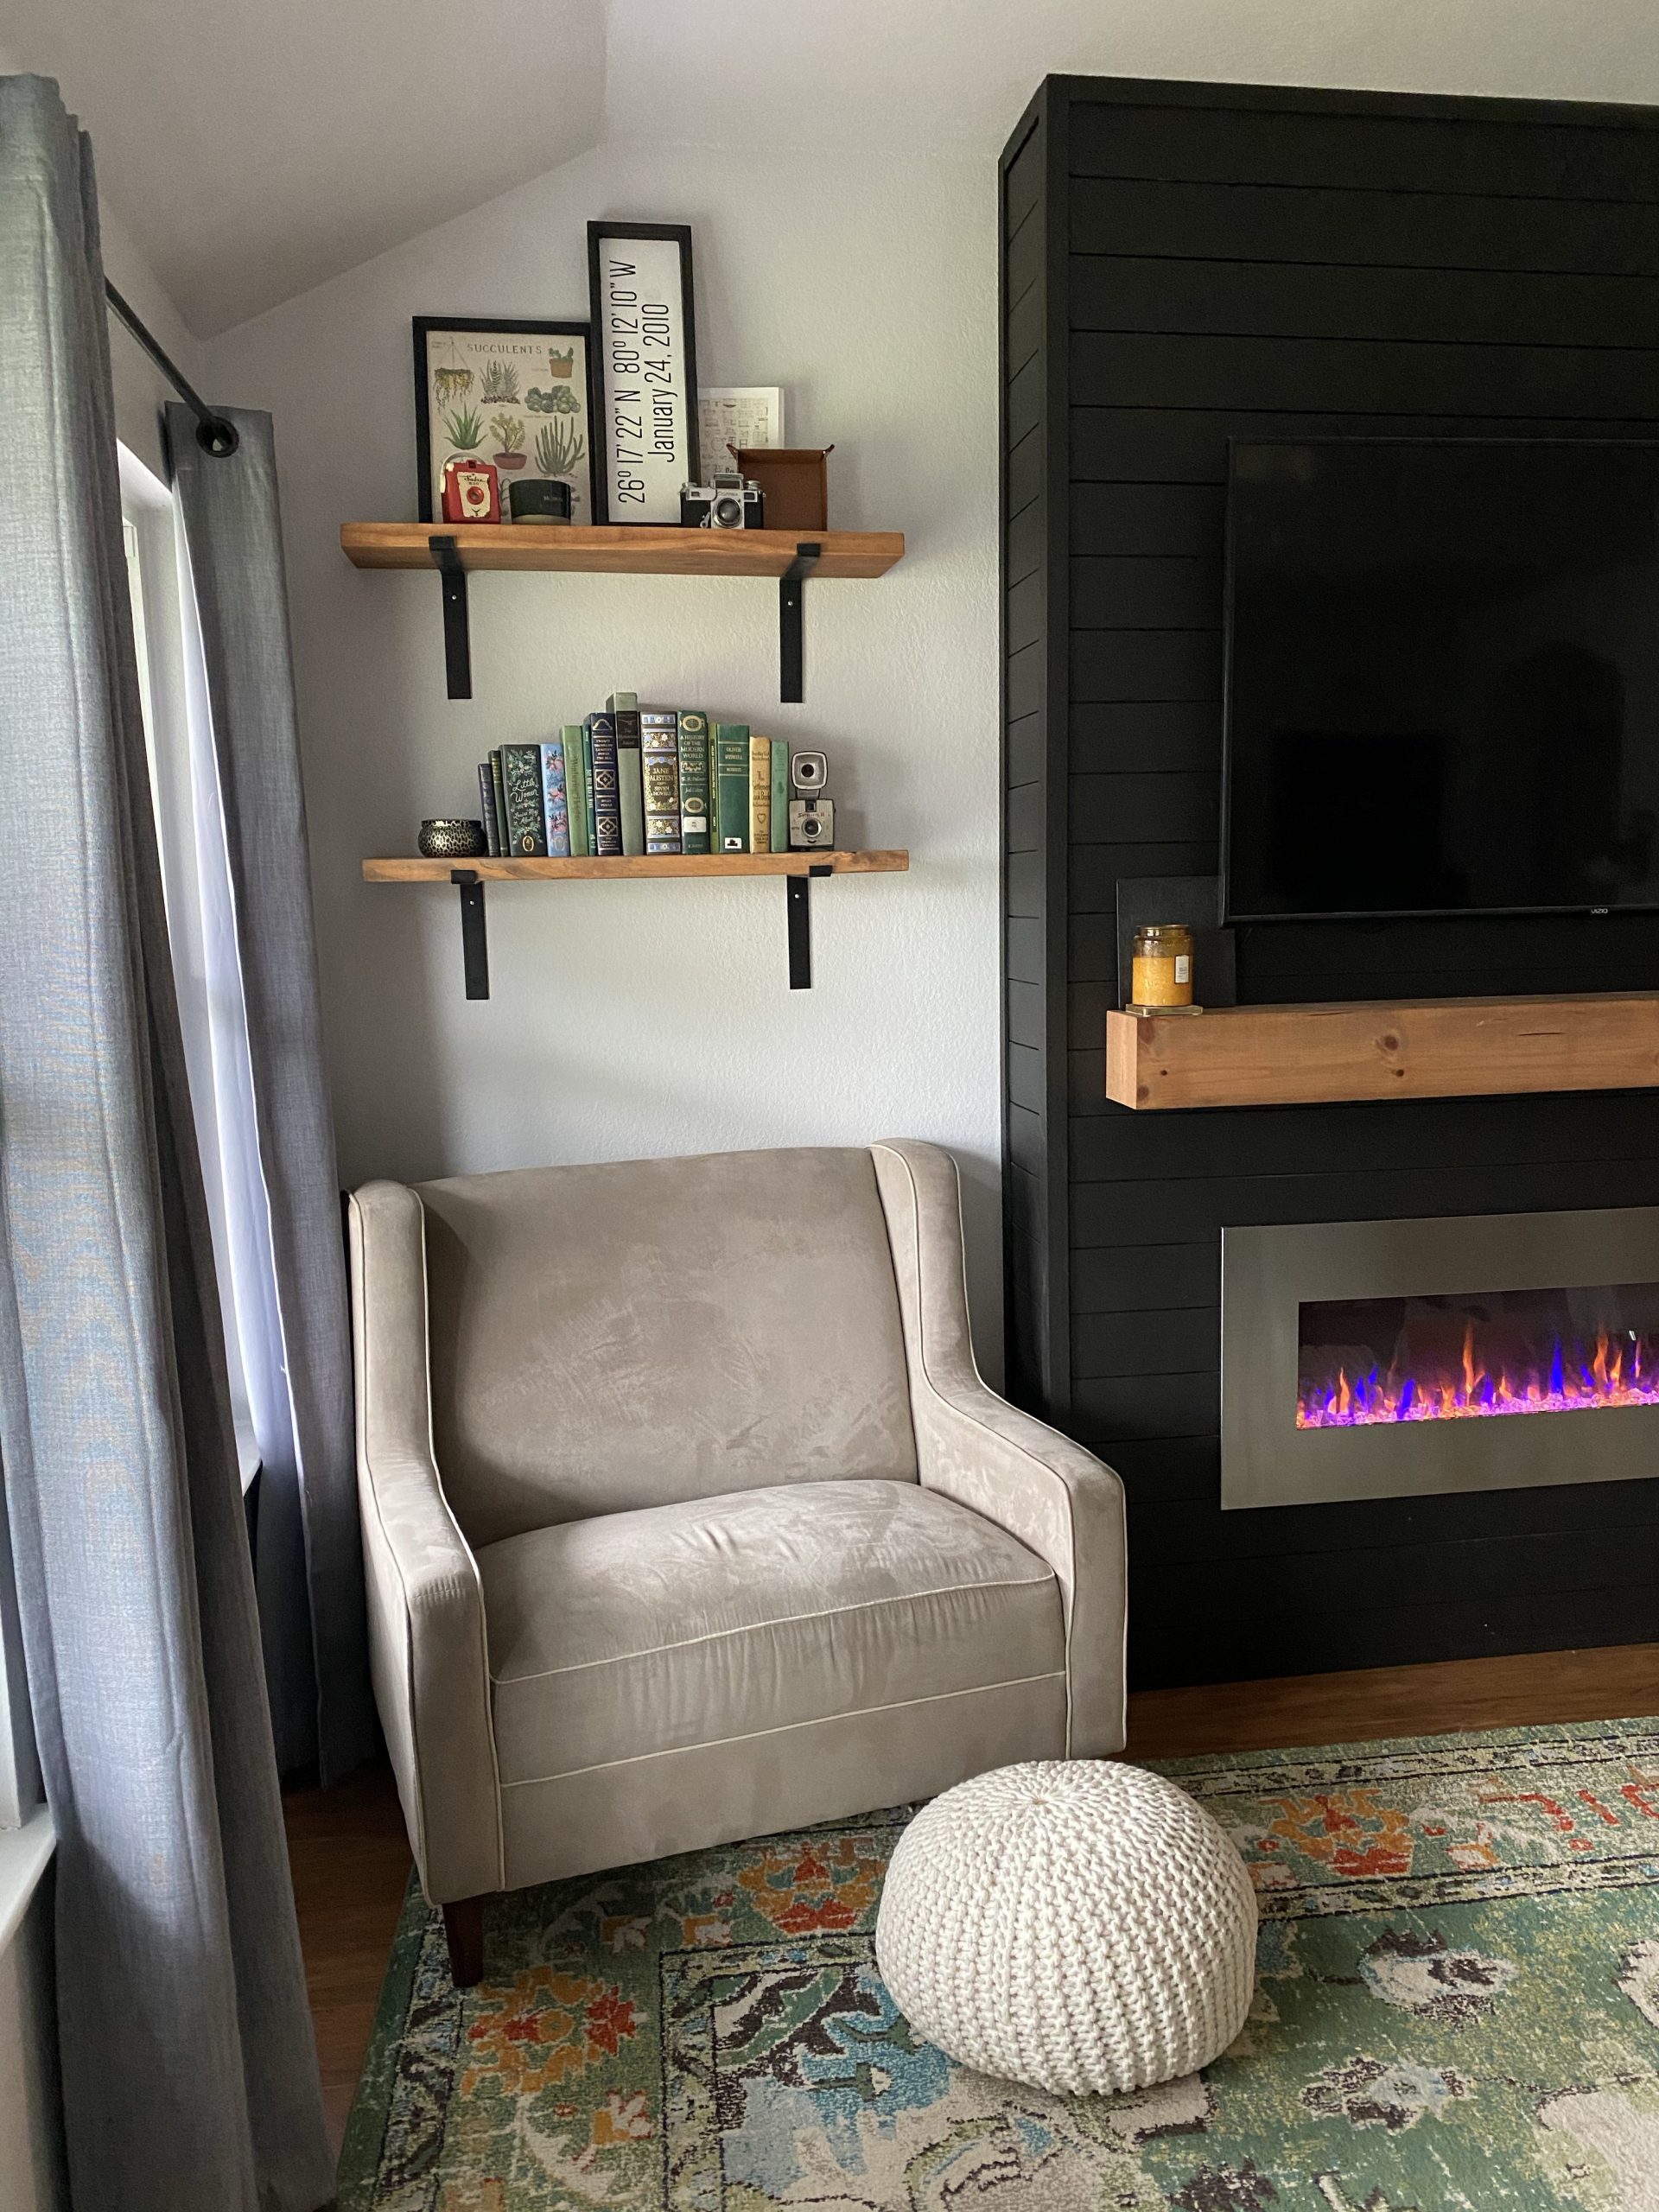
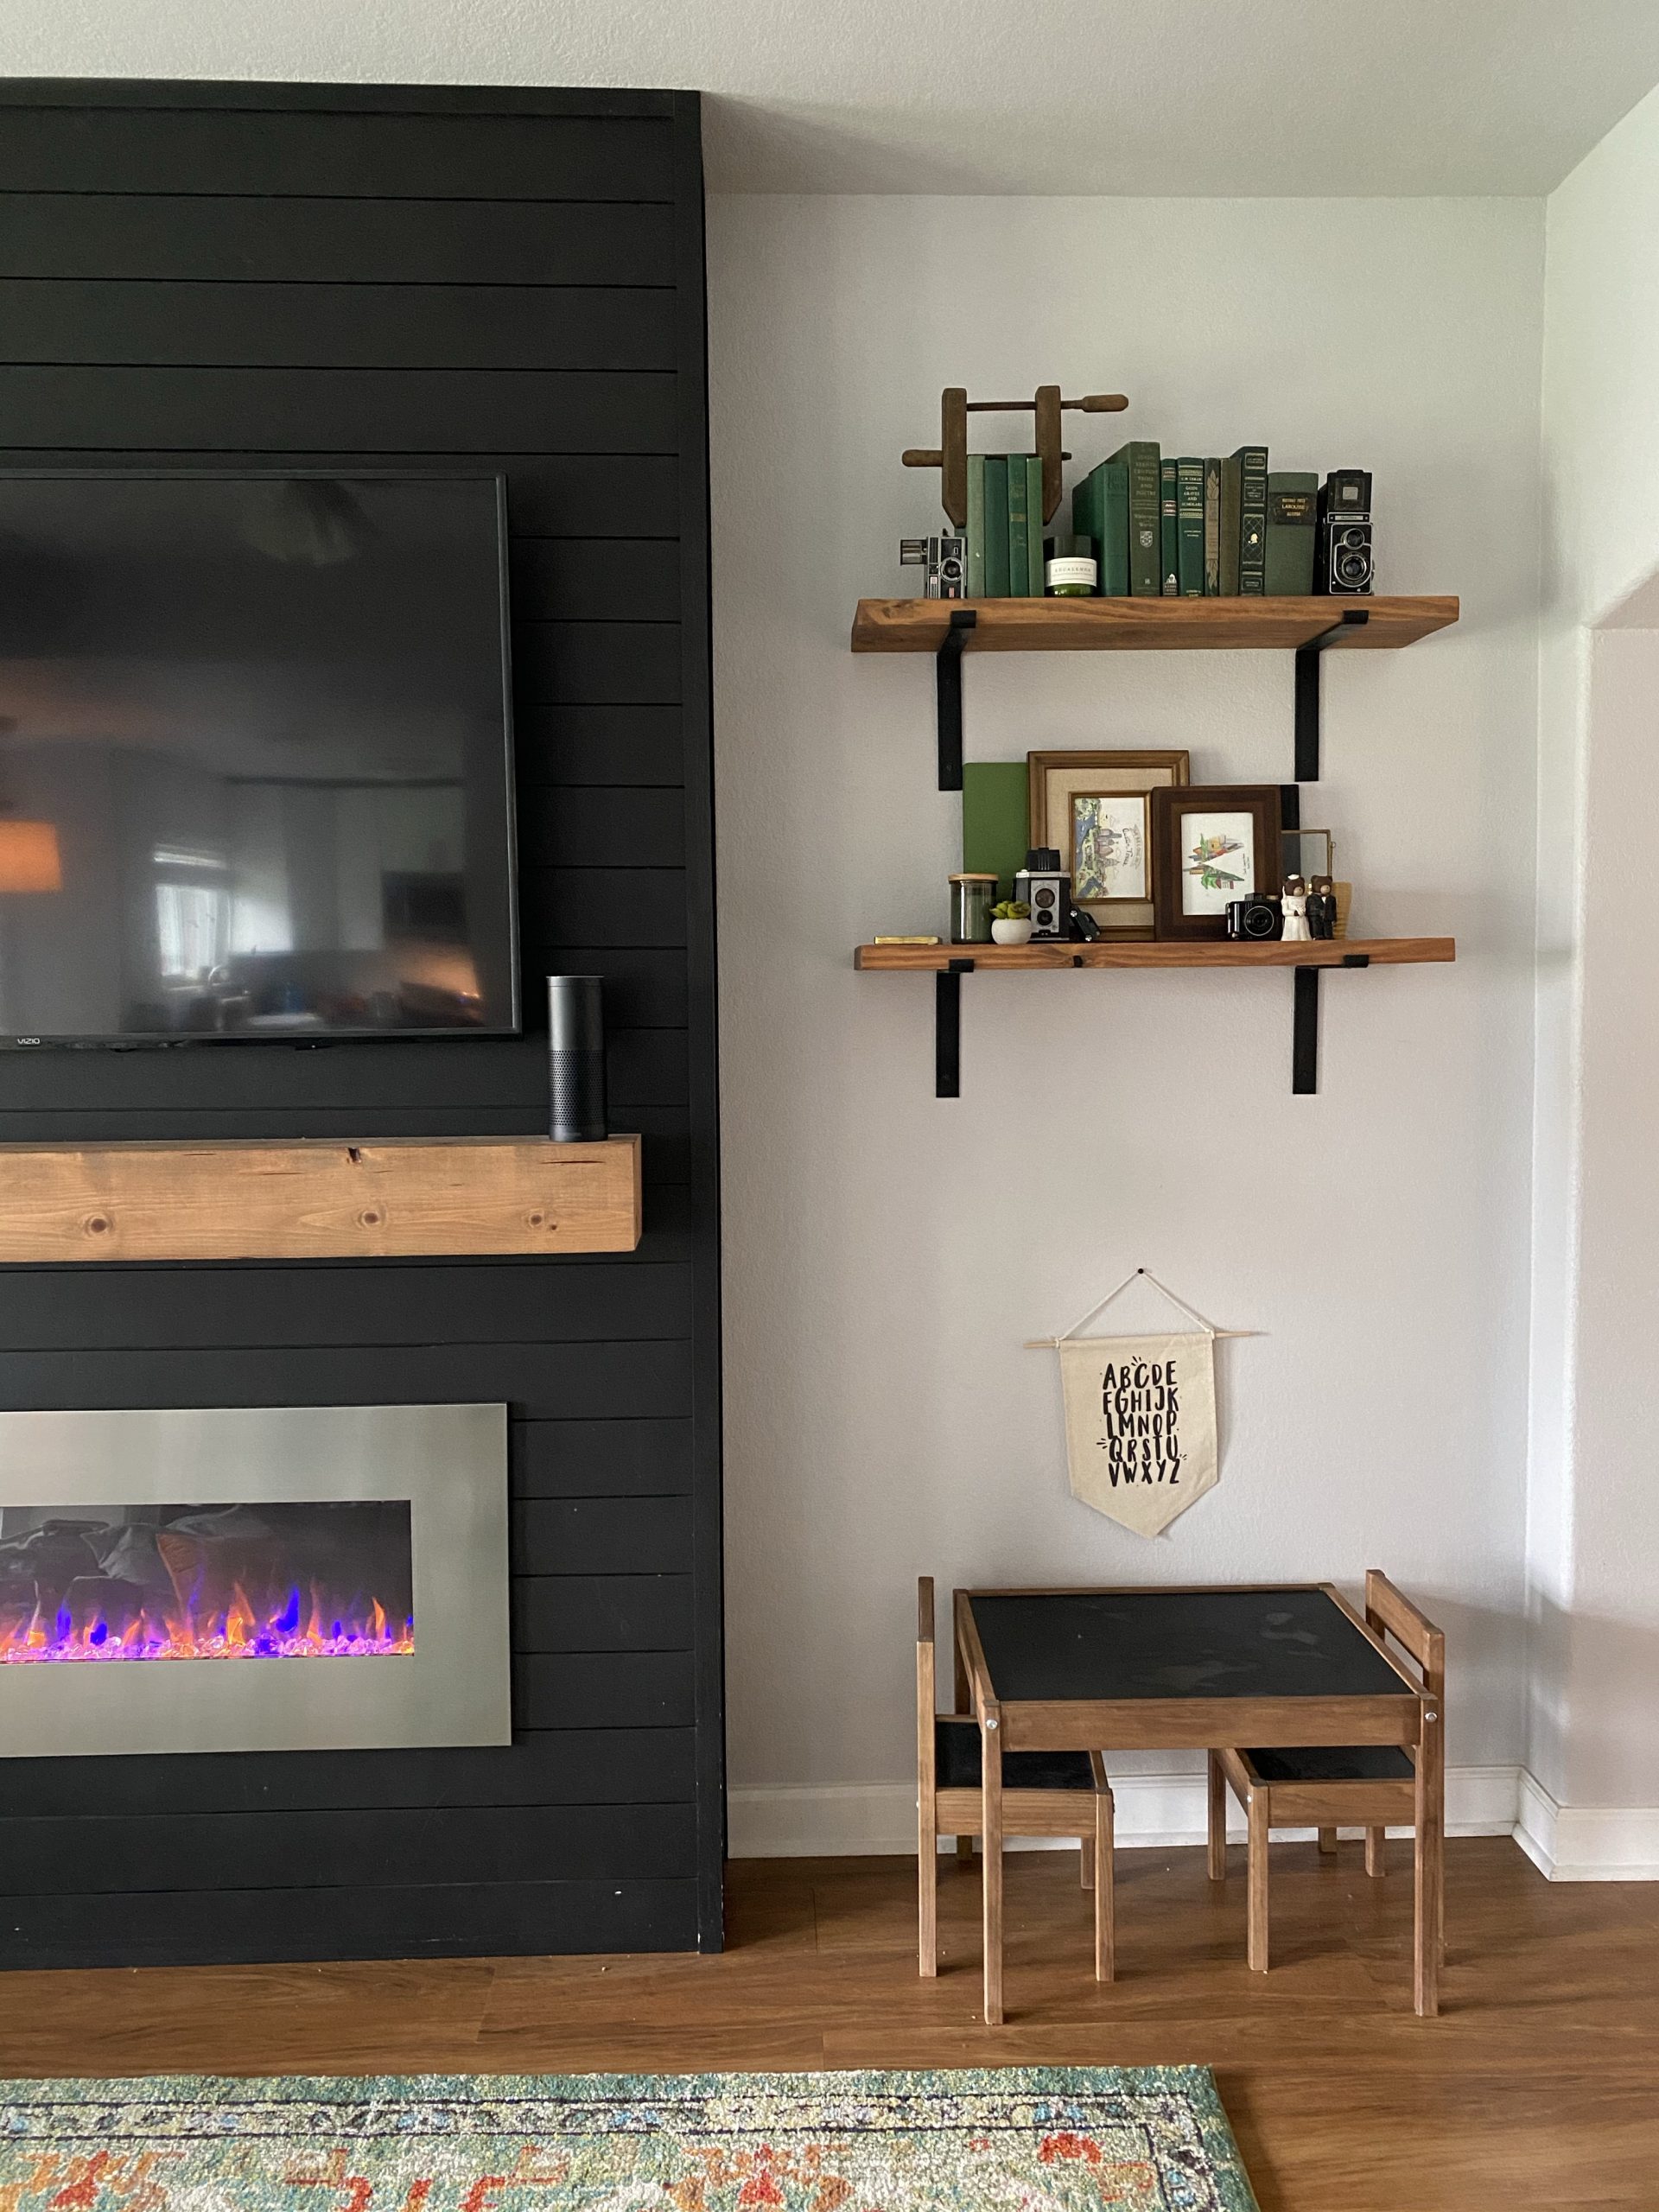
P.P.S. About 18 months later and this post is the most popular one on my blog by far and since we’re about to move out of this house, I wanted to post some updated photos. (Below) You can see it’s held up beautifully except for some paint touch up needed at the bottom where my kids are constantly scratching at and “vrooming” hot wheels cars across it. We added floating shelves on either side that are just 2×10 pine boards stained to match the mantel and farmhouse style brackets from Home Depot. A big comfortable chair on one side and ever affordable IKEA LÄTT kids table that we also stained and chalkboard painted to match. I’ve loved having this fireplace on everyday and I’ve LOVED seeing so many of the fireplaces y’all have built inspired by this one. Thank you for stopping by!
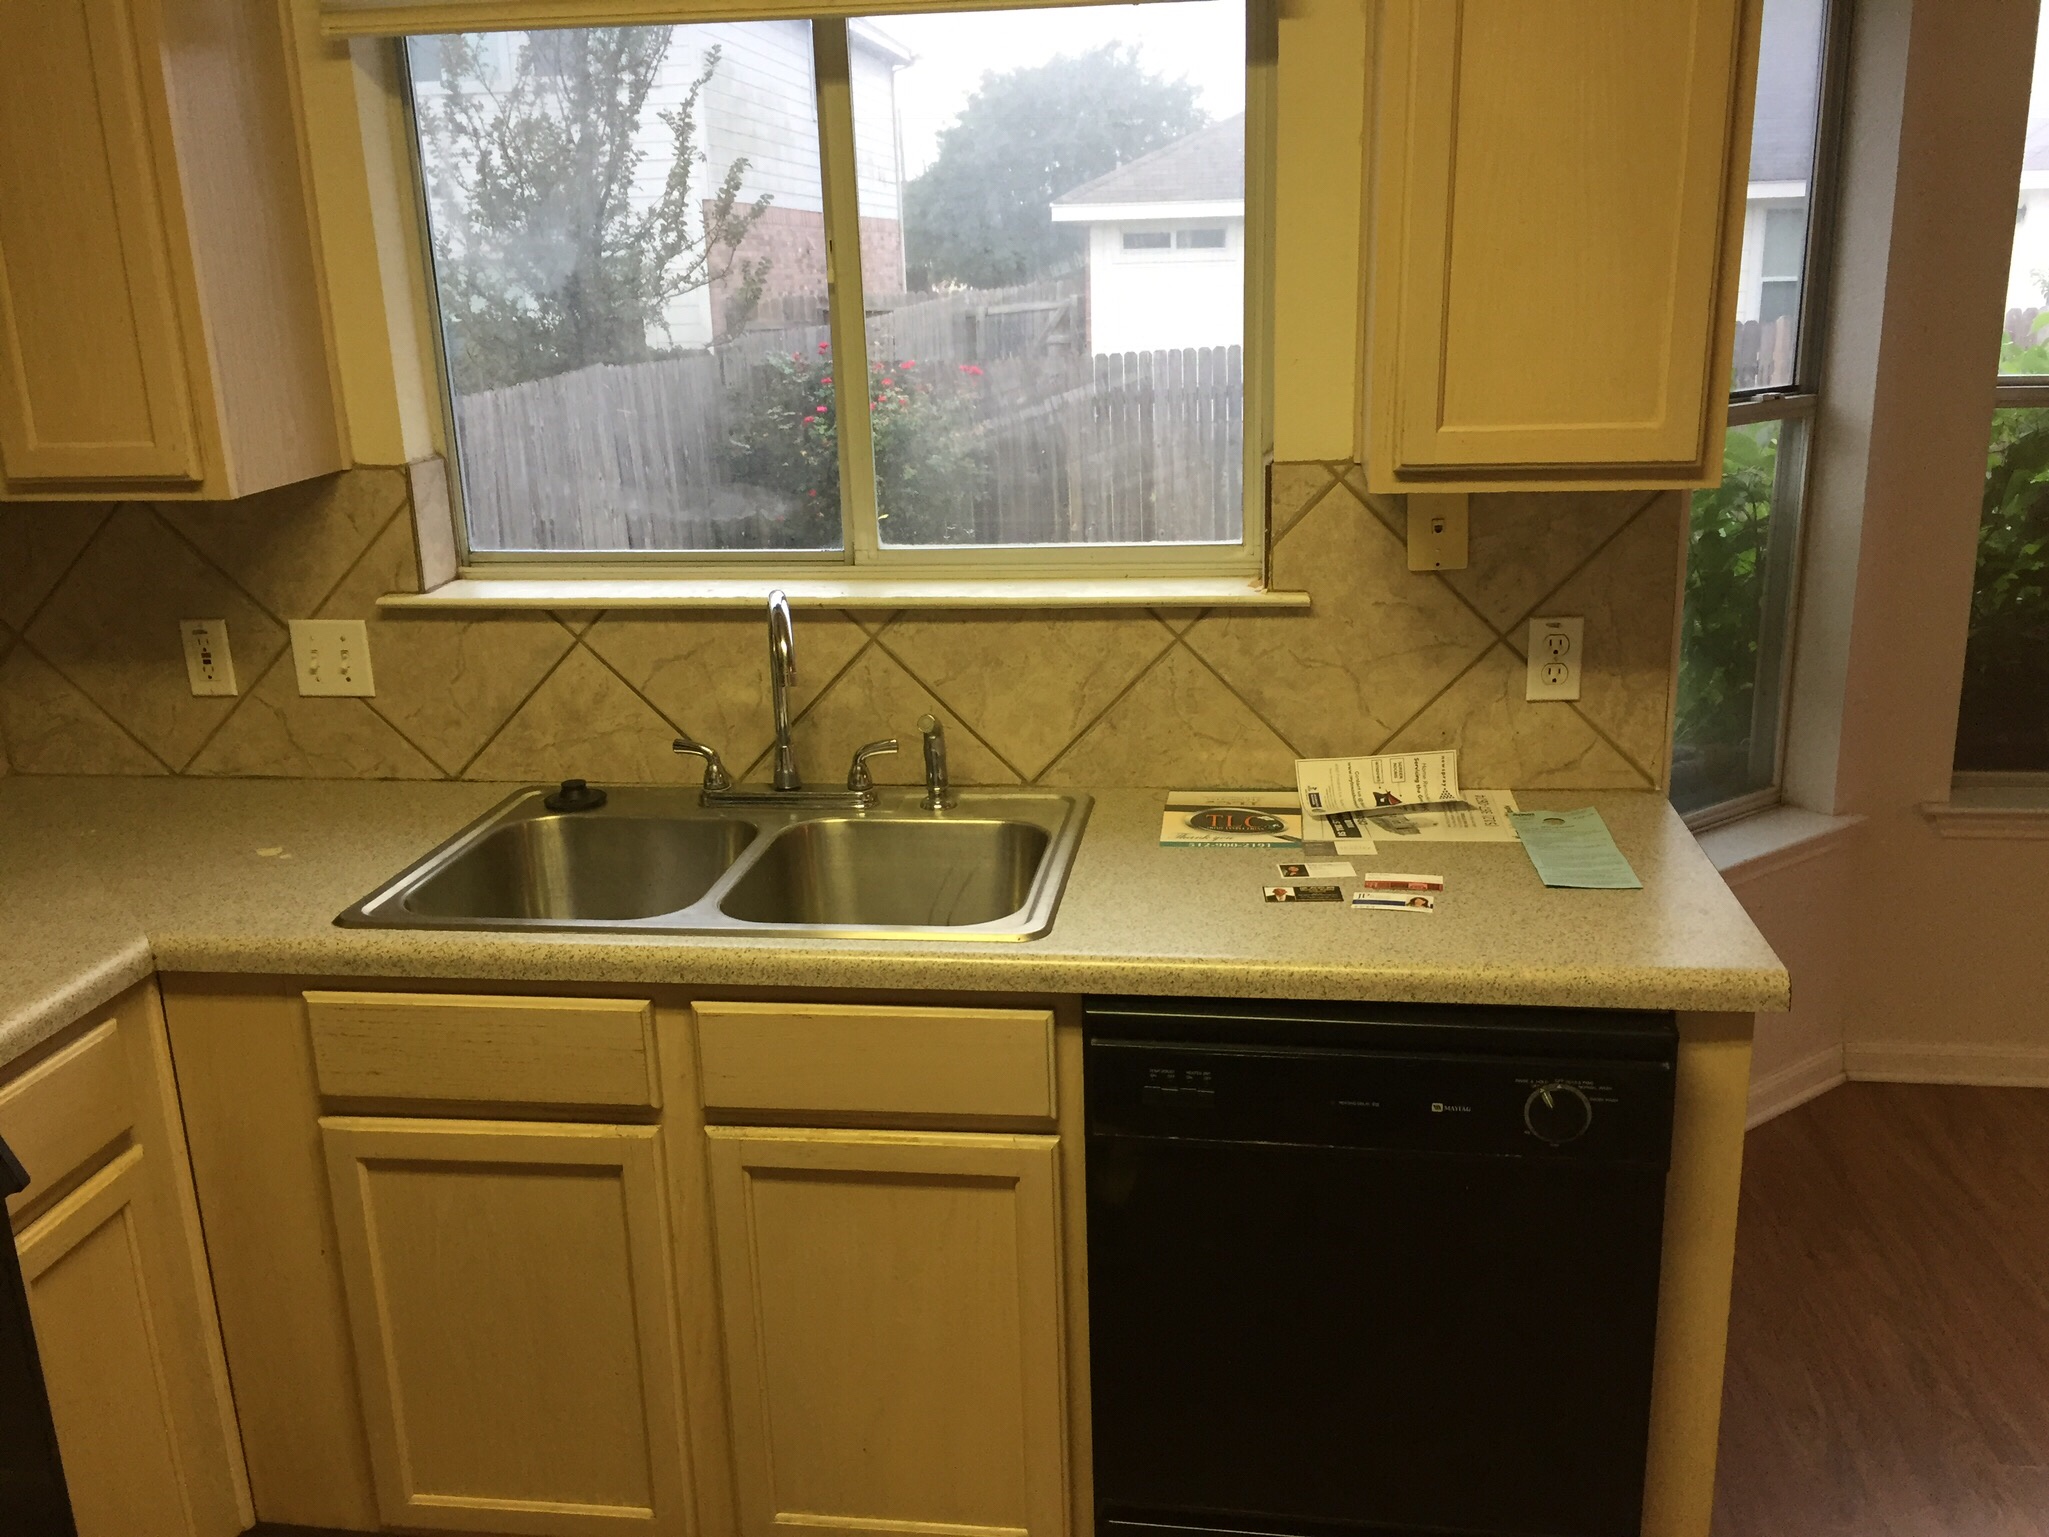
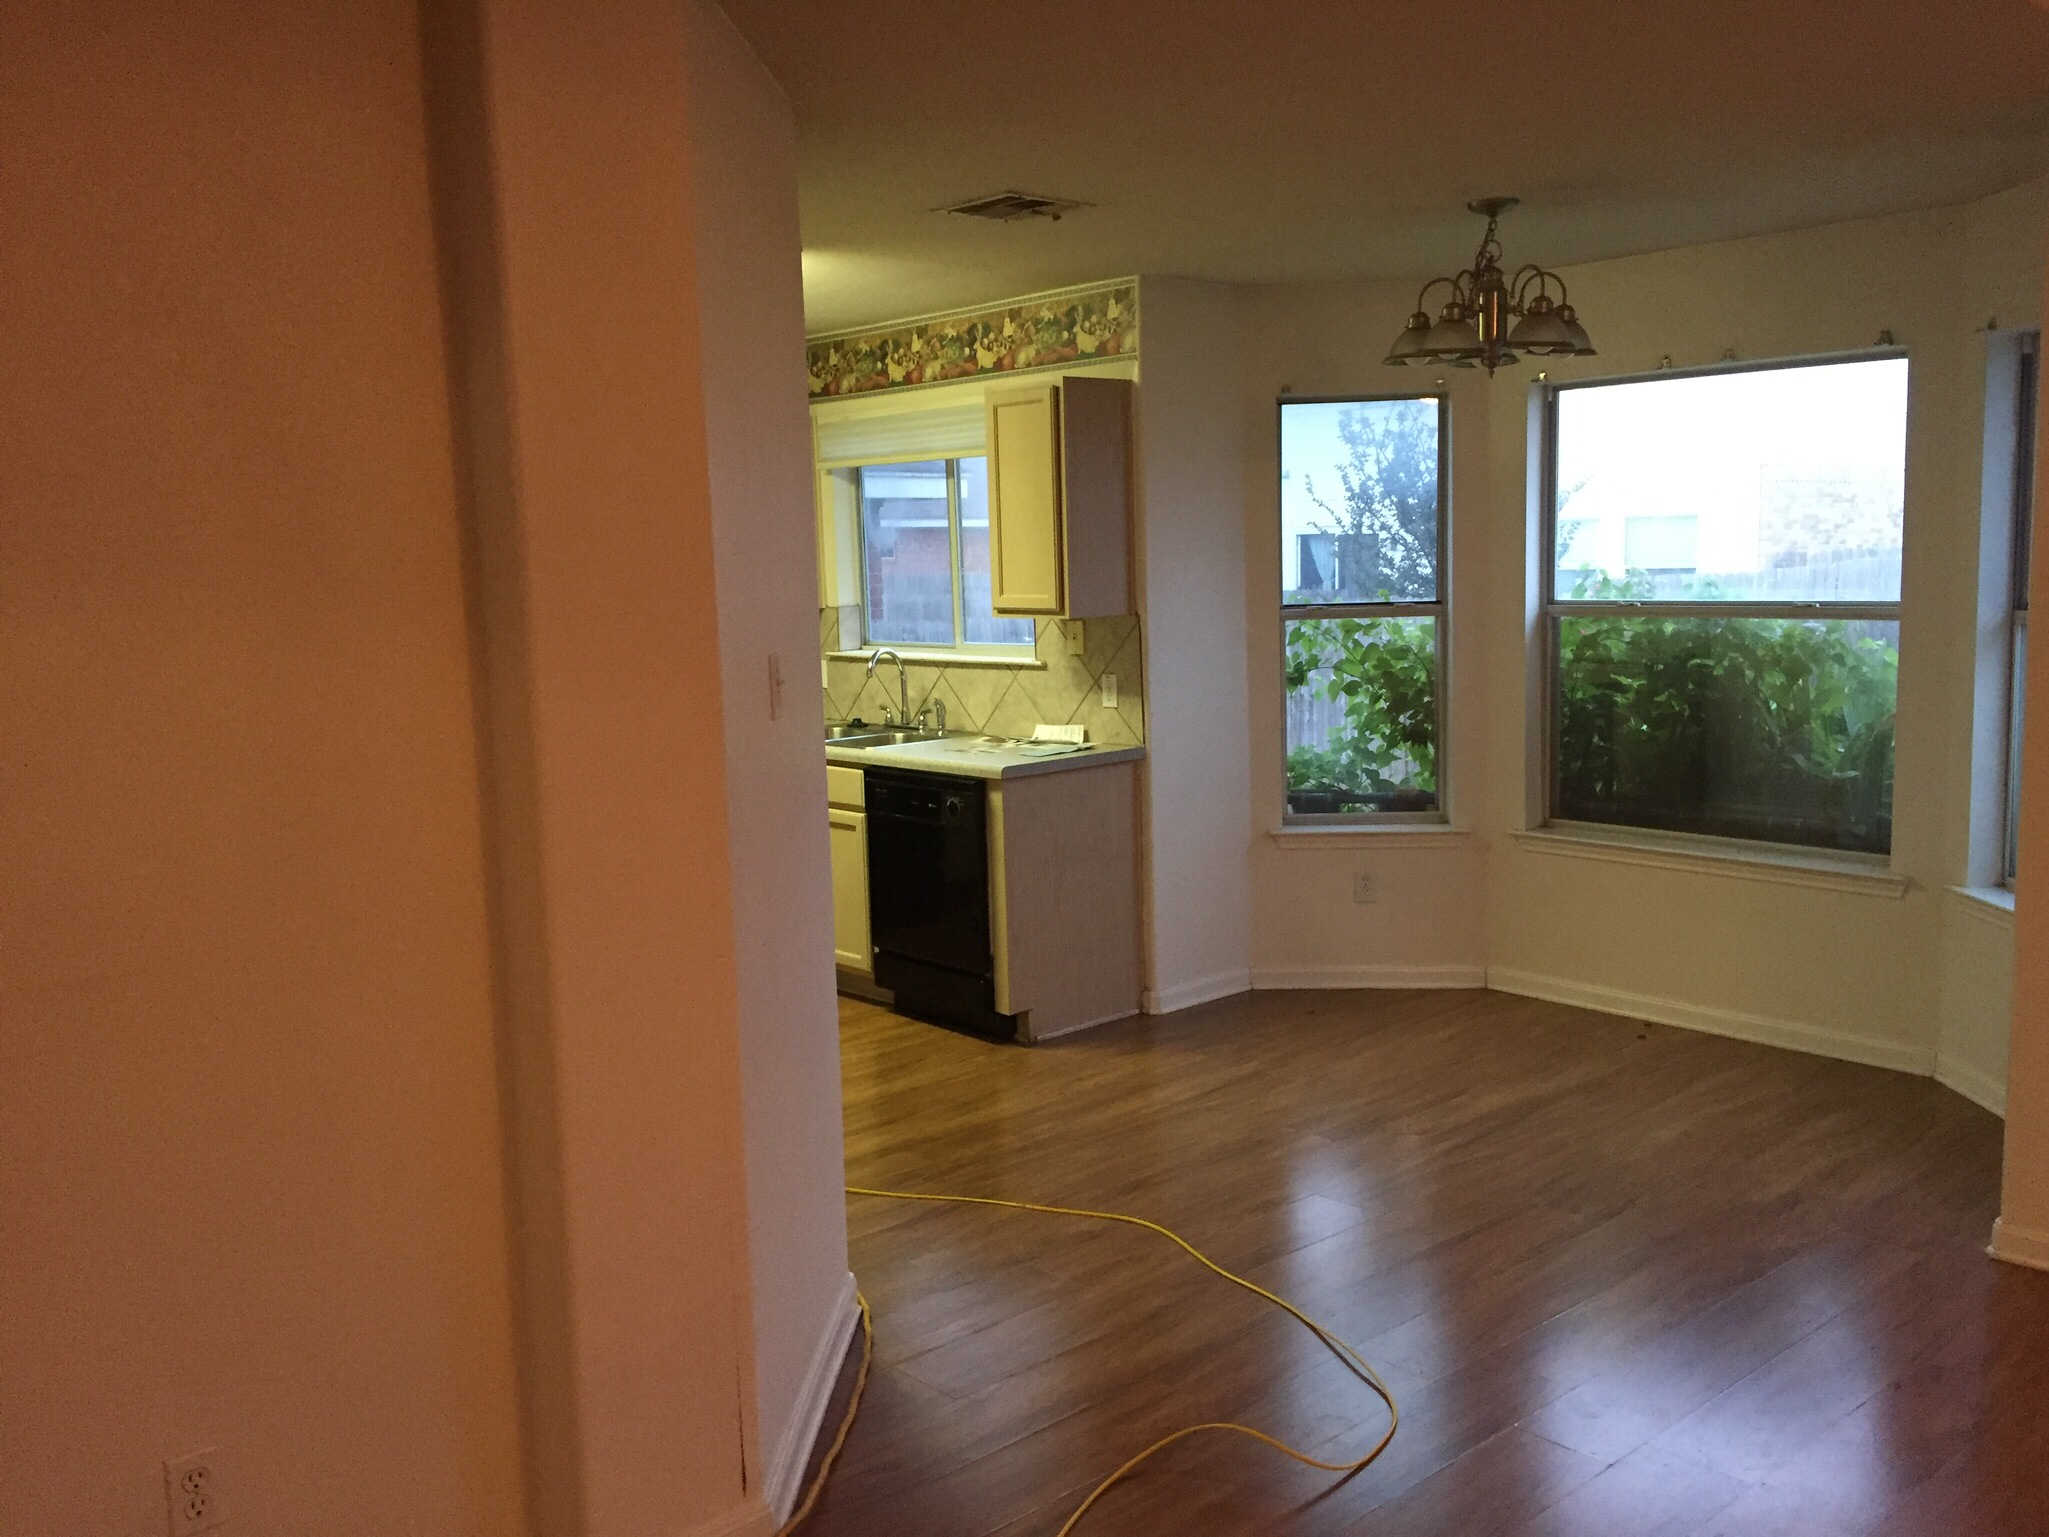
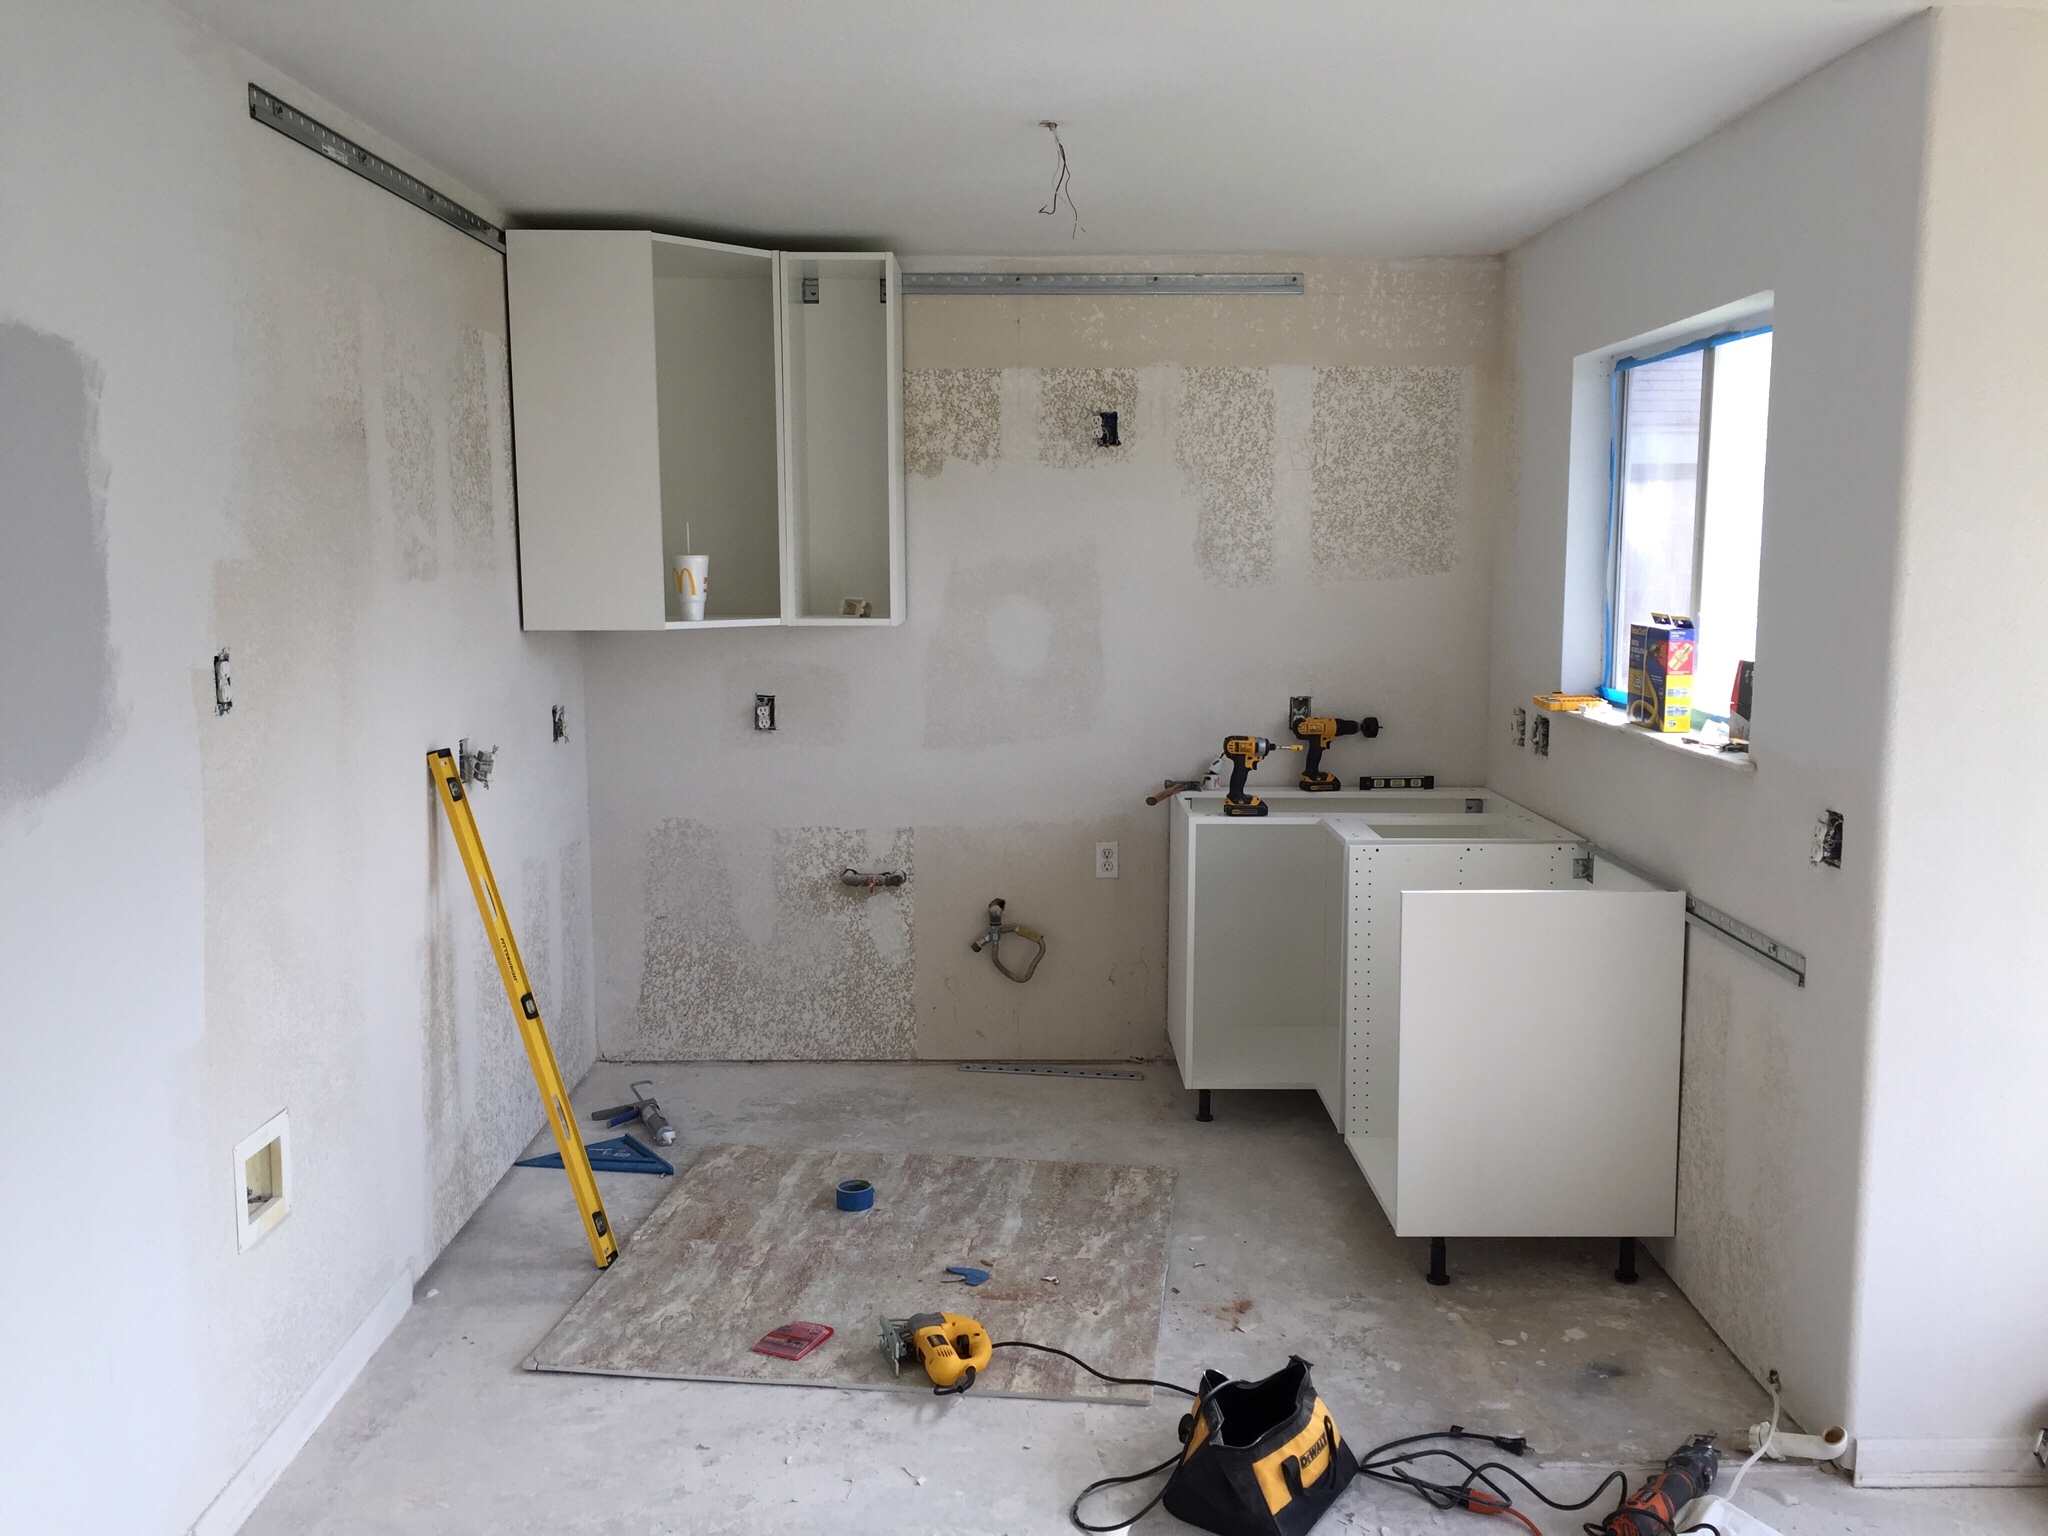
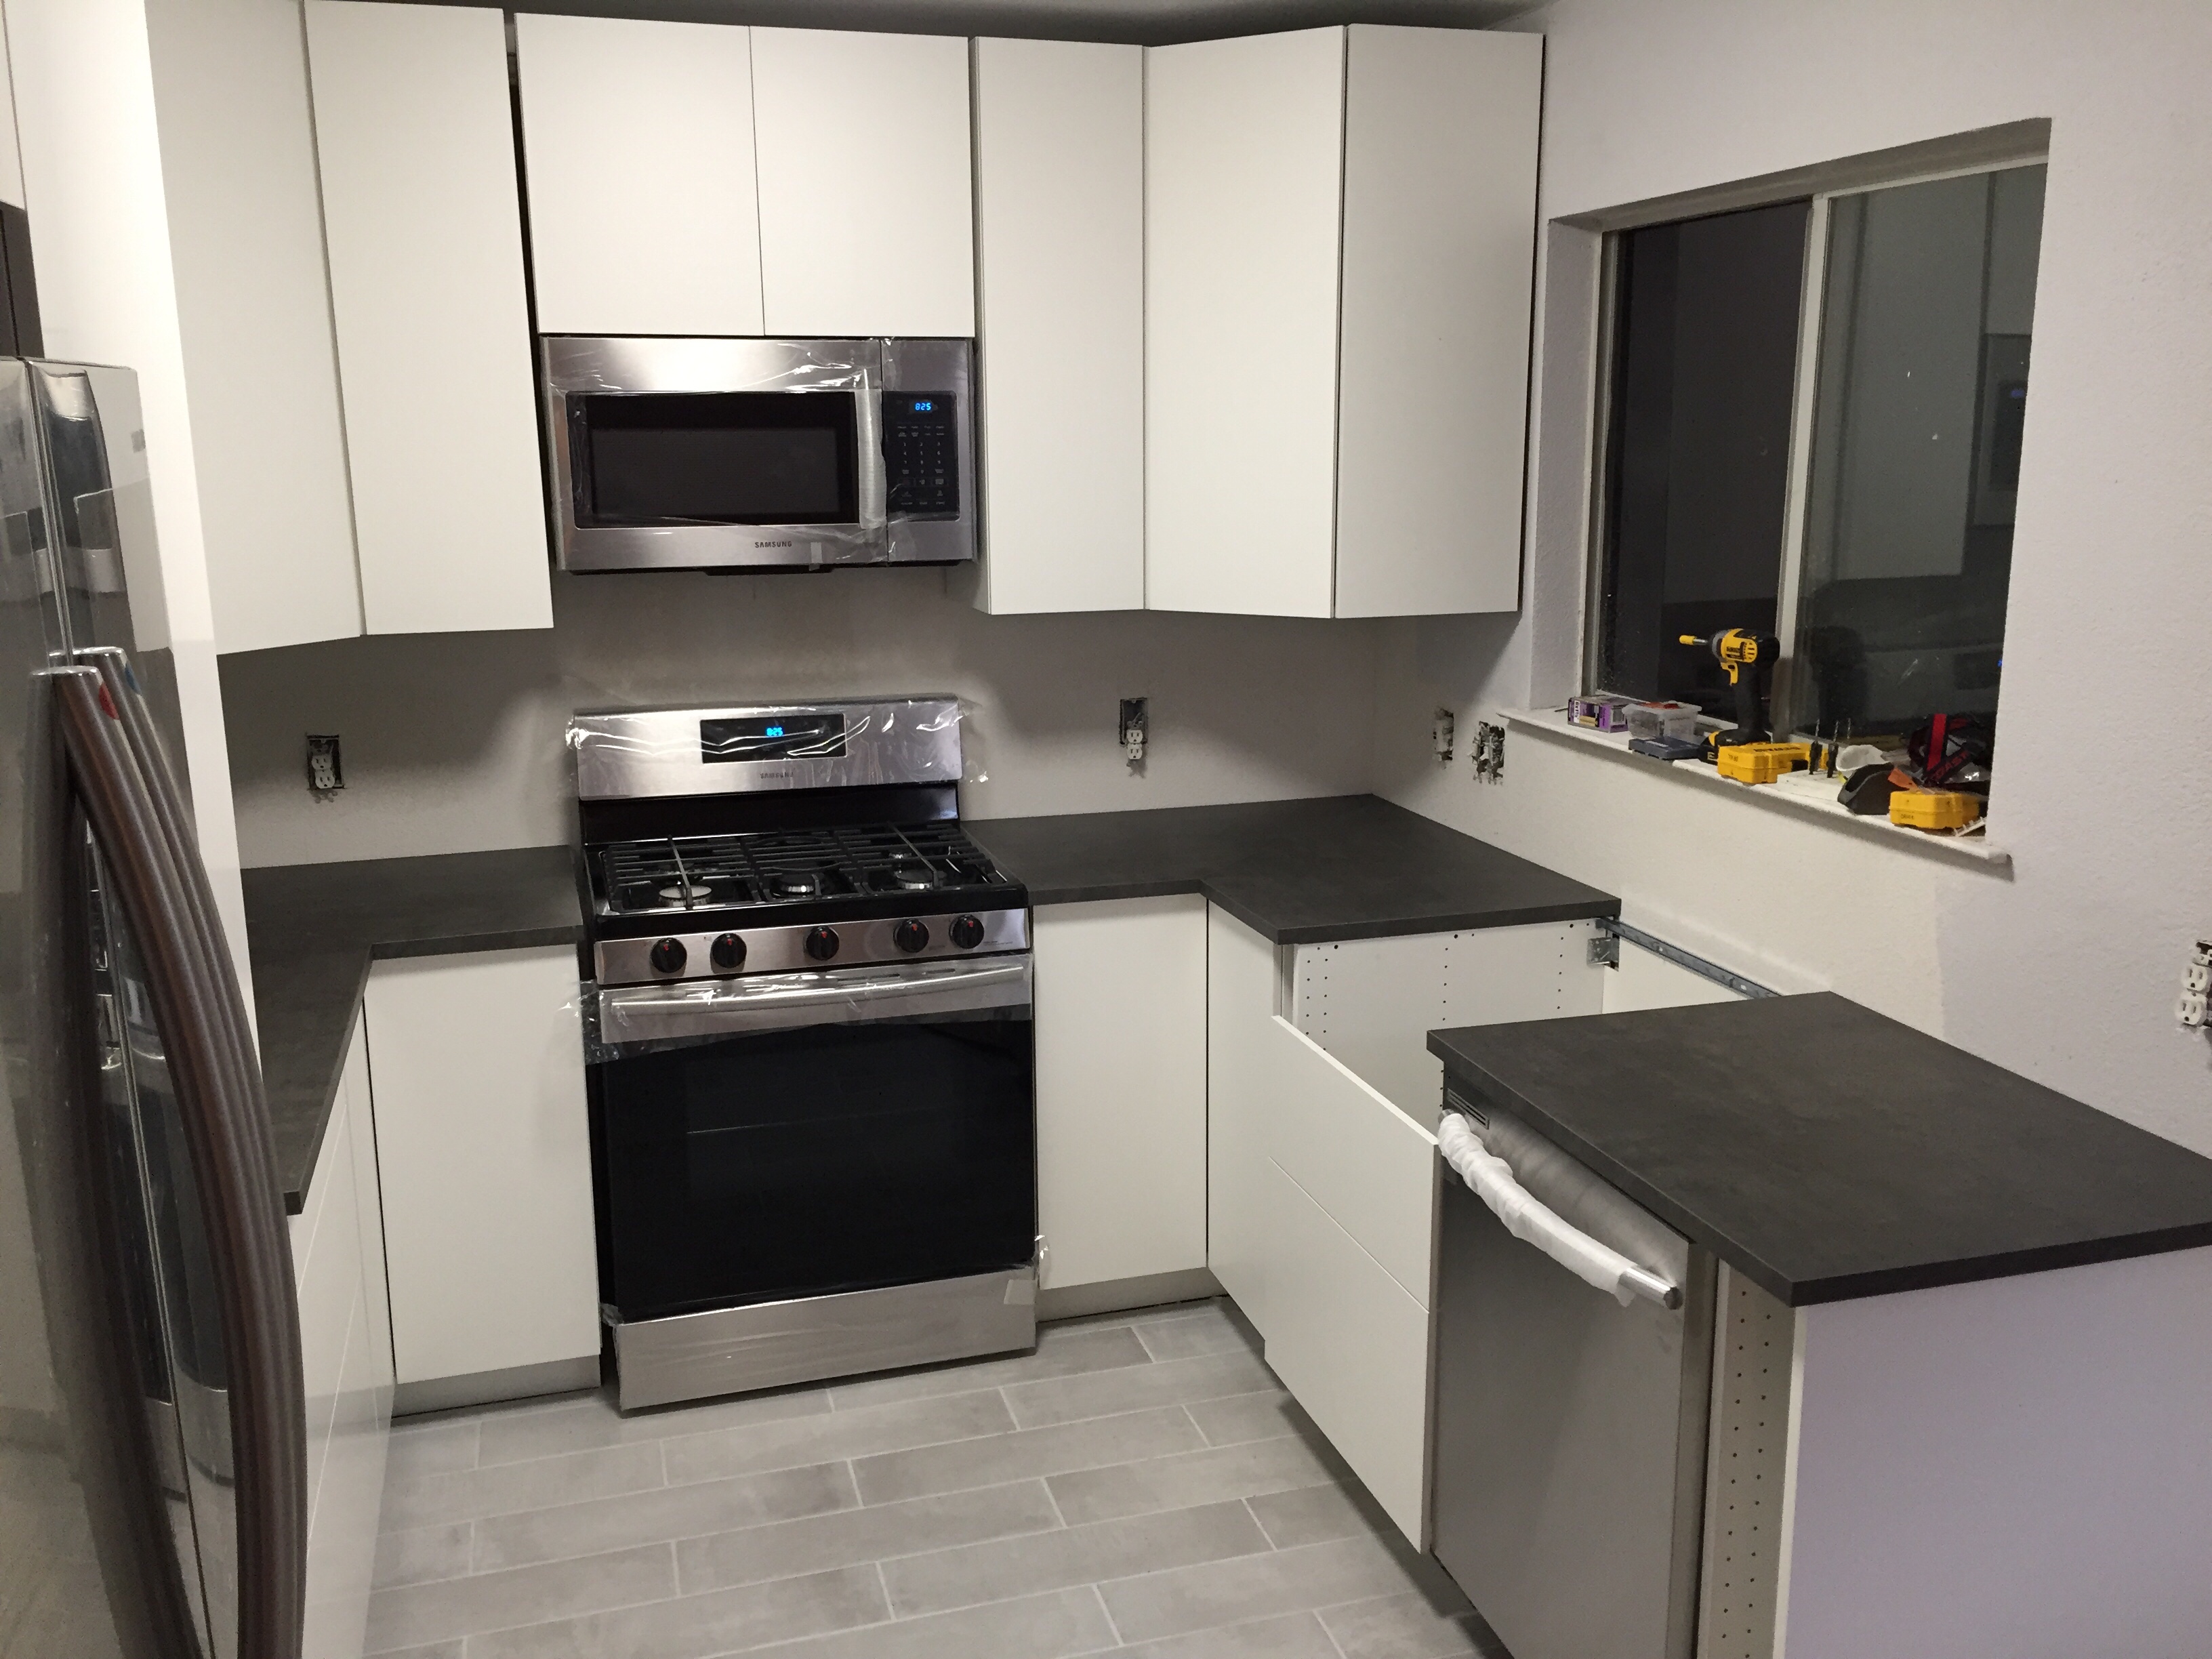
We knew we needed a total kitchen renovation before we could move into this 20 year old neglected builder grade house. I love to cook and while I don’t love cleaning, I do love clean – if that makes sense.
We were working with a painfully small foot print here, so keep in mind, that naturally kept some of our costs lower. This house will eventually be a rental so I wanted to keep everything modern but neutral and give it as much mass appeal as possible while staying as cheap as possible. I wanted to keep in mind that the cabinet doors and countertops might need to be replaced if they take a bit of a beating that tends to come with being a rental unit, so those pieces specifically I really wanted to be affordable. This house is 5 minutes from IKEA. I mean door-to-door: 5 minutes. It’s a blessing and a curse. Mostly a blessing.
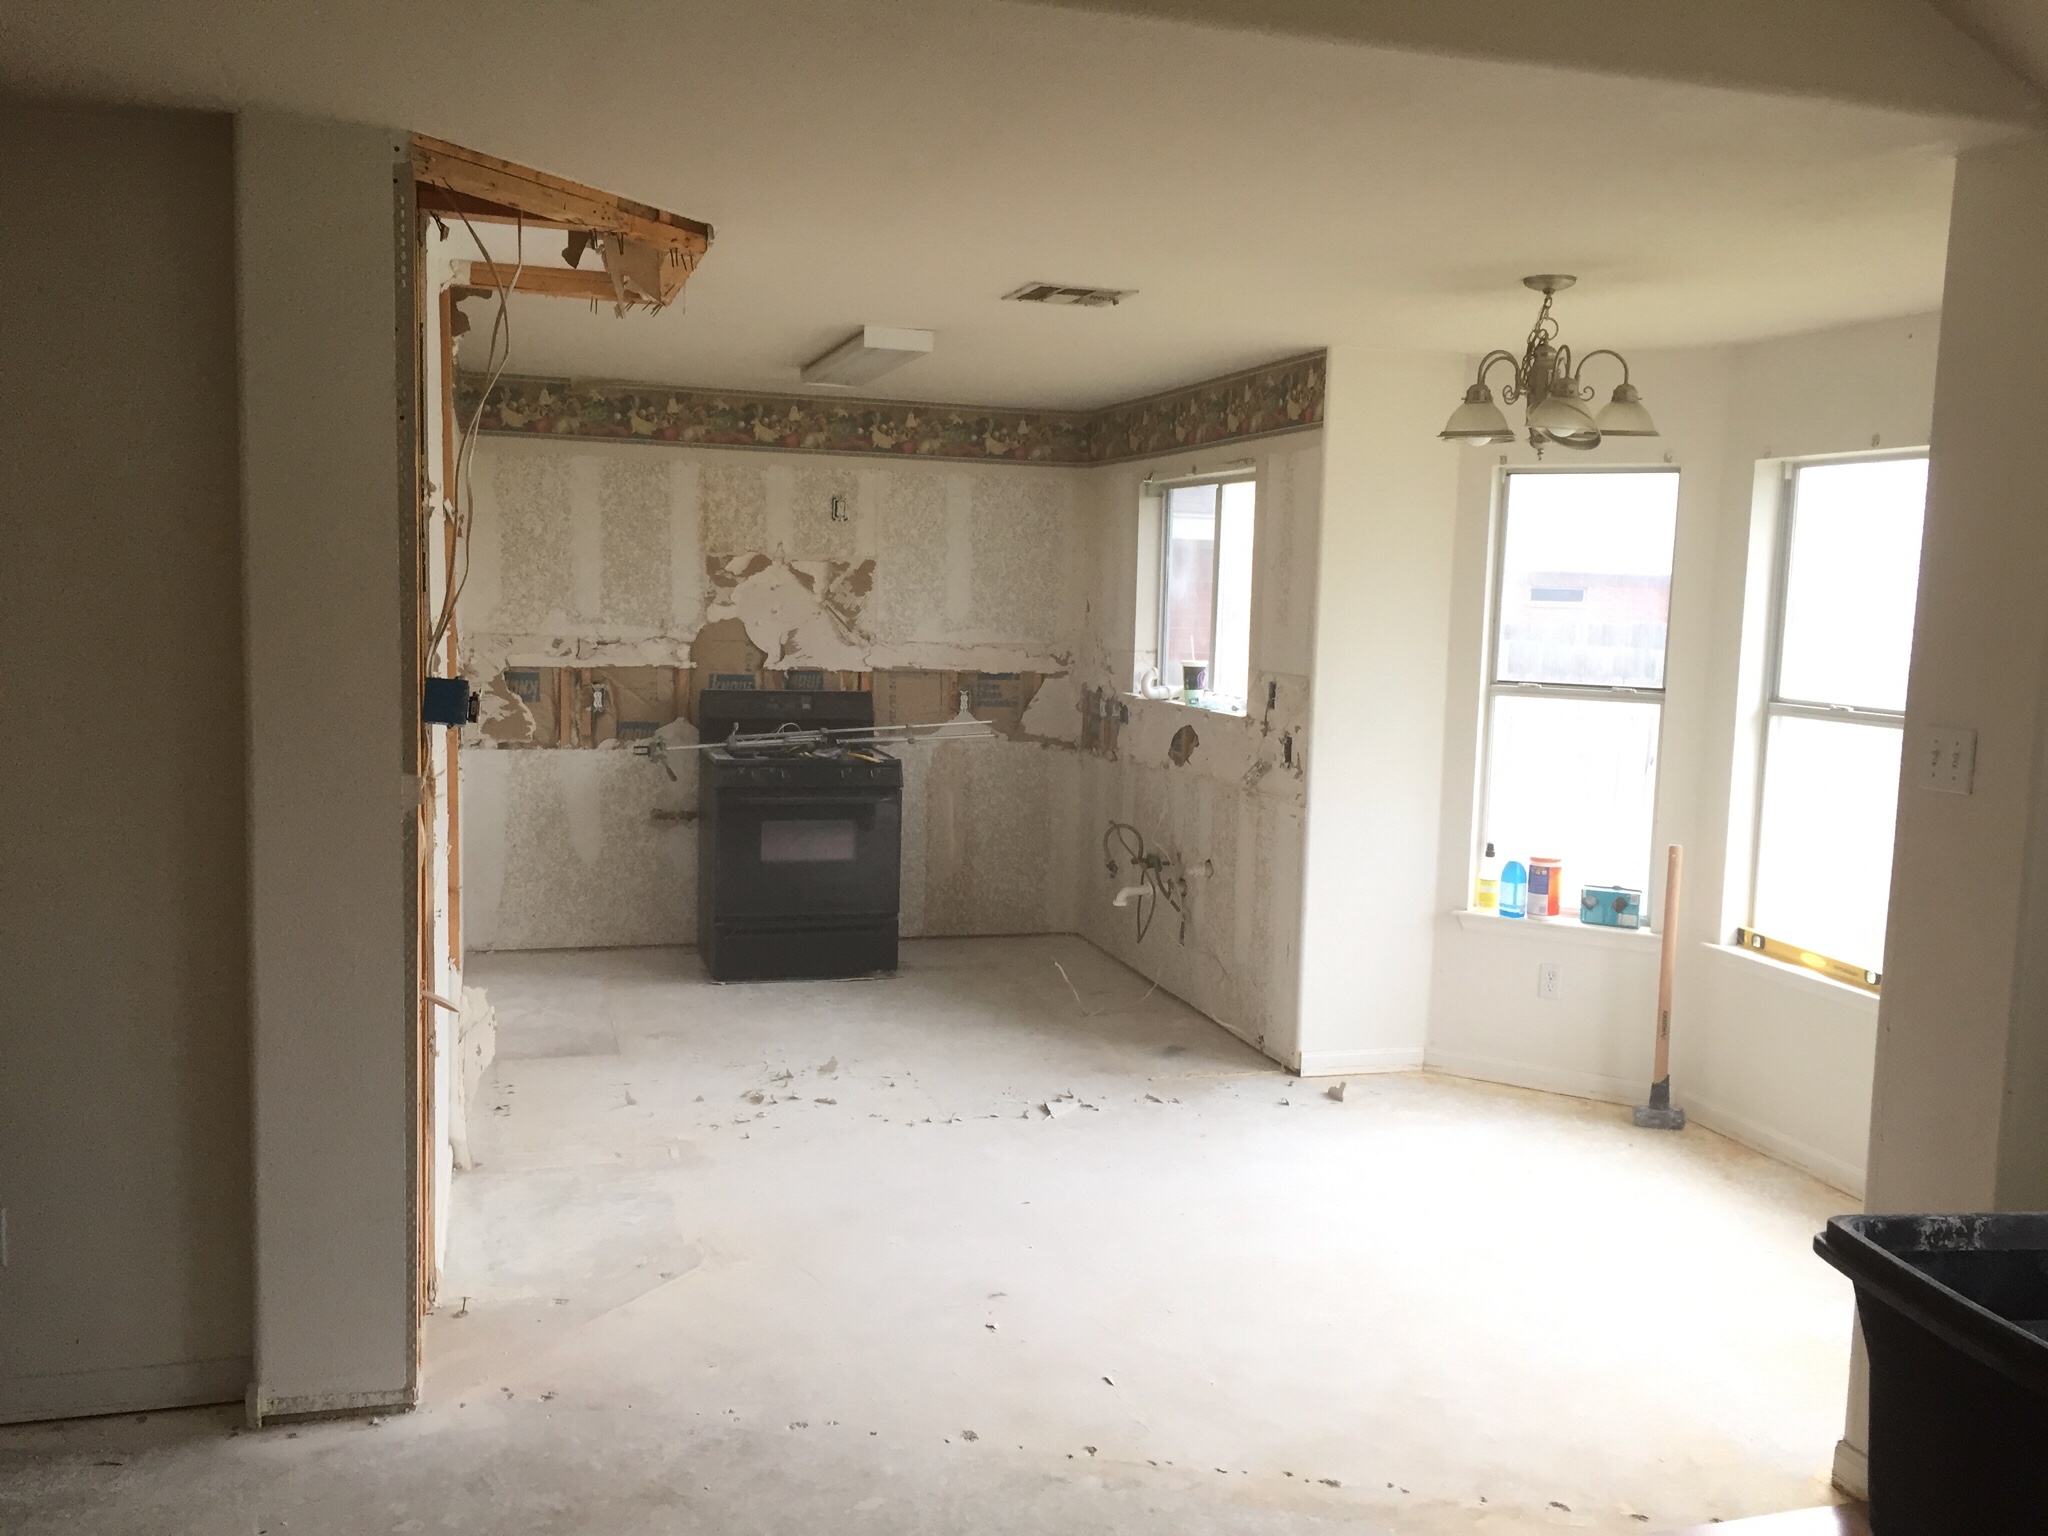
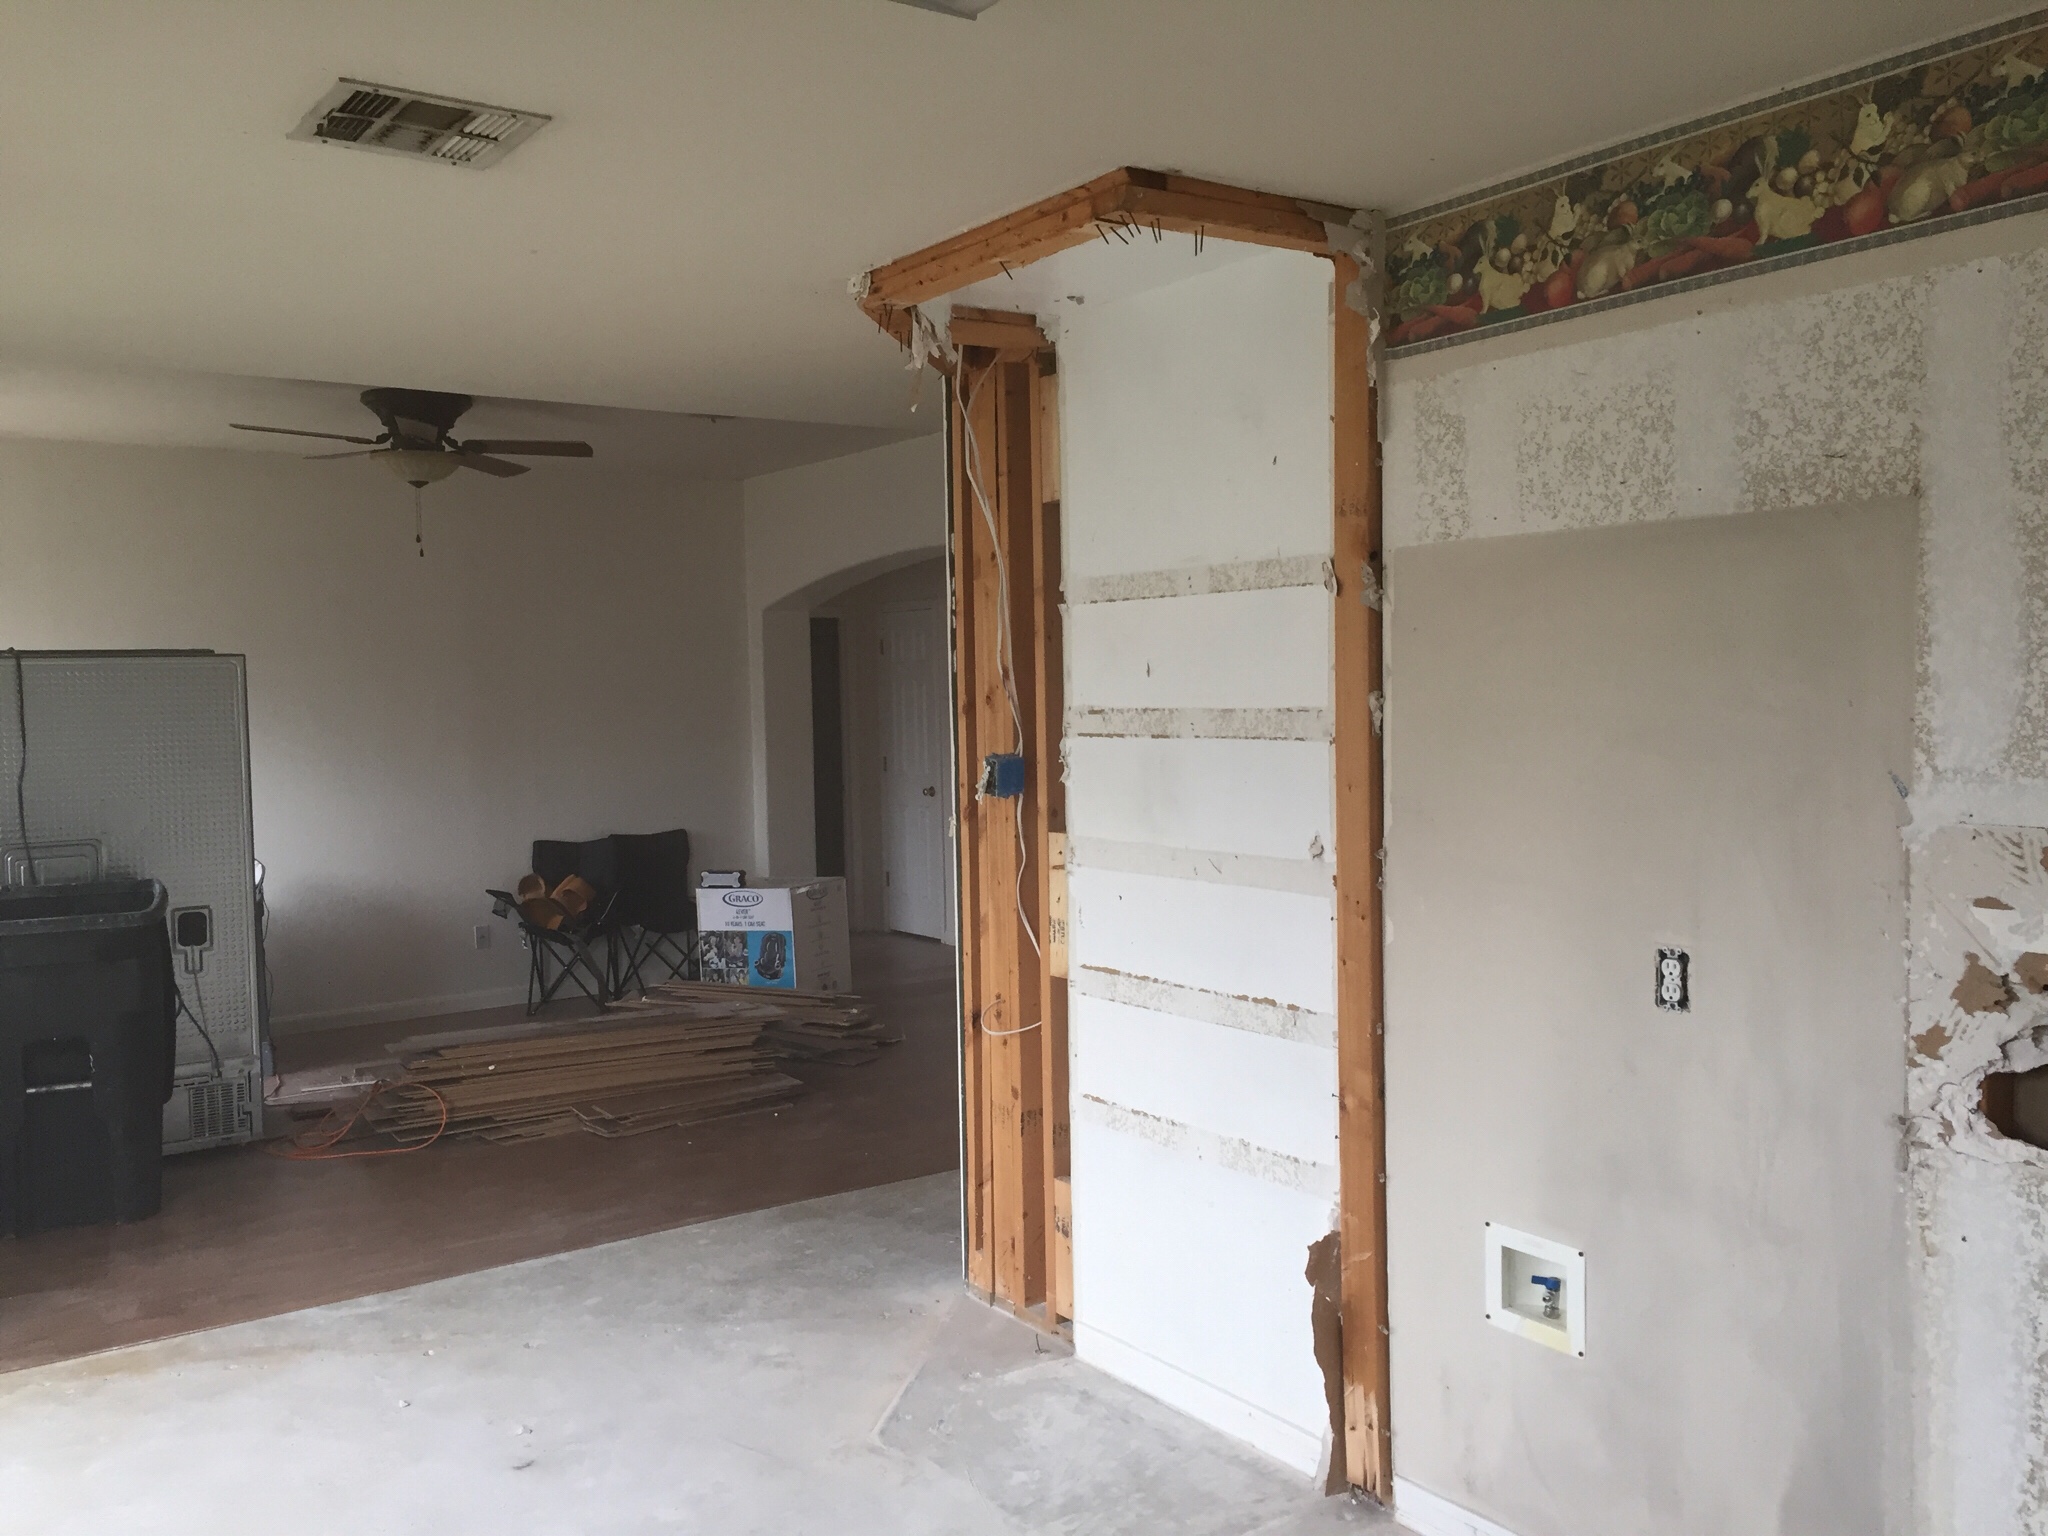
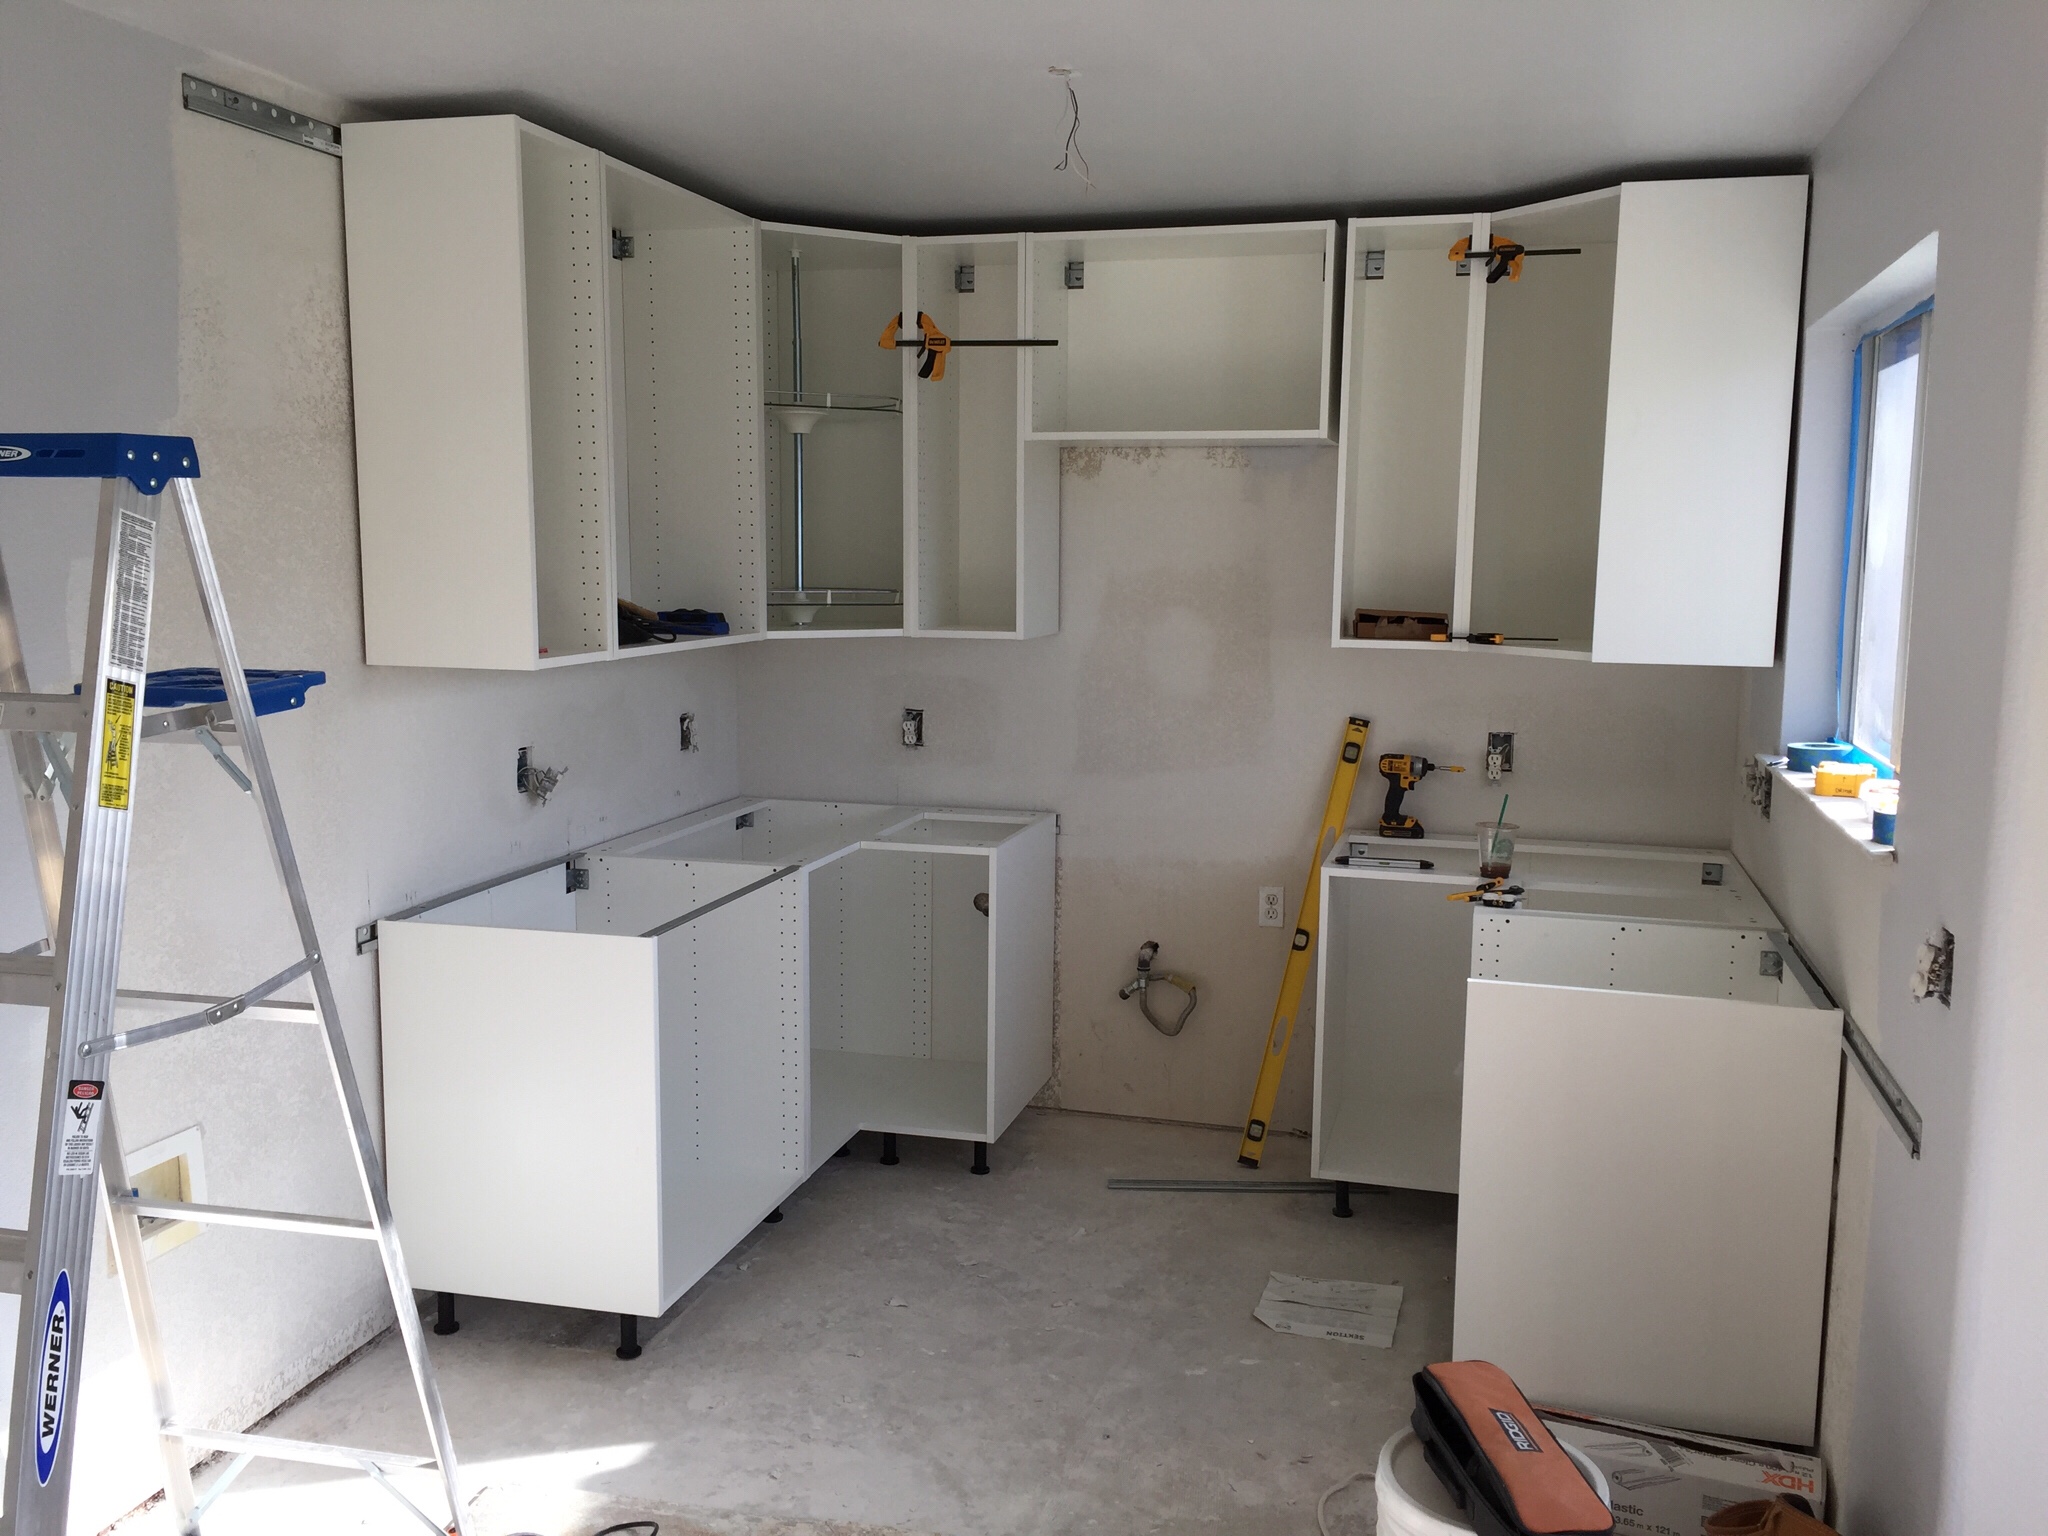
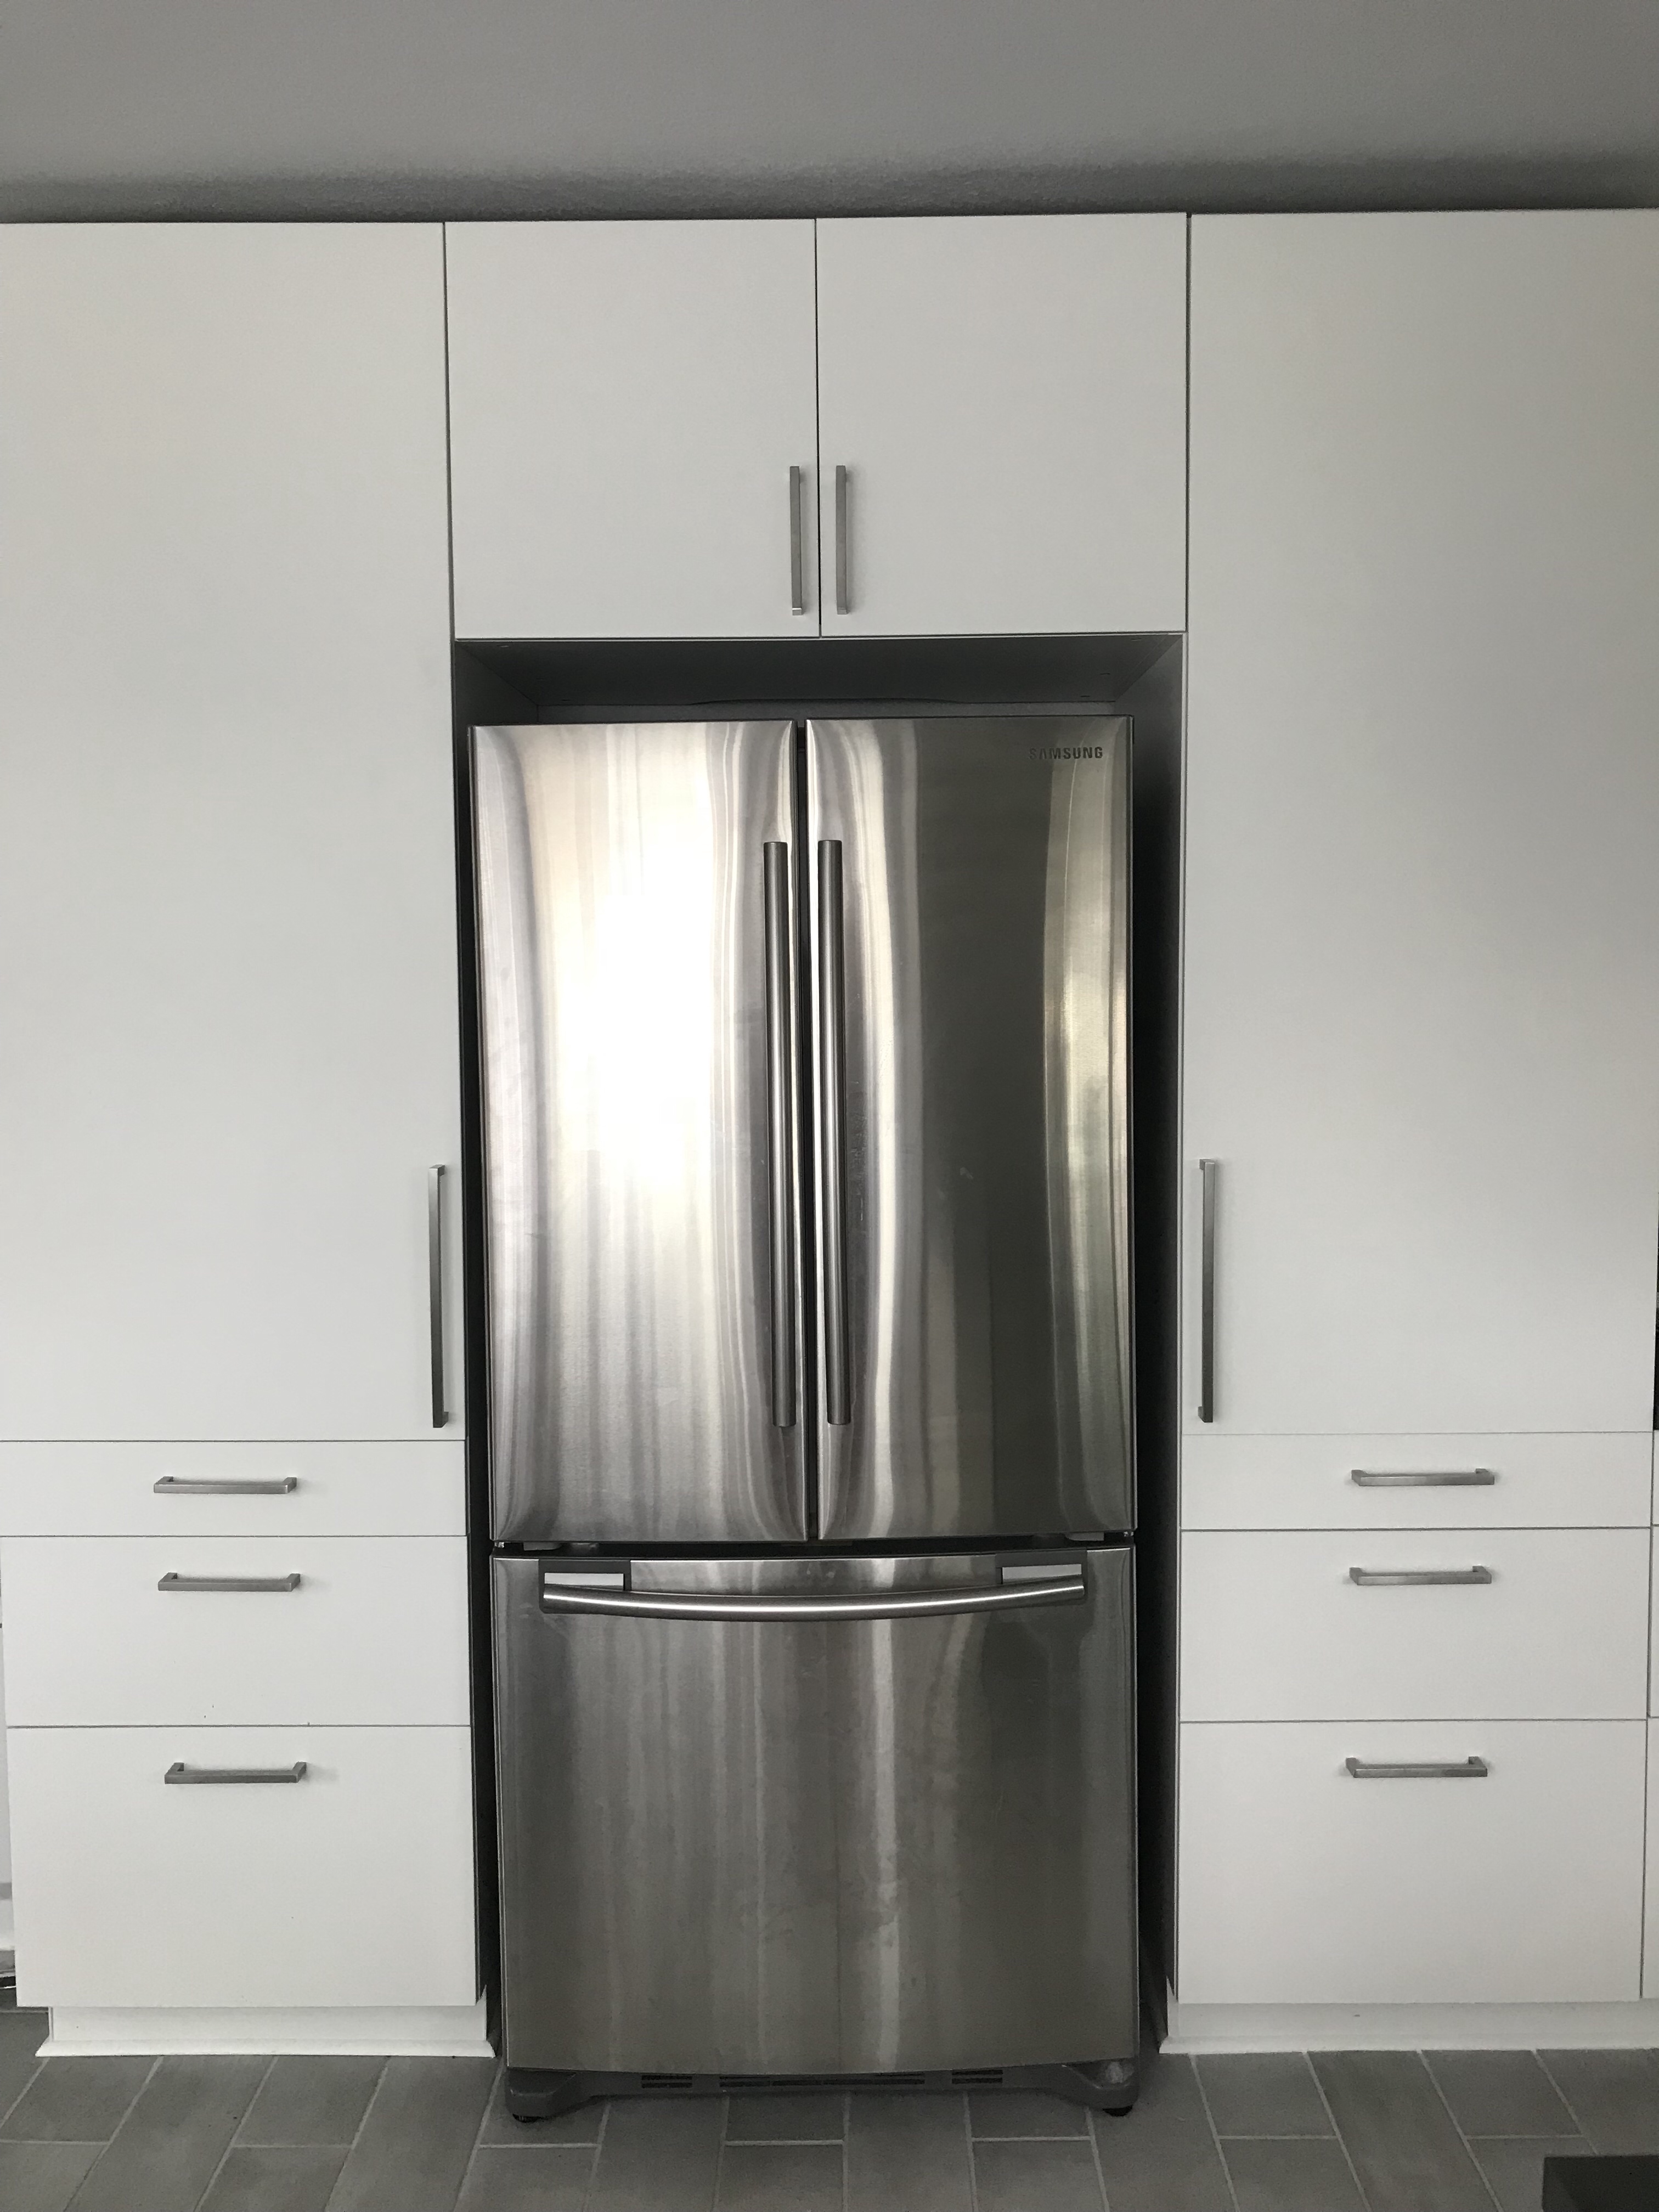
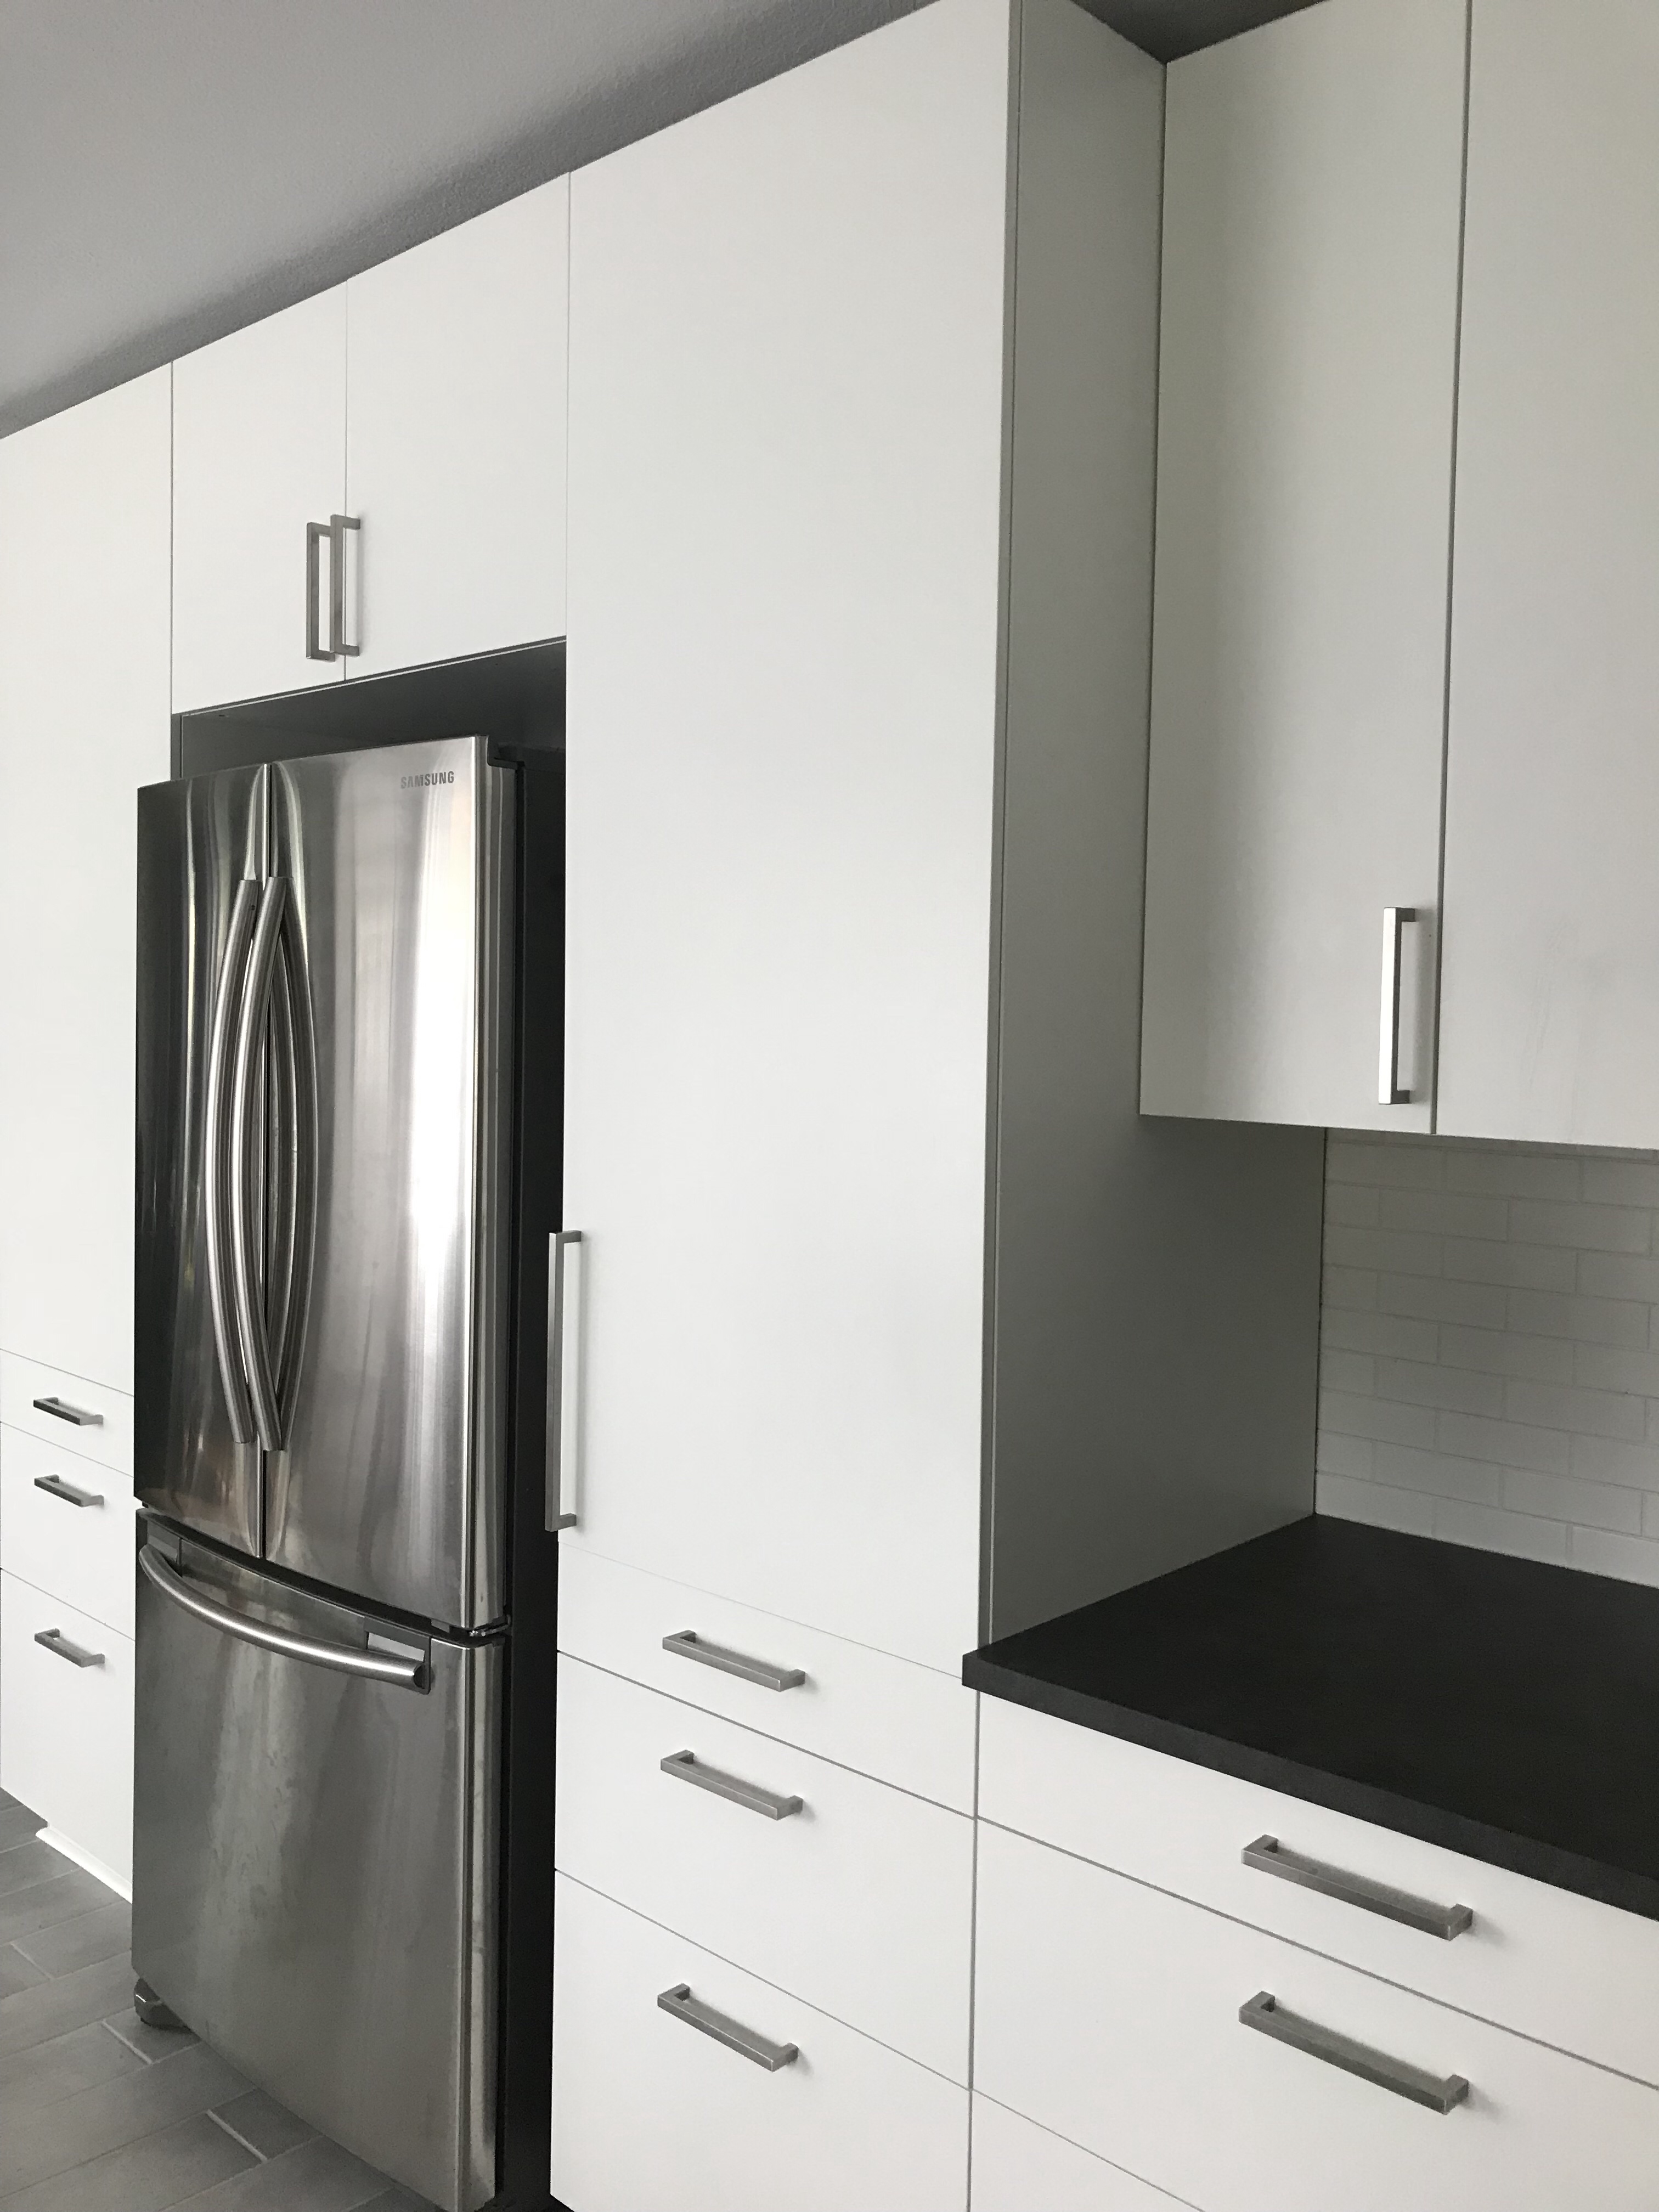
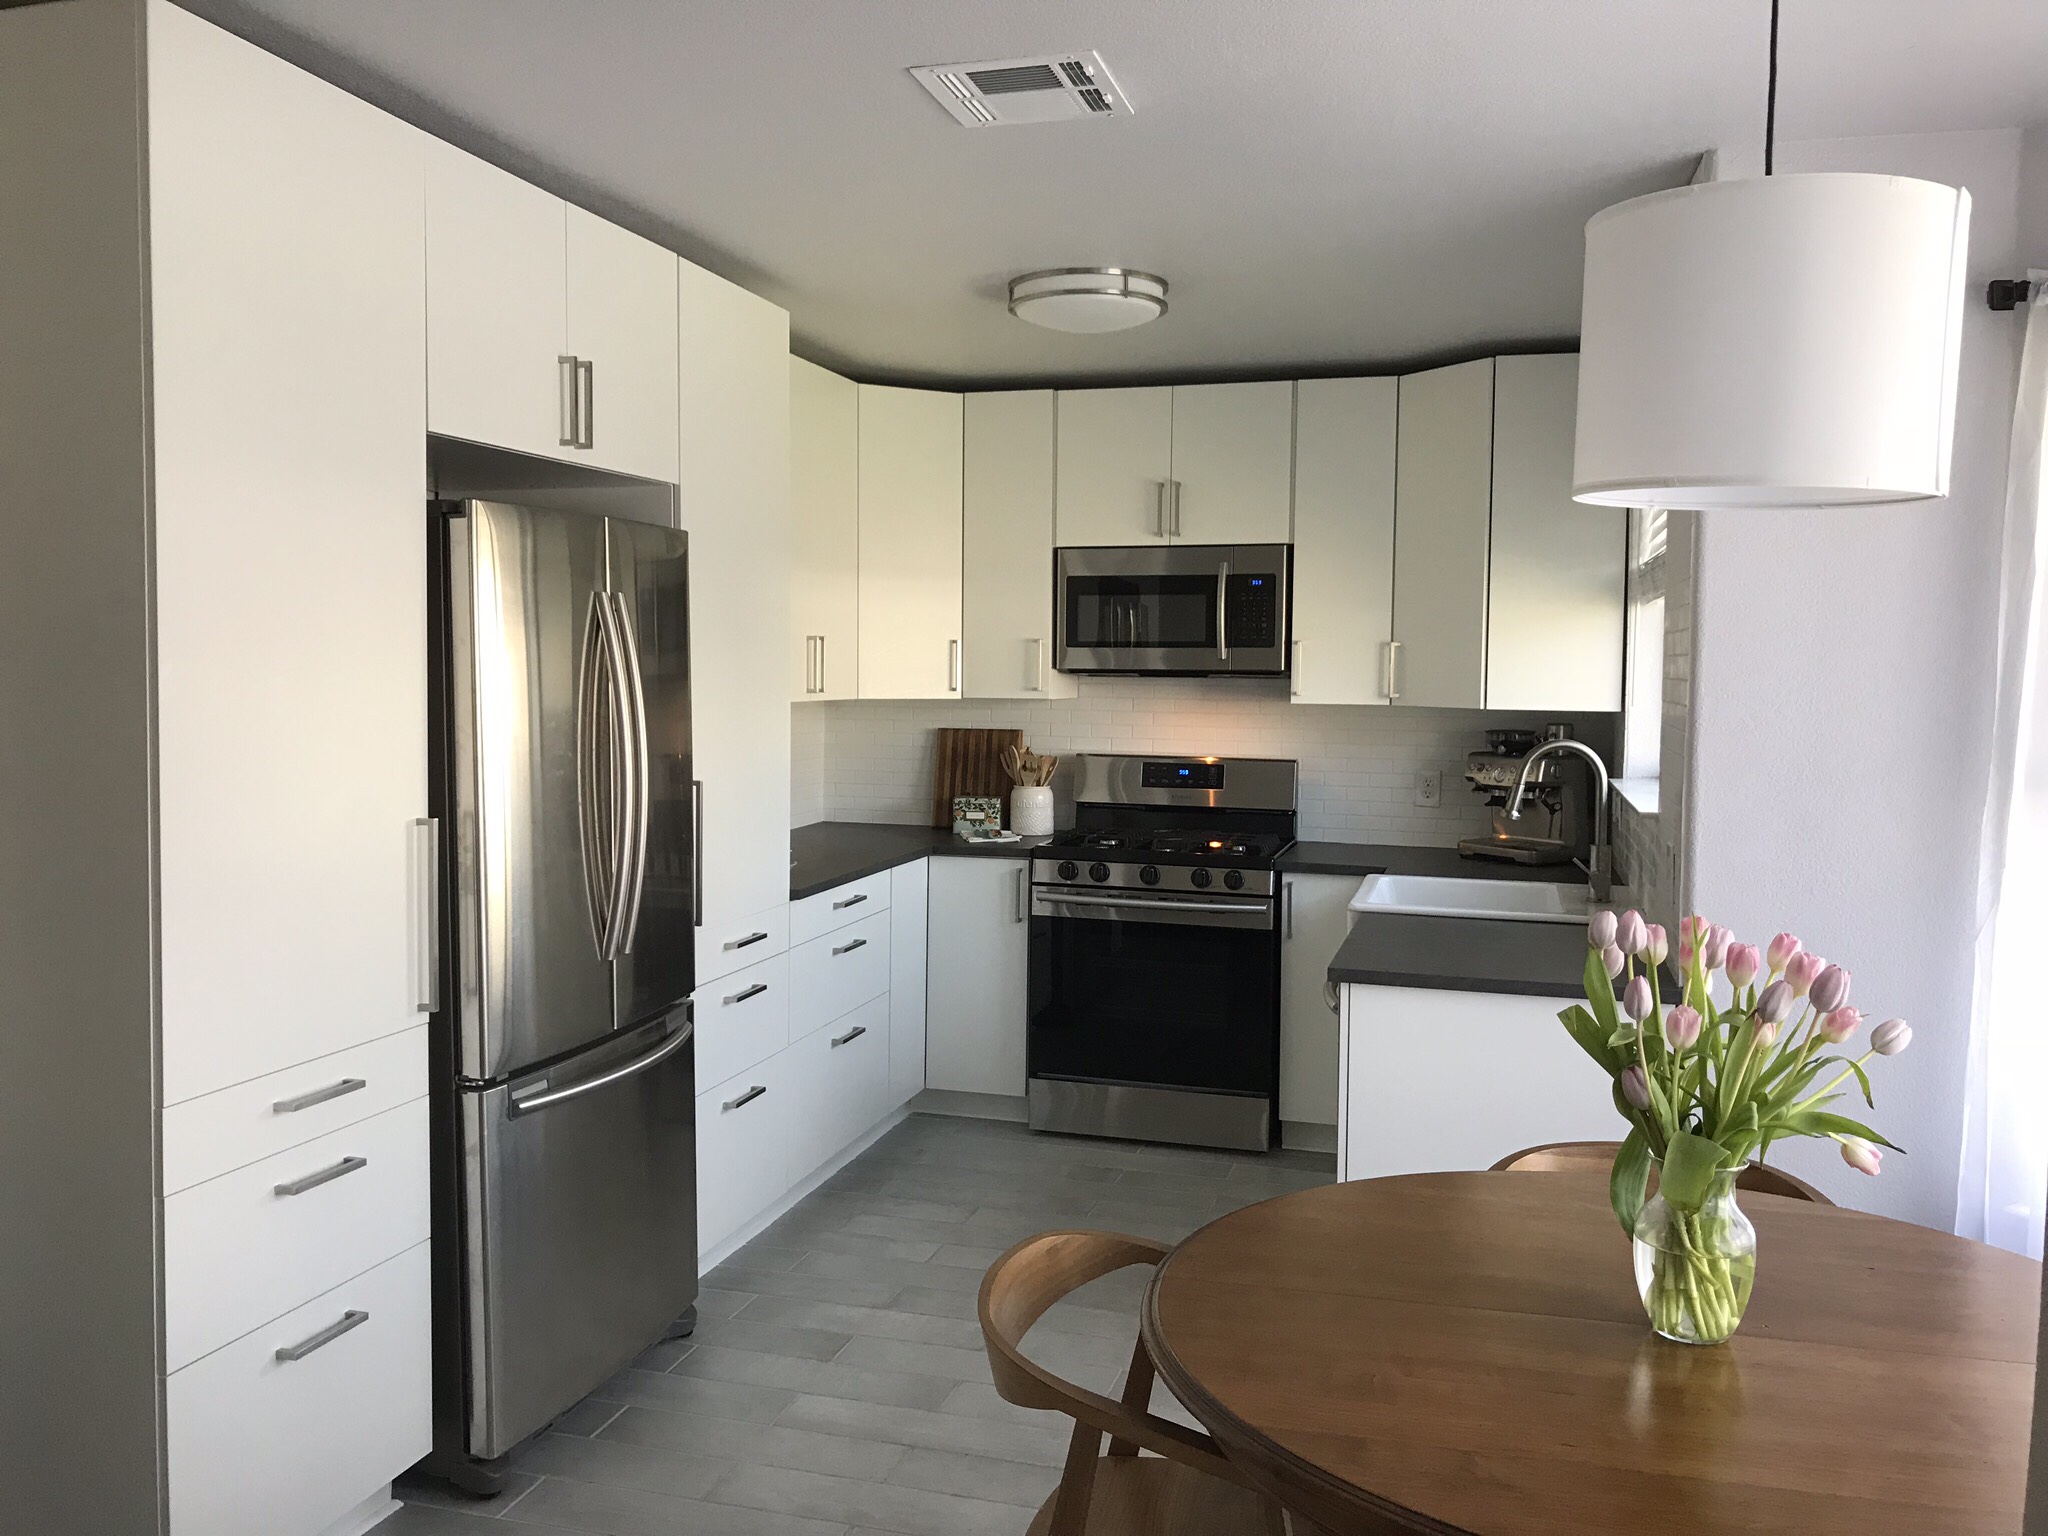
First off there was a builder grade pantry that they tried to make architecturally interesting by setting it at an angle and making the already tight kitchen feel even tighter. I knew replacing that framed out pantry with pantry cabinets would make the entire kitchen look larger and allow us to surround the fridge, so a few swings of a sledge hammer later – we were on our way.
My husband Josh is a master at SketchUp so that allowed us to really mess around with the cabinet layout and figure out what would work best in that space while not moving any plumbing or electric around to avoid having to pull permits. SketchUp also let us realize that we would absolutely need a cabinet depth fridge, any regular fridge would stick out so far into the tiny kitchen that you’d have to step around it. No bueno. SketchUp also helped us decide to not do open shelving to the right of the window and I think that decision makes the kitchen look bigger. I mean look at that render! It looks like a picture! He’s amazing, y’all.
Once we had a layout finalized, Josh got to work. I did not join him. I had a 3 month old baby that I stayed home with but I got text updates as Josh spent his nights and weekends 45 minutes away from us, getting our new home ready.
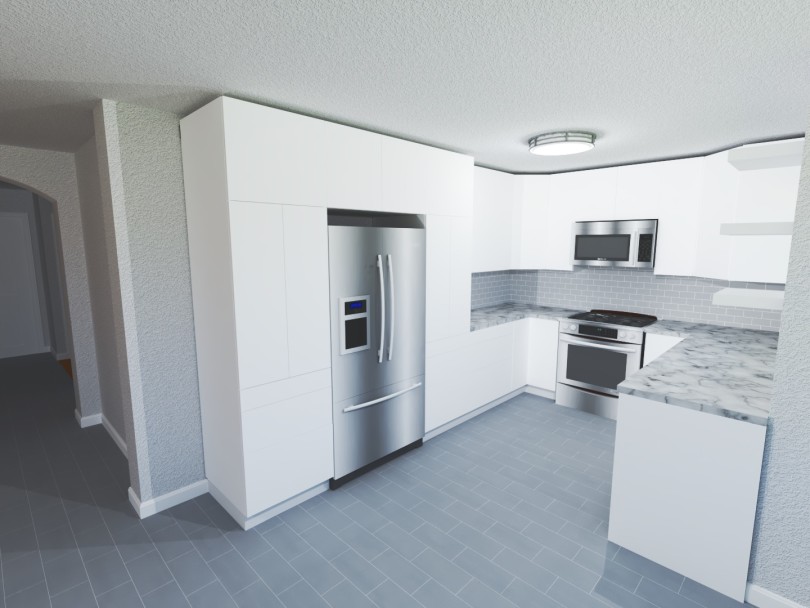
And I don’t mind telling y’all, he did an AMAZING job. This kitchen was a labor of love and I now enjoy being in it more than I can say. Thank you to my wonderful husband for my wonderful kitchen.
When I’ve read blog posts about remodeling, they never really have their prices laid out and specified so I want to do that here. Now, there are probably tools that were bought for this project that I’m not accounting for here, but for the most part – these are the numbers.
Links to all the finishes we used:
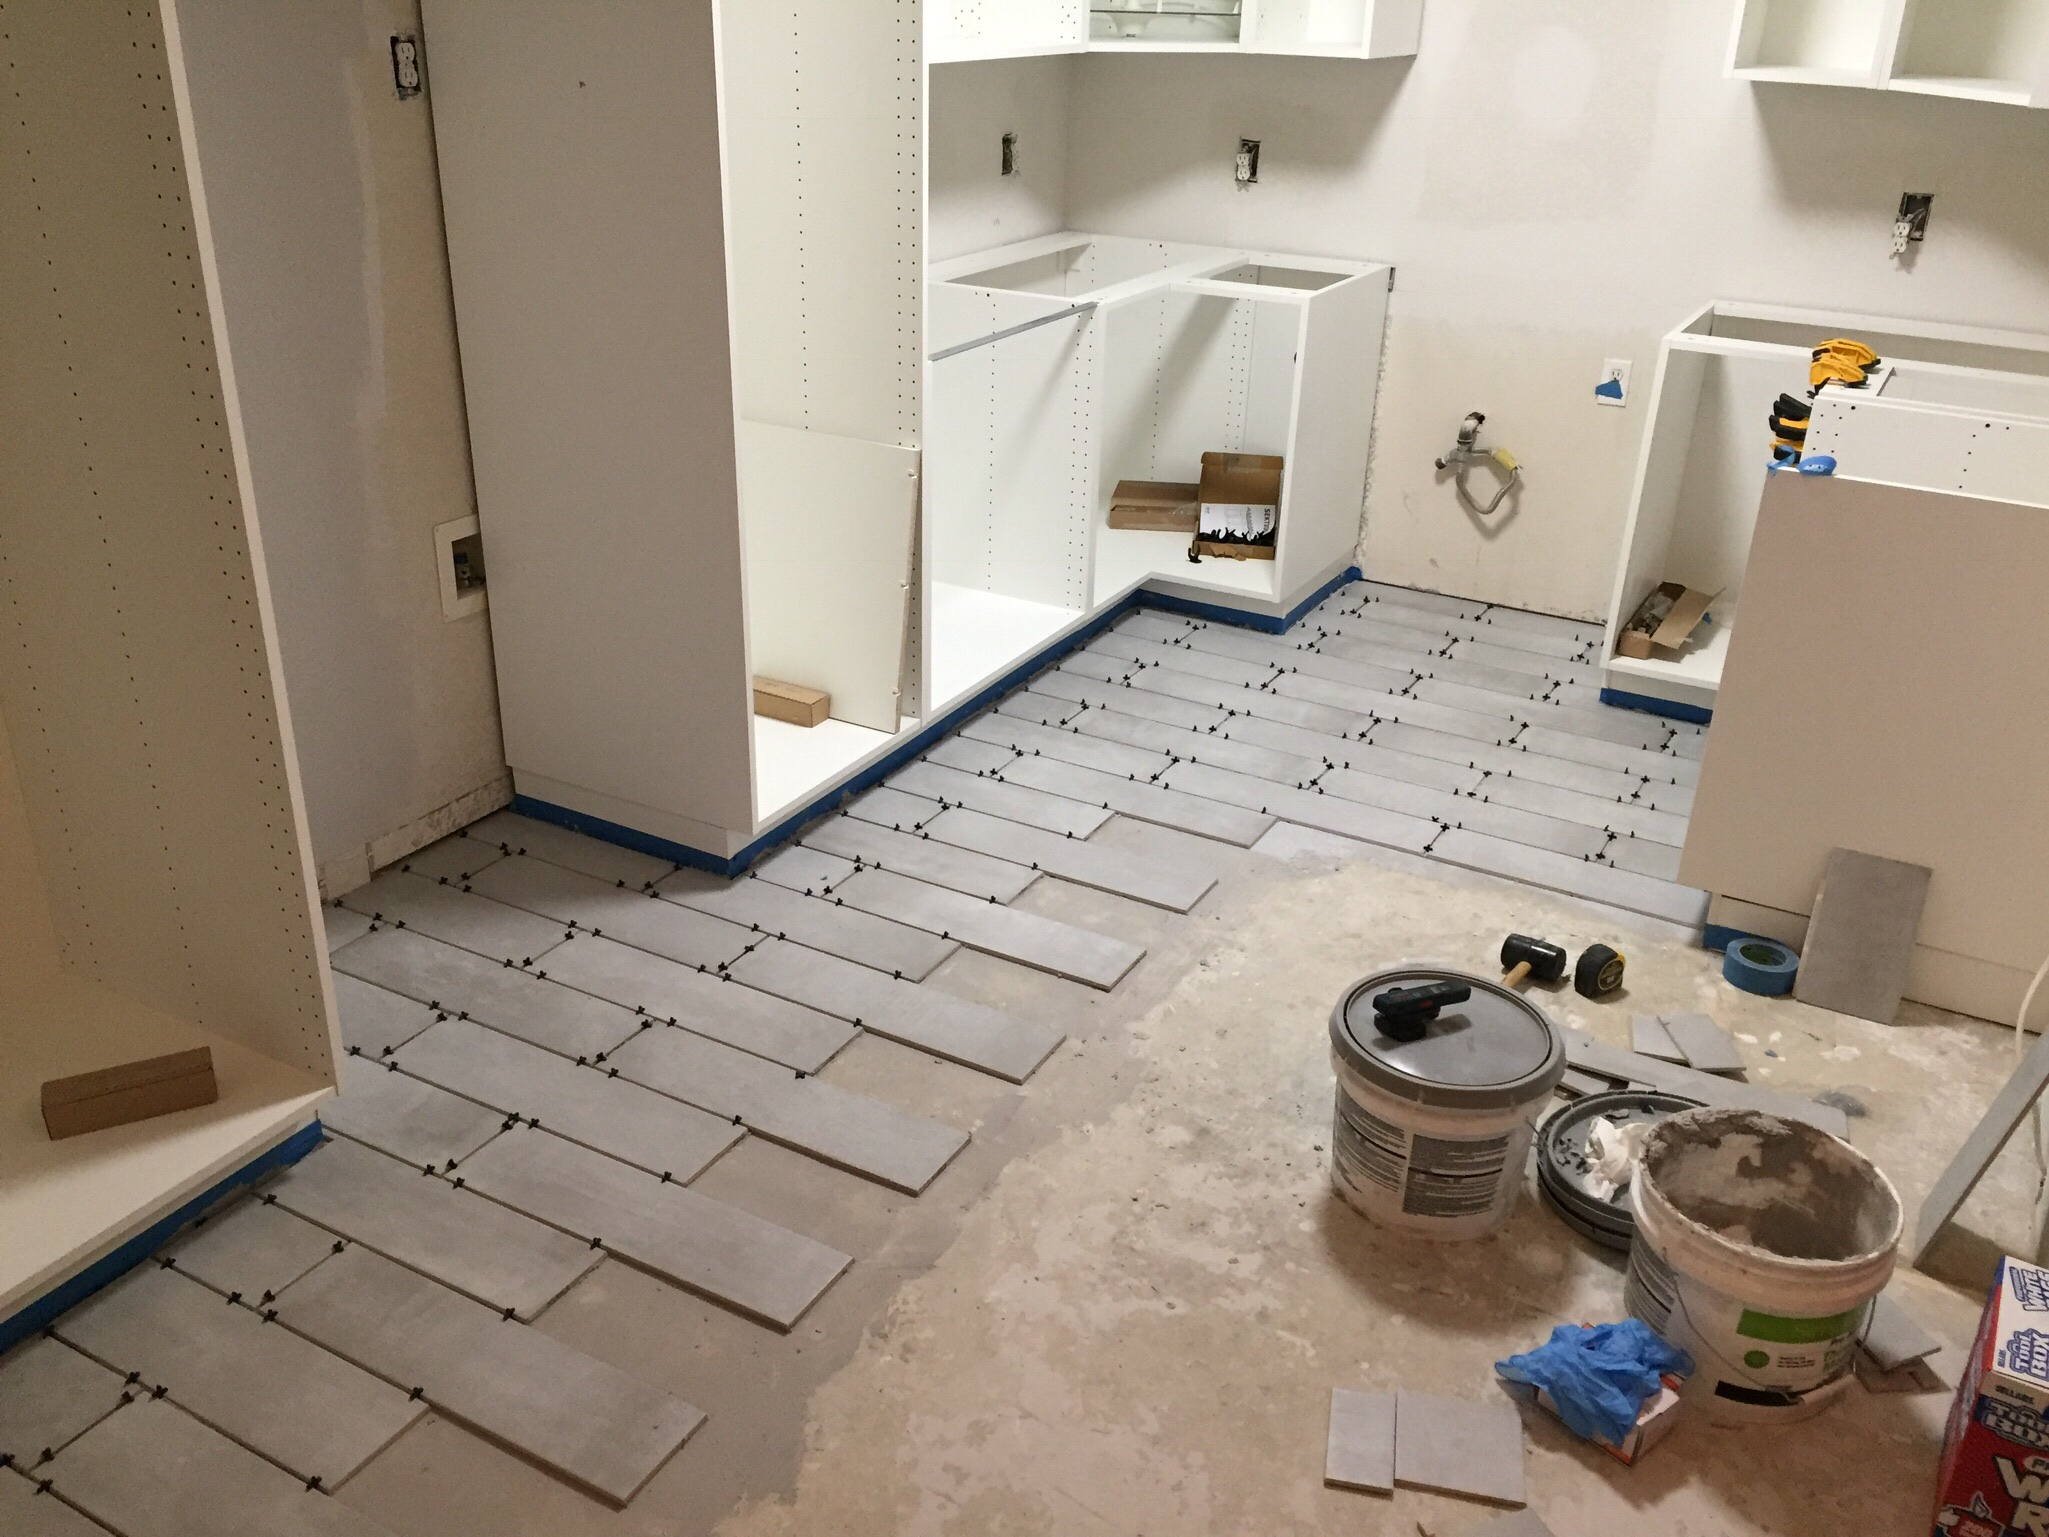
Discontinued Tile Floors: $50
We found these on clearance at Lowes for 38 cents per square foot. We bought all they had and got three other Lowe’s to price match. This tile runs from the front door into the eat-in-kitchen/dining space and into the kitchen itself. I added the entire cost for the tile into the kitchen budget even though it goes through other rooms. What was there before is the cheapest laminate you can buy that specifically says not to use it in kitchens and bathrooms. It was in both. Not the best scenario.
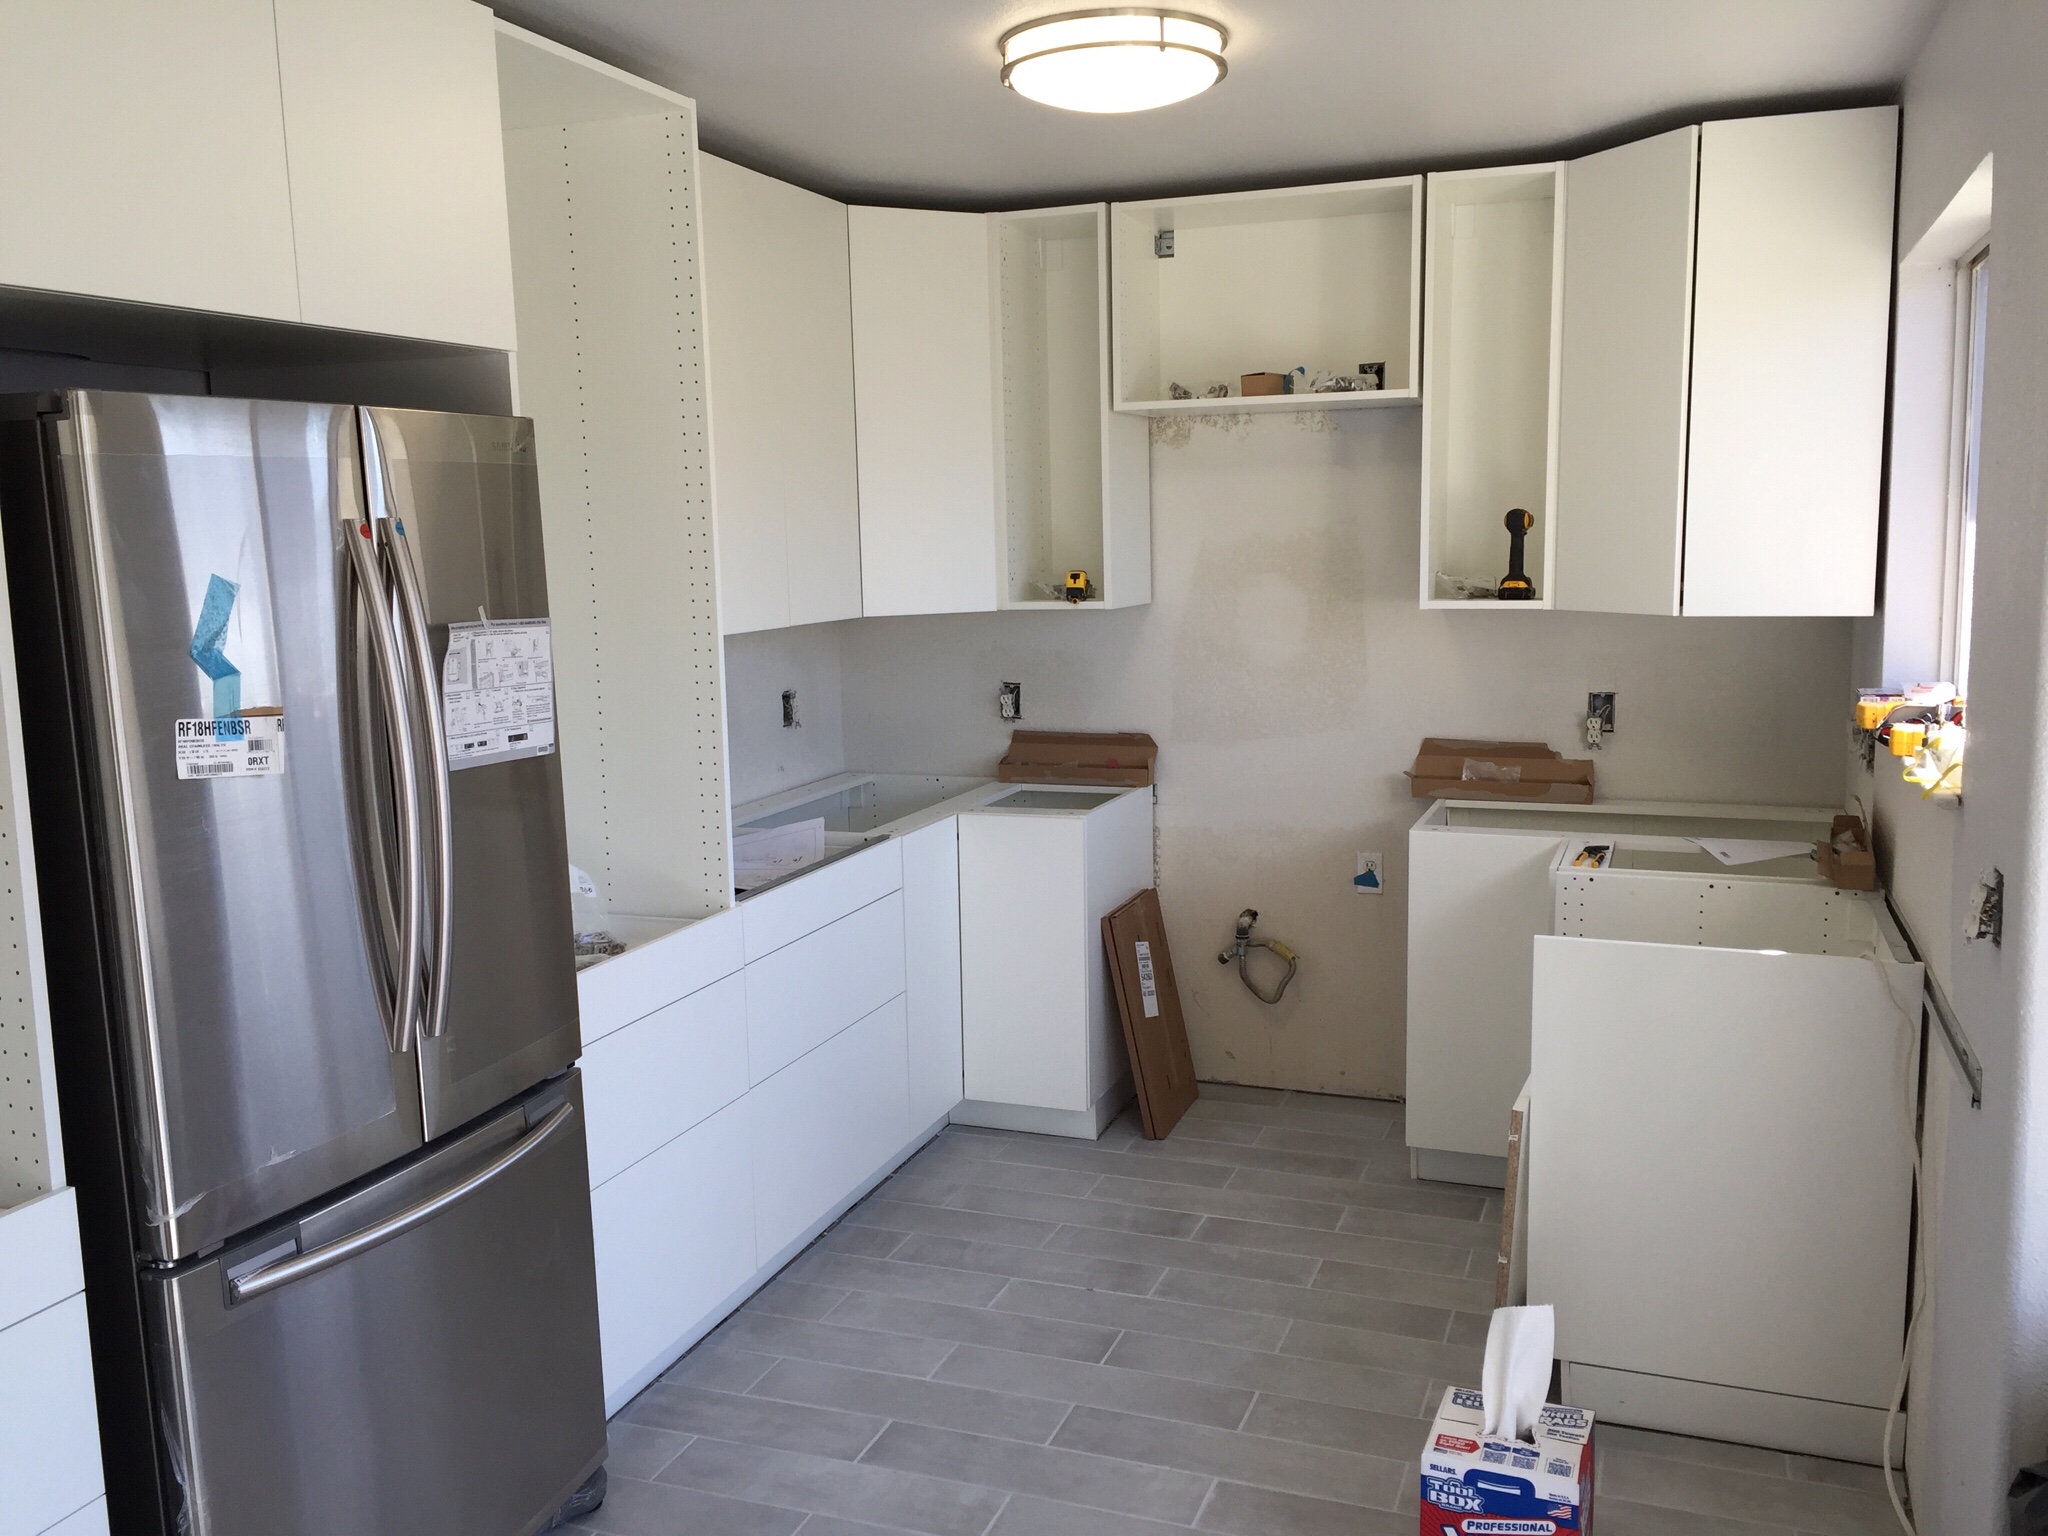
Ikea Cabinets & Haggeby Doors: $2224
These little doors catch a lot of crap online. I still don’t know why other than people just shy away from the cheapest option. These are the cheapest cabinet doors IKEA sells by a mile and 6 months in so far, they’re holding up just fine. More importantly, as a rental, it will be easy on the wallet to replace damaged doors. I even added them into the laundry room above the machines and play room for storage so I’m on the bandwagon. Also, this price could have been lower if we didn’t get all drawers (and soft close hinges and drawer hardware) but man, it’s worth it! The most efficient lower cabinet storage I’ve ever had and no slammed baby fingers.
Cabinet Pulls: $100
I went back and forth on these guys between stainless and black. I still randomly declare I’m going to order the black and replace them all. I might, but I love the shape of them. All are the same sixe (6.25″ except for our large pantry doors, I ordered 12-3/5″ pulls for those.)
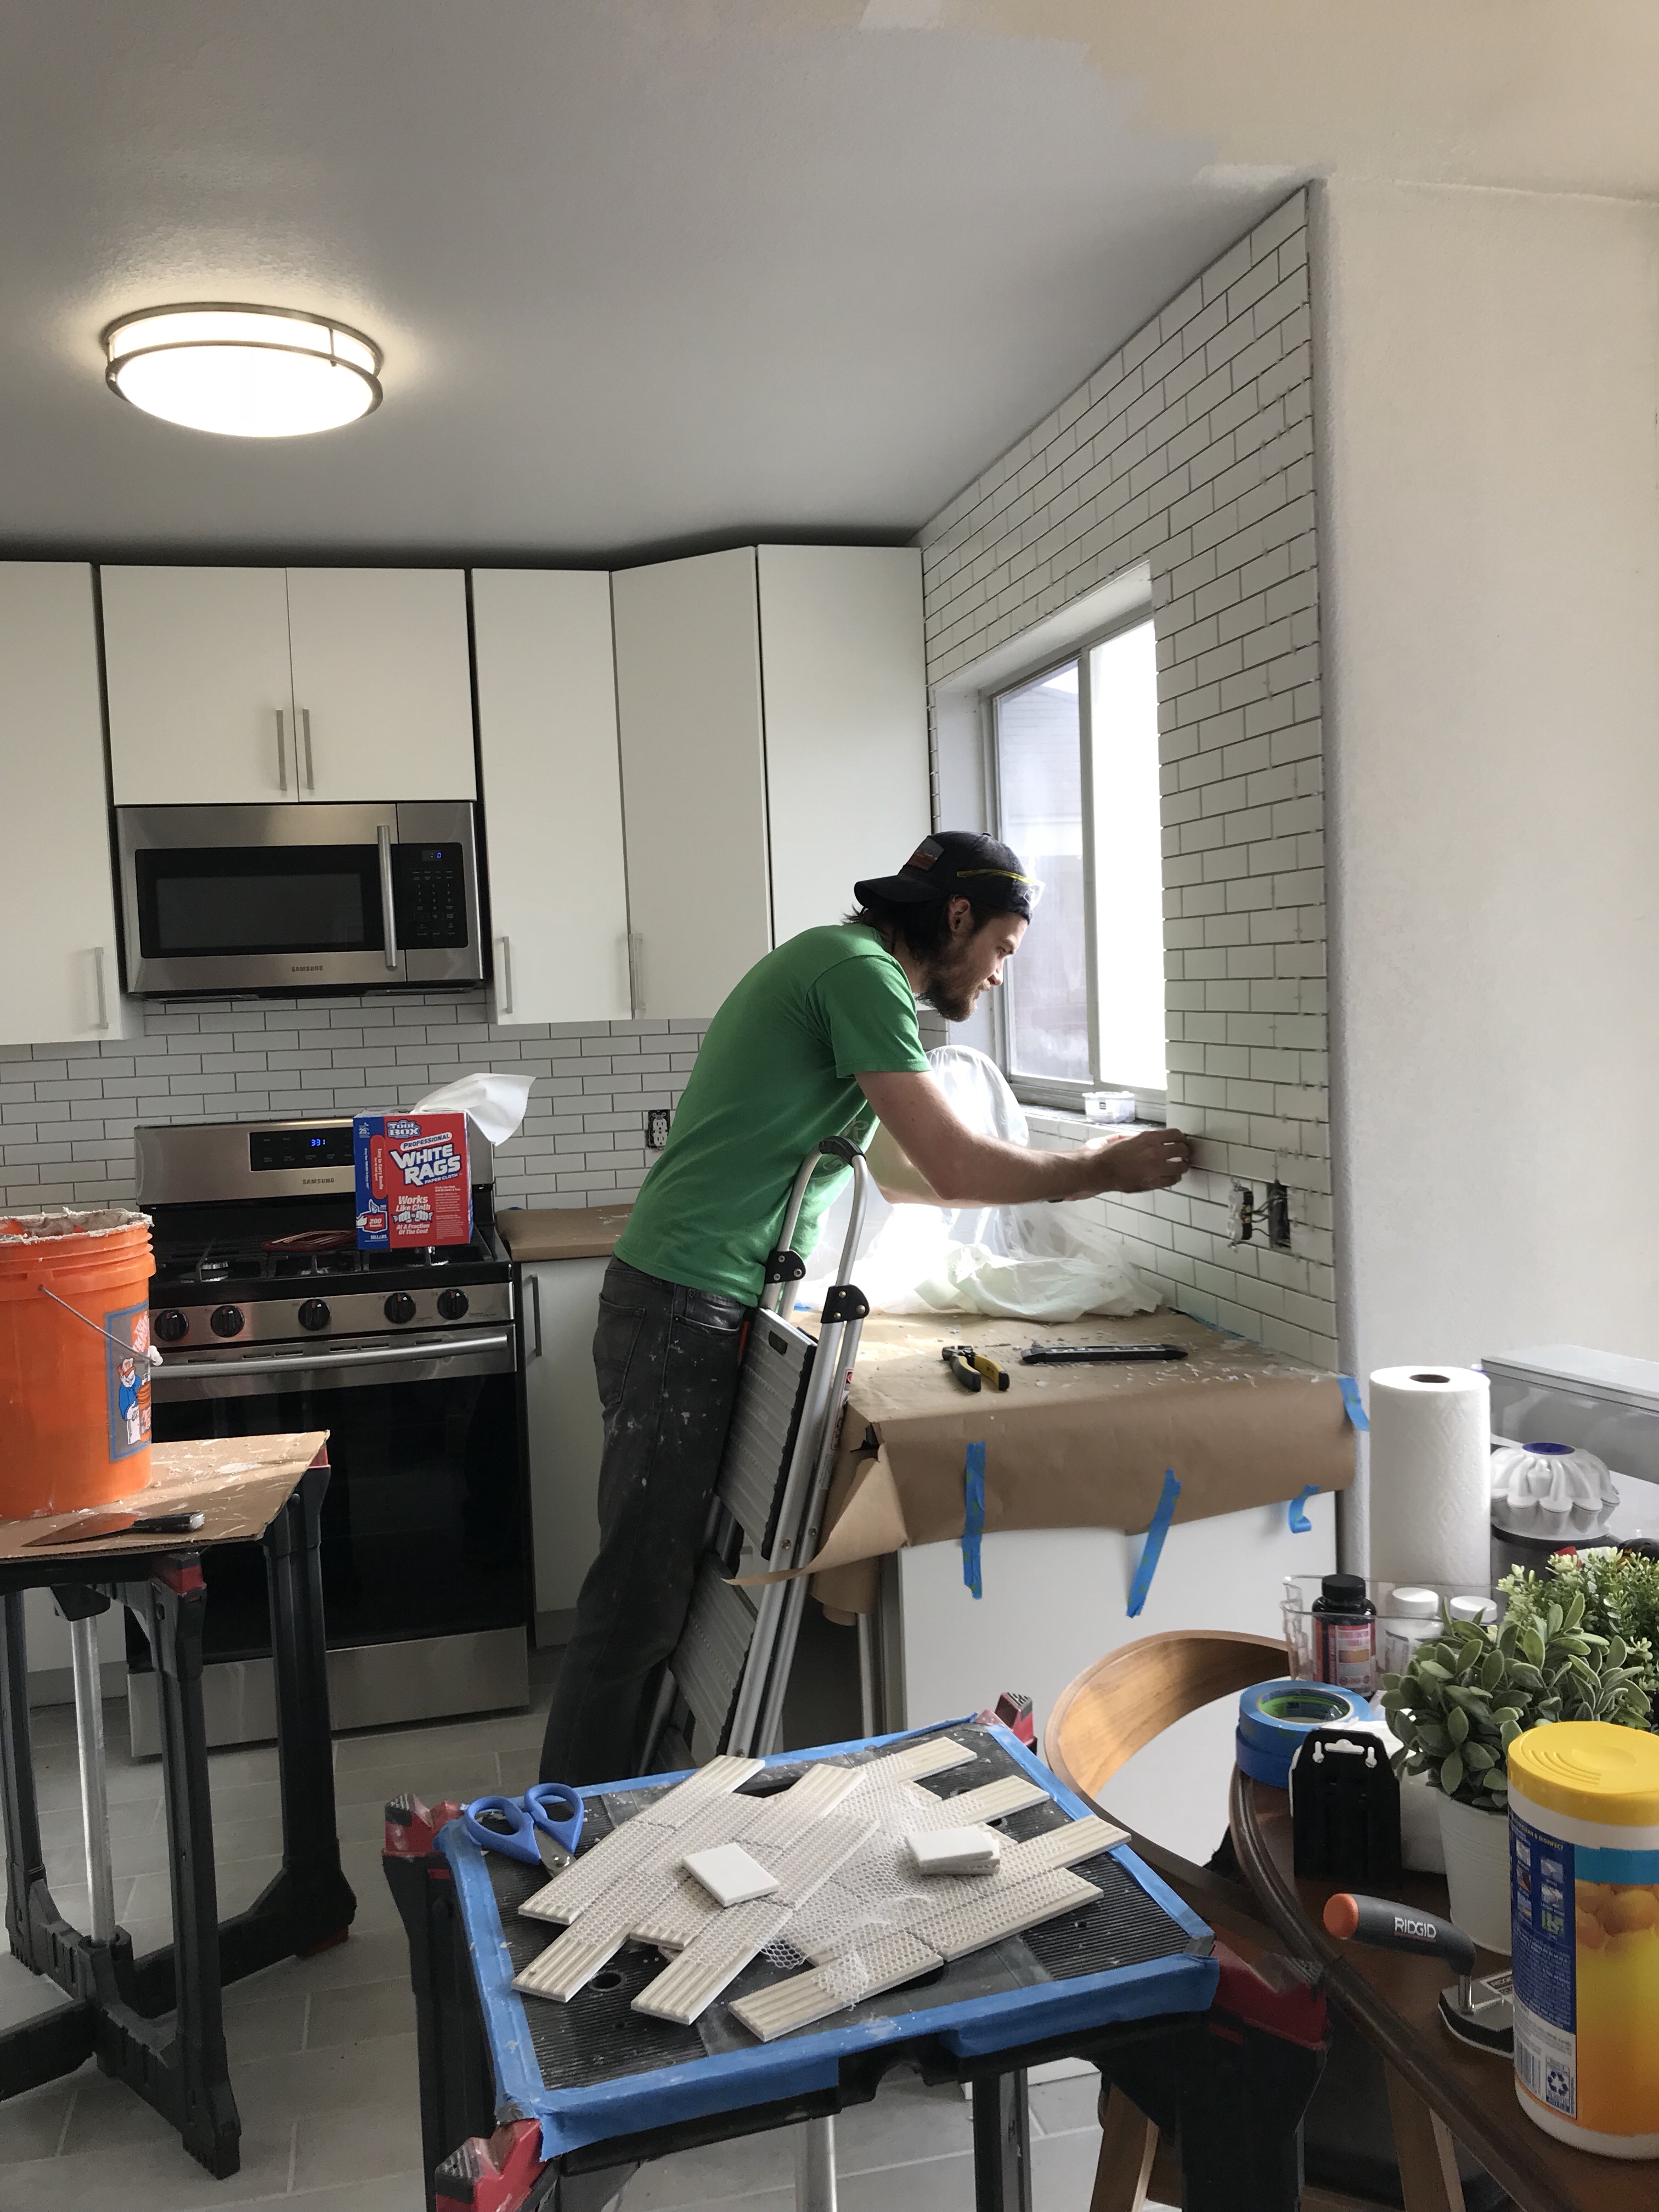
Backsplash: $200
This tile is priced at just under $3/sf. The rest of the cost was thinset and grout.
We added standard size white subway tiles to both bathrooms so these slightly smaller tiles tie into the rest of the house while making the kitchen feel bigger while carrying the tile to the ceiling on the small wall where we didn’t add uppers, and around the window really adds a modern vibe.
Sink: $186
IKEA farm sink, by far the cheapest farm sink you can buy. Now that I’ve had both, I have to say that stainless sinks are SOOO much easier to keep clean, but this one is a beauty. This link goes to their new style which doesn’t have the faucet mount incorporated. I am glad we bought it when we did because I like the faucet being incorporated since we have laminate countertops. Speaking of which…
Countertops: $178
Ekbacken: The faux concrete look. Real concrete countertops take a lot of sealing and upkeep. With this being a rental eventually we either needed quartz (too expensive – our quote was $2200) or laminate. I WAS-THIS-CLOSE to going with the faux butcherblock from IKEA, but am happy with this look. For now. I threaten to change these as often as I threaten to change the cabinet pulls.
Faucet: $60
Amazon is a Mecca for inexpensive finishes like this.
Light: $70
We had awful florescent lights in this kitchen. I obviously want all LED’s everywhere and I liked bringing something round into this very straight lined space.
Samsung Fridge: $2325 for the entire suite
I am not brand loyal here. Lowe’s was having a sale and this was the cheapest stainless steel suite. Getting the counter depth sets you back more than you’d expect and is such a tight squeeze inside the fridge. If your kitchen can handle a full depth fridge, stick with that. Or add an old backup fridge in the garage. Like we did.
Stove: See total cost above
Really regretting having the knobs in the front with a tall baby/toddler who is learning to love grabbing things.
Dishwasher: See total cost above
Makes a weird noise when it first starts running but whatever.
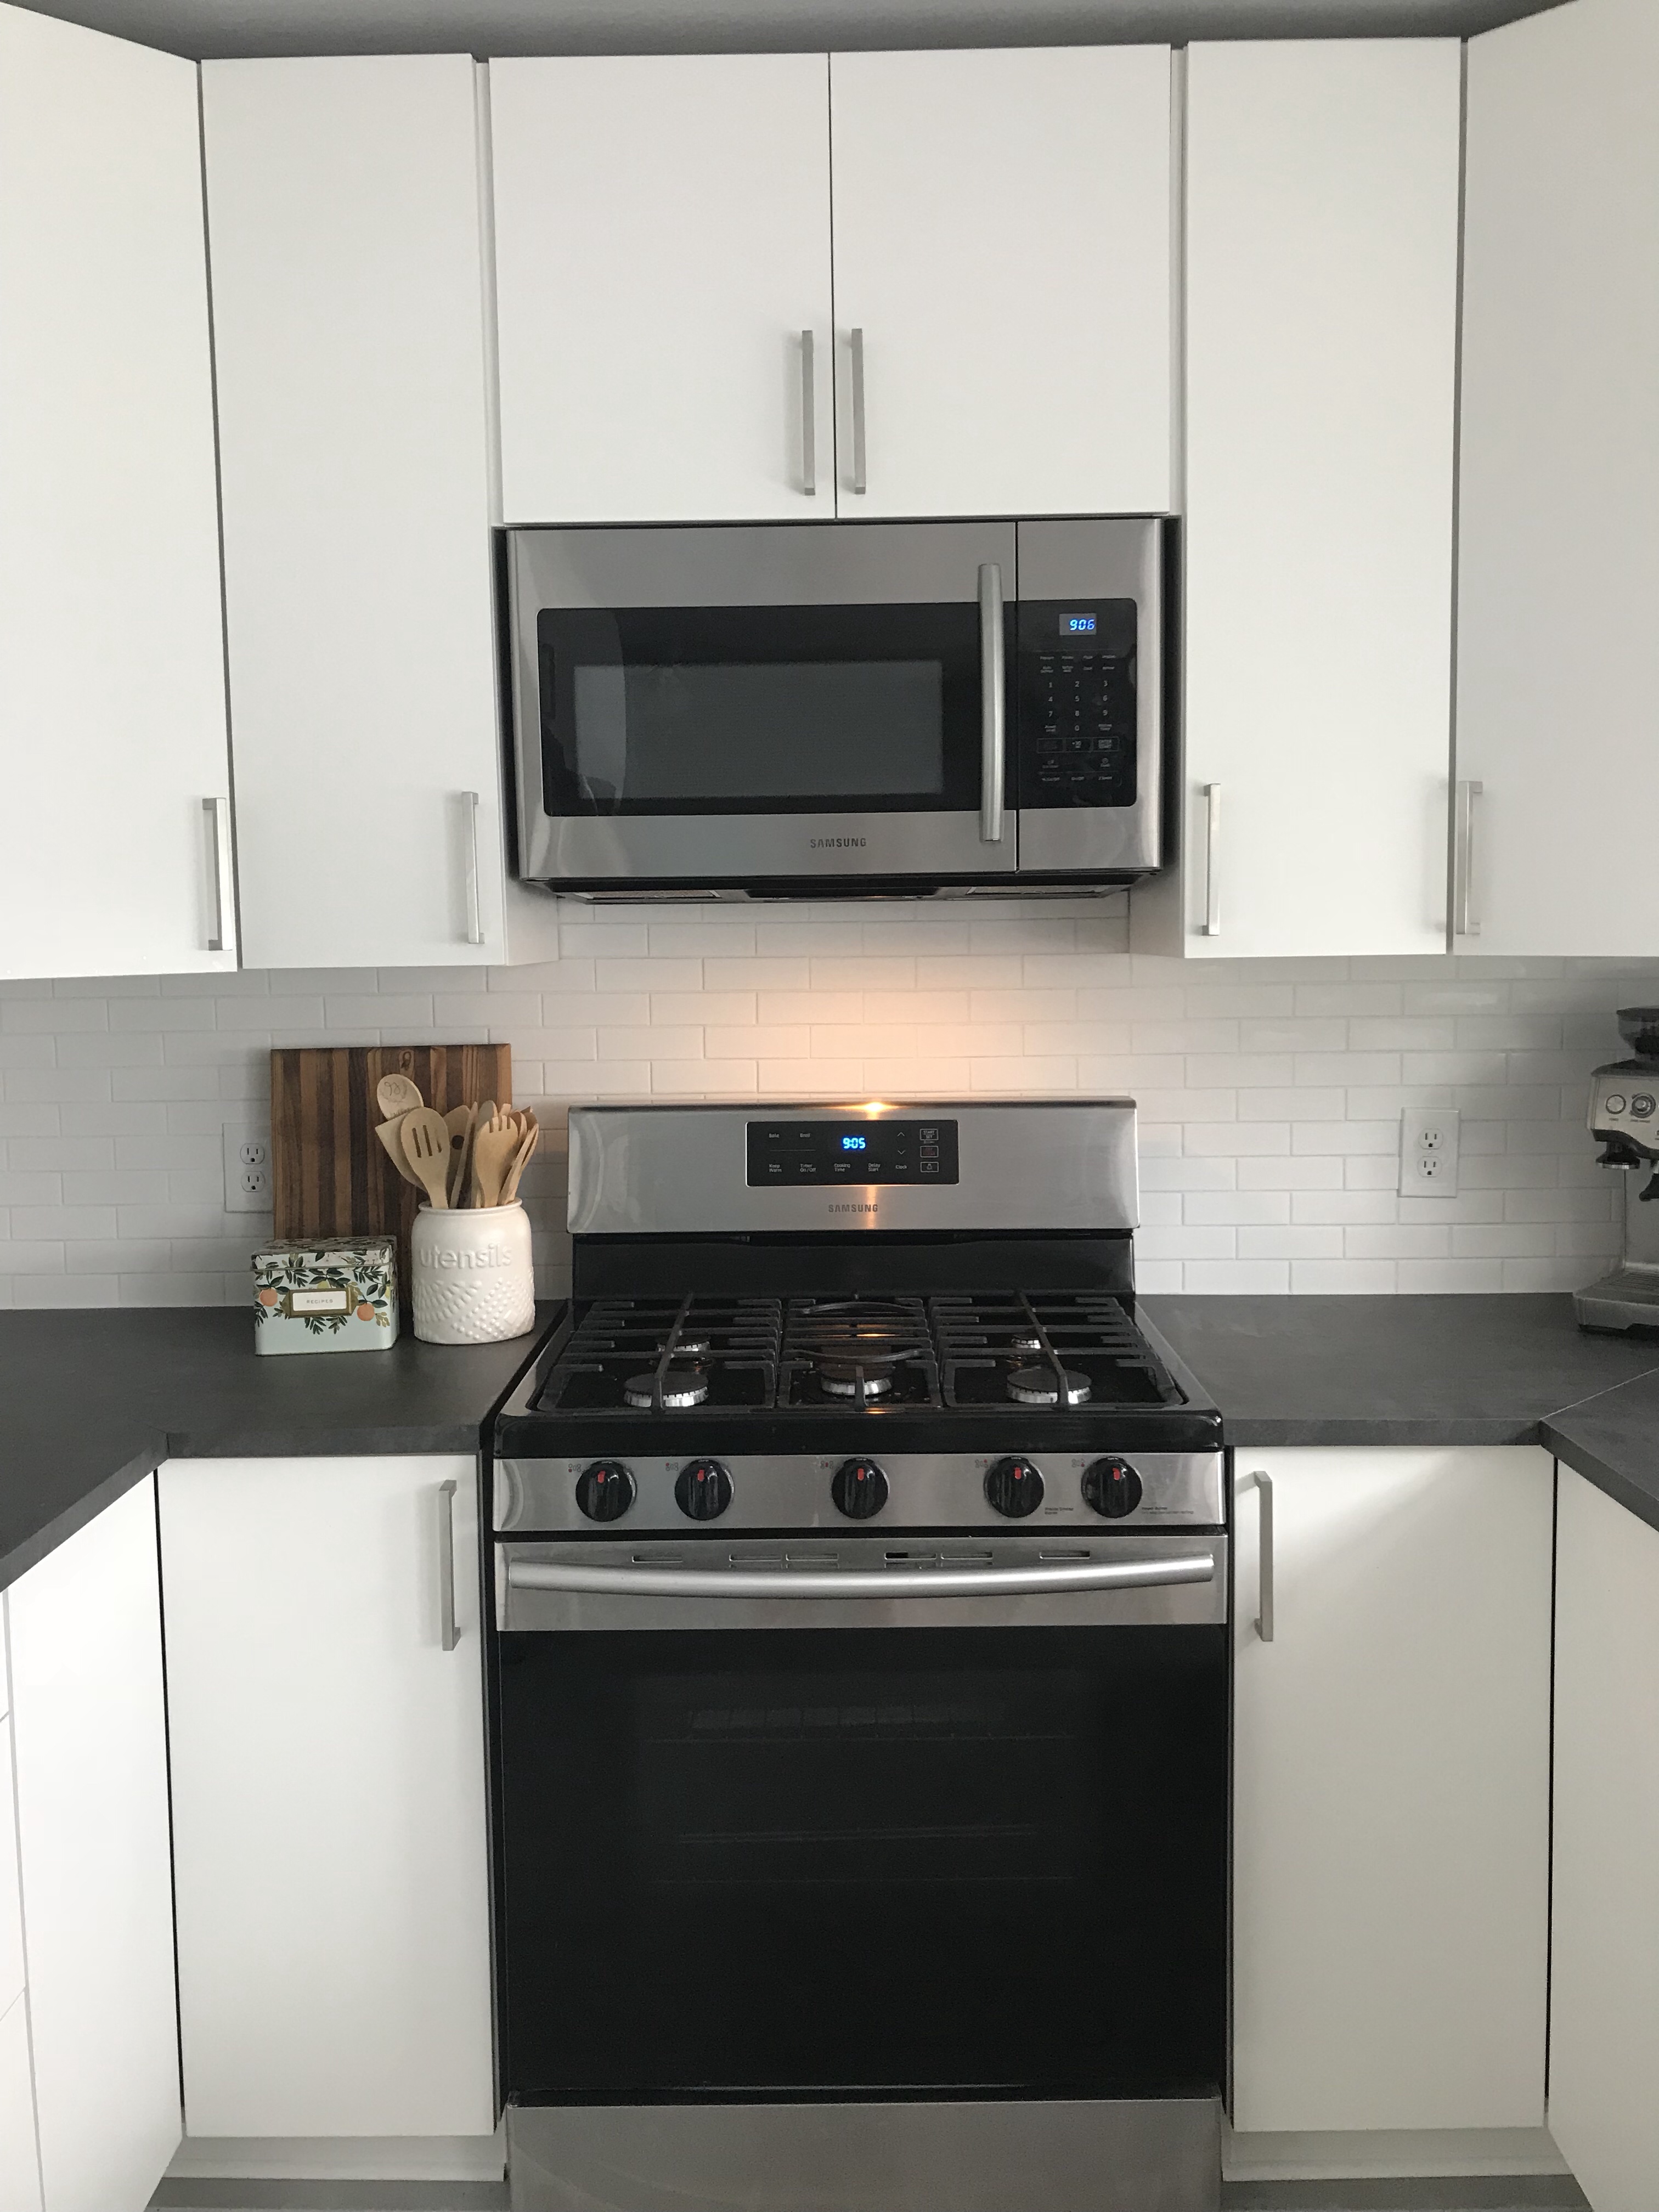
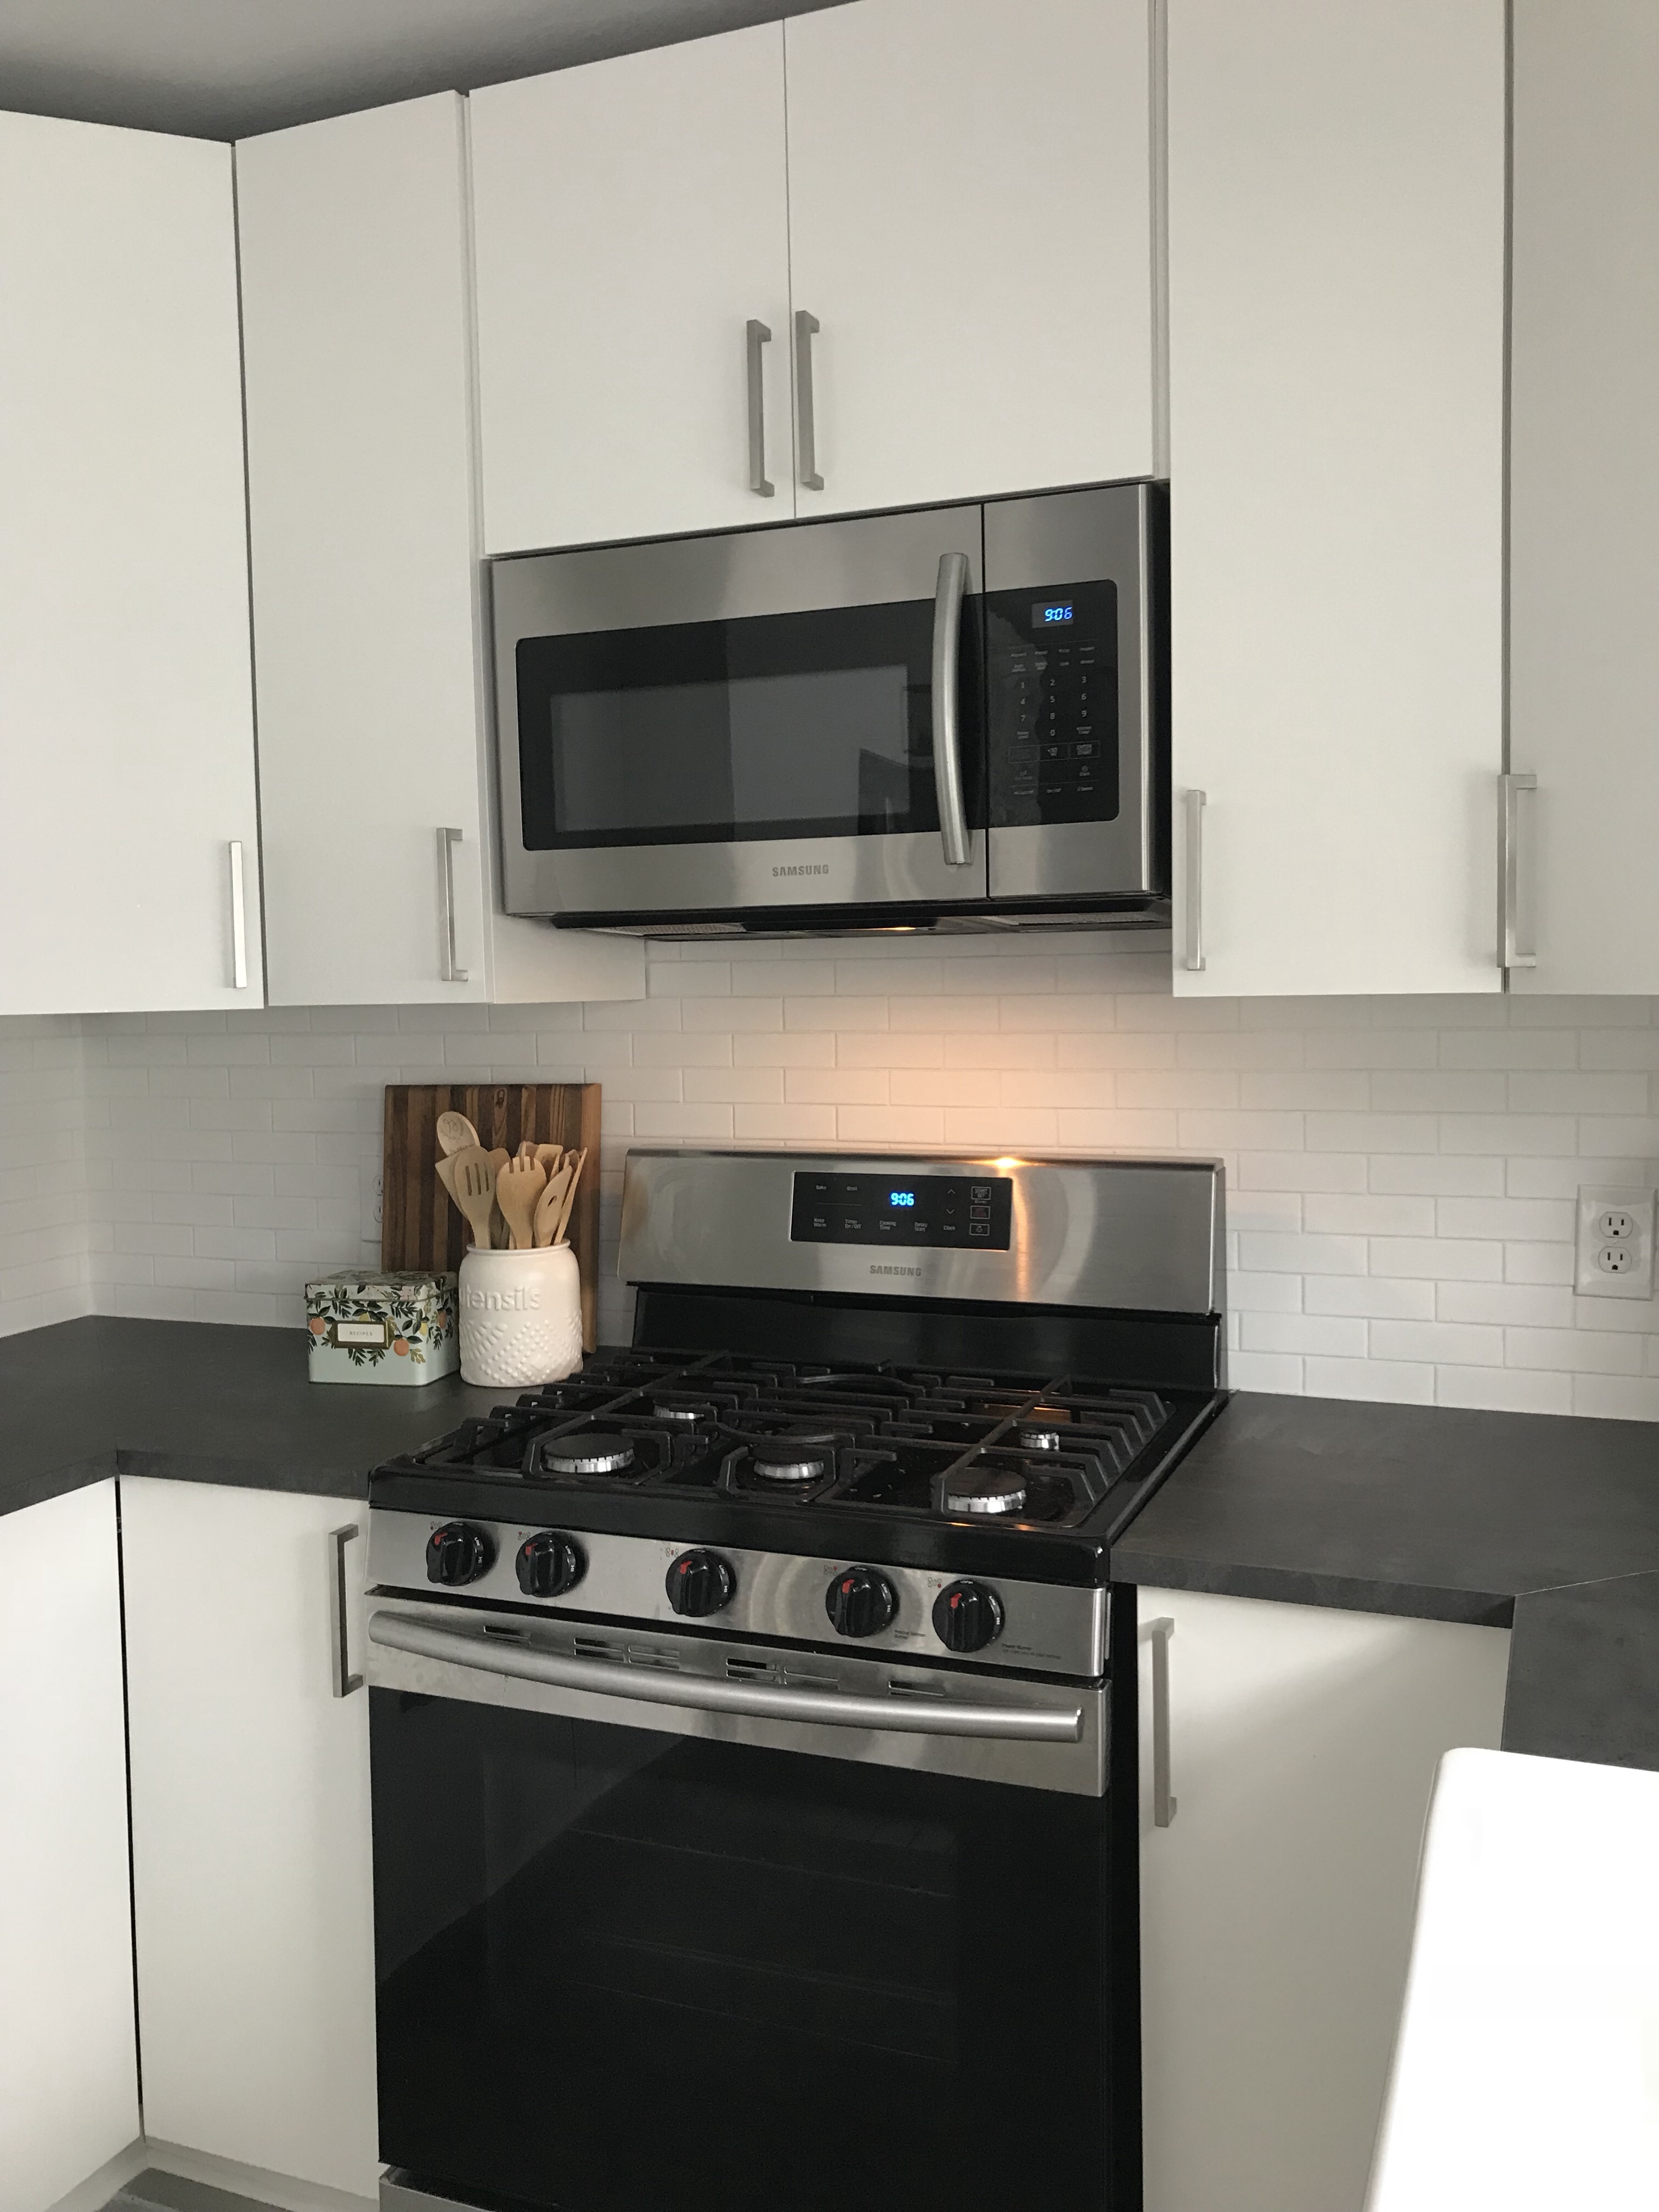
Venting Microwave: See total cost above
We mounted this pretty high up. There’s no chance of kids using it any time soon, but I love having vertical space to work with on my stove top. Also, we vented this directly out the back so I still have the entire cabinet above the microwave for storage.
Blinds over Sink: $35
Nothing special, blocks the sun since the window looks full west. No cords to get tangled up in. Impulse buy when I was grocery shopping one day.
New Marble Window Sill: $28
The old window sill was made of wood but the position of the window to the sink just begs you to place something wet from your hand onto the window sill. So, a natural stone won’t get water damage or mold and it looks so pretty.
Paint – BEHR Premium Plus Interior Eggshell in “Subtle Touch”: $30
I’m adding the entire cost of a gallon of paint even though we used much less than that in this room. This is the color that we used throughout the house and you can see it on the ceiling.
Total Cost: $5486
I’m not including the cost of trash disposal in the reno budget because that’s going to vary wildly but want to include info here about what we did.
Trash: Bagster Bag $180
$30 for the bag and $150 for the pickup which was fun to show a baby the big crane on the truck.
When you buy new appliances they come with free removal and disposal of old appliances. Everything that can be donated to habitat restore should be (like your old sink) and the rest gets bagstered.
And now, for everyone’s favorite part: progress photos and more before and afters.
This last side by side photo might be my favorite part of the kitchen. Normally when a dishwasher is at the end of a cabinet row, they just use a filler panel, but I knew if we could get a SUPER skinny cabinet in there then it could store cutting boards and wire racks beautifully. Obviously IKEA doesn’t sell super skinny cabinets but Josh figured out how to cut down a 12″ cabinet and shelf so I could have my storage. But we both wanted it to look like a filler panel so we used this hidden drawer pull that IKEA sells and you often see used on flat front cabinet doors. You have to know it’s there to know it’s there and it’s just the cutest little thing. There are a bunch of tutorials on YouTube on how to cut down IKEA cabinets and we used those to get this little cutie in place.
Thanks for following along and I hope this motivates you to DIY your own space! With Youtube tutorials and determination, you’re capable of so much more than you think you are. Until next time…
Not that anyone reads this blog like a novel…but I haven’t posted in over a year and I think I’d like to start again. It feels strange to just start back up without filling in the gap of time with some details. So much has happened. I’m a mom now. At long last. I think i’m contractually obligated to at least write up my birth story or they’ll hold my first Mother’s day card ransom. It was a difficult birth and something I think I’m still processing so many months later. Personal stories to come, hopefully followed by some home improvement posts because we have remodeled an entire house that we moved into when Jett was 3 months old. In the meantime, here’s my son, Jett David Owen Gillespie who was born on July 20th, 2017 and has been breaking hearts ever since.
There’s this one record store in the heart of SoCo. If you don’t know it’s there you might miss it, you have to go behind the building it’s in and enter from the alley, but if you’re the record collecting kind (as Josh and I are) then this is a place you want to go. It’s called Friends of Sound and if you can handle the little to no AC – you’ll be able to find some rad old albums. I hope you go check it out!
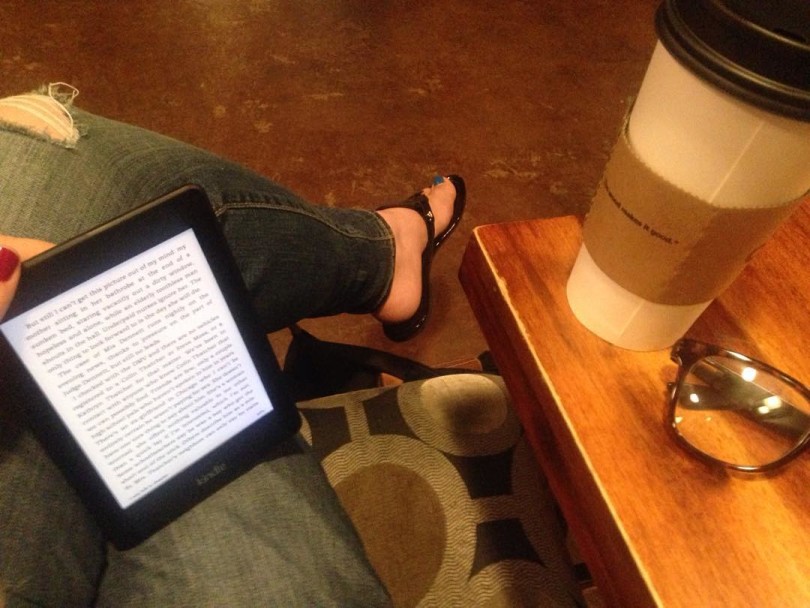
There are no words to properly describe how delicious the Mocha-moon (cafe mocha made with their secret moon milk) is, there’s a ton of laptop stands with comfy chairs and of course free wifi. Not to mention, their coffee is wood fired – which might be the most Austin thing I’ve ever heard. This gem doesn’t end up on many of the “things to do in Austin” lists, I think just because it’s far south on 1st street, but trust me – it’s worth checking out. So if you’re in the area…
Since I read more than I do pretty much anything else, I like to share snippets of the books I’m reading with you all. Just little phrases that stick out to me.
You are easy to overlook. Slim and pale and so quiet. But now that I’ve studied your soft grey eyes and traced the fine bones of your face, now that I’ve kissed your pale pink mouth, I don’t want to look anywhere else. My gaze is continually drawn back to you. –The Bird and the Sword
This recipe is legitimately one of the easiest things to throw together.
Ingredients:
-Riced Cauliflower
-Frozen Pineapple
-Frozen Peas and Carrots
-Eggs
-EVOO
-Sesame oil
-Salt and Pepper
-Curry Powder
-Soy and or Teriyaki sauce
Directions:
Throw the riced cauliflower, frozen pineapple, and frozen peas and carrots into a pan over medium/medium-high heat, with some toasted sesame oil and evoo. Stir as it cooks. Add salt & pepper, soy & teriyaki sauce to taste. When the cauliflower is almost done, move everything to the side and crack two eggs into the pan and scramble. Finally, add some curry powder at the end, mix through and serve.
Since I read more than I do pretty much anything else, I like to share snippets of the books I’m reading with you all. Just little phrases that stick out to me.
Anna’s eyes soften, and the stubborn tears begin to recede. The way she stands, the way she breathes, I know she wants to come closer. New knowledge fills up the air between us and neither of us wants to breathe it in. -Anna Dressed in Blood
Back before I stopped eating anything fun and delicious, Josh and I visited the new VooDoo Donuts in downtown Austin and let me tell yooooou that it was everything that people say it is. So, if you’re ever in Denver, Portland, Eugene, or Austin, go have yourself some donuts kids!
Welcome to my blog! My name is Adora. Here you'll see plenty of DIY projects, random videos, recipes, and fun little things from my life. I'm so glad you're here!
While some of my posts contain affiliate links; this blog would not be possible without the support of my husband Josh, and our beautiful baby boys, Jett & Jace!


 We knew we needed a total kitchen renovation before we could move into this 20 year old neglected builder grade house. I love to cook and while I don’t love cleaning, I do love clean – if that makes sense.
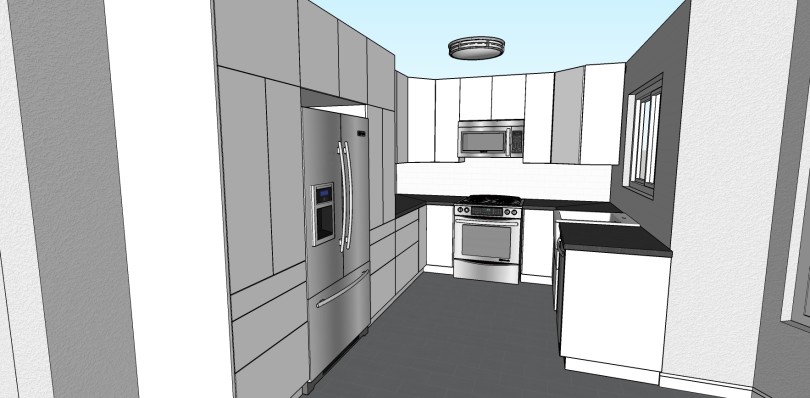
 I mean look at that render! It looks like a picture! He’s amazing, y’all.
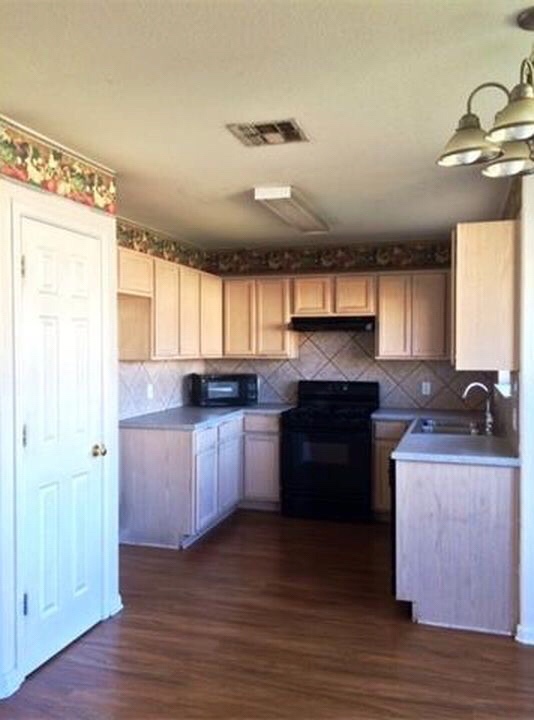


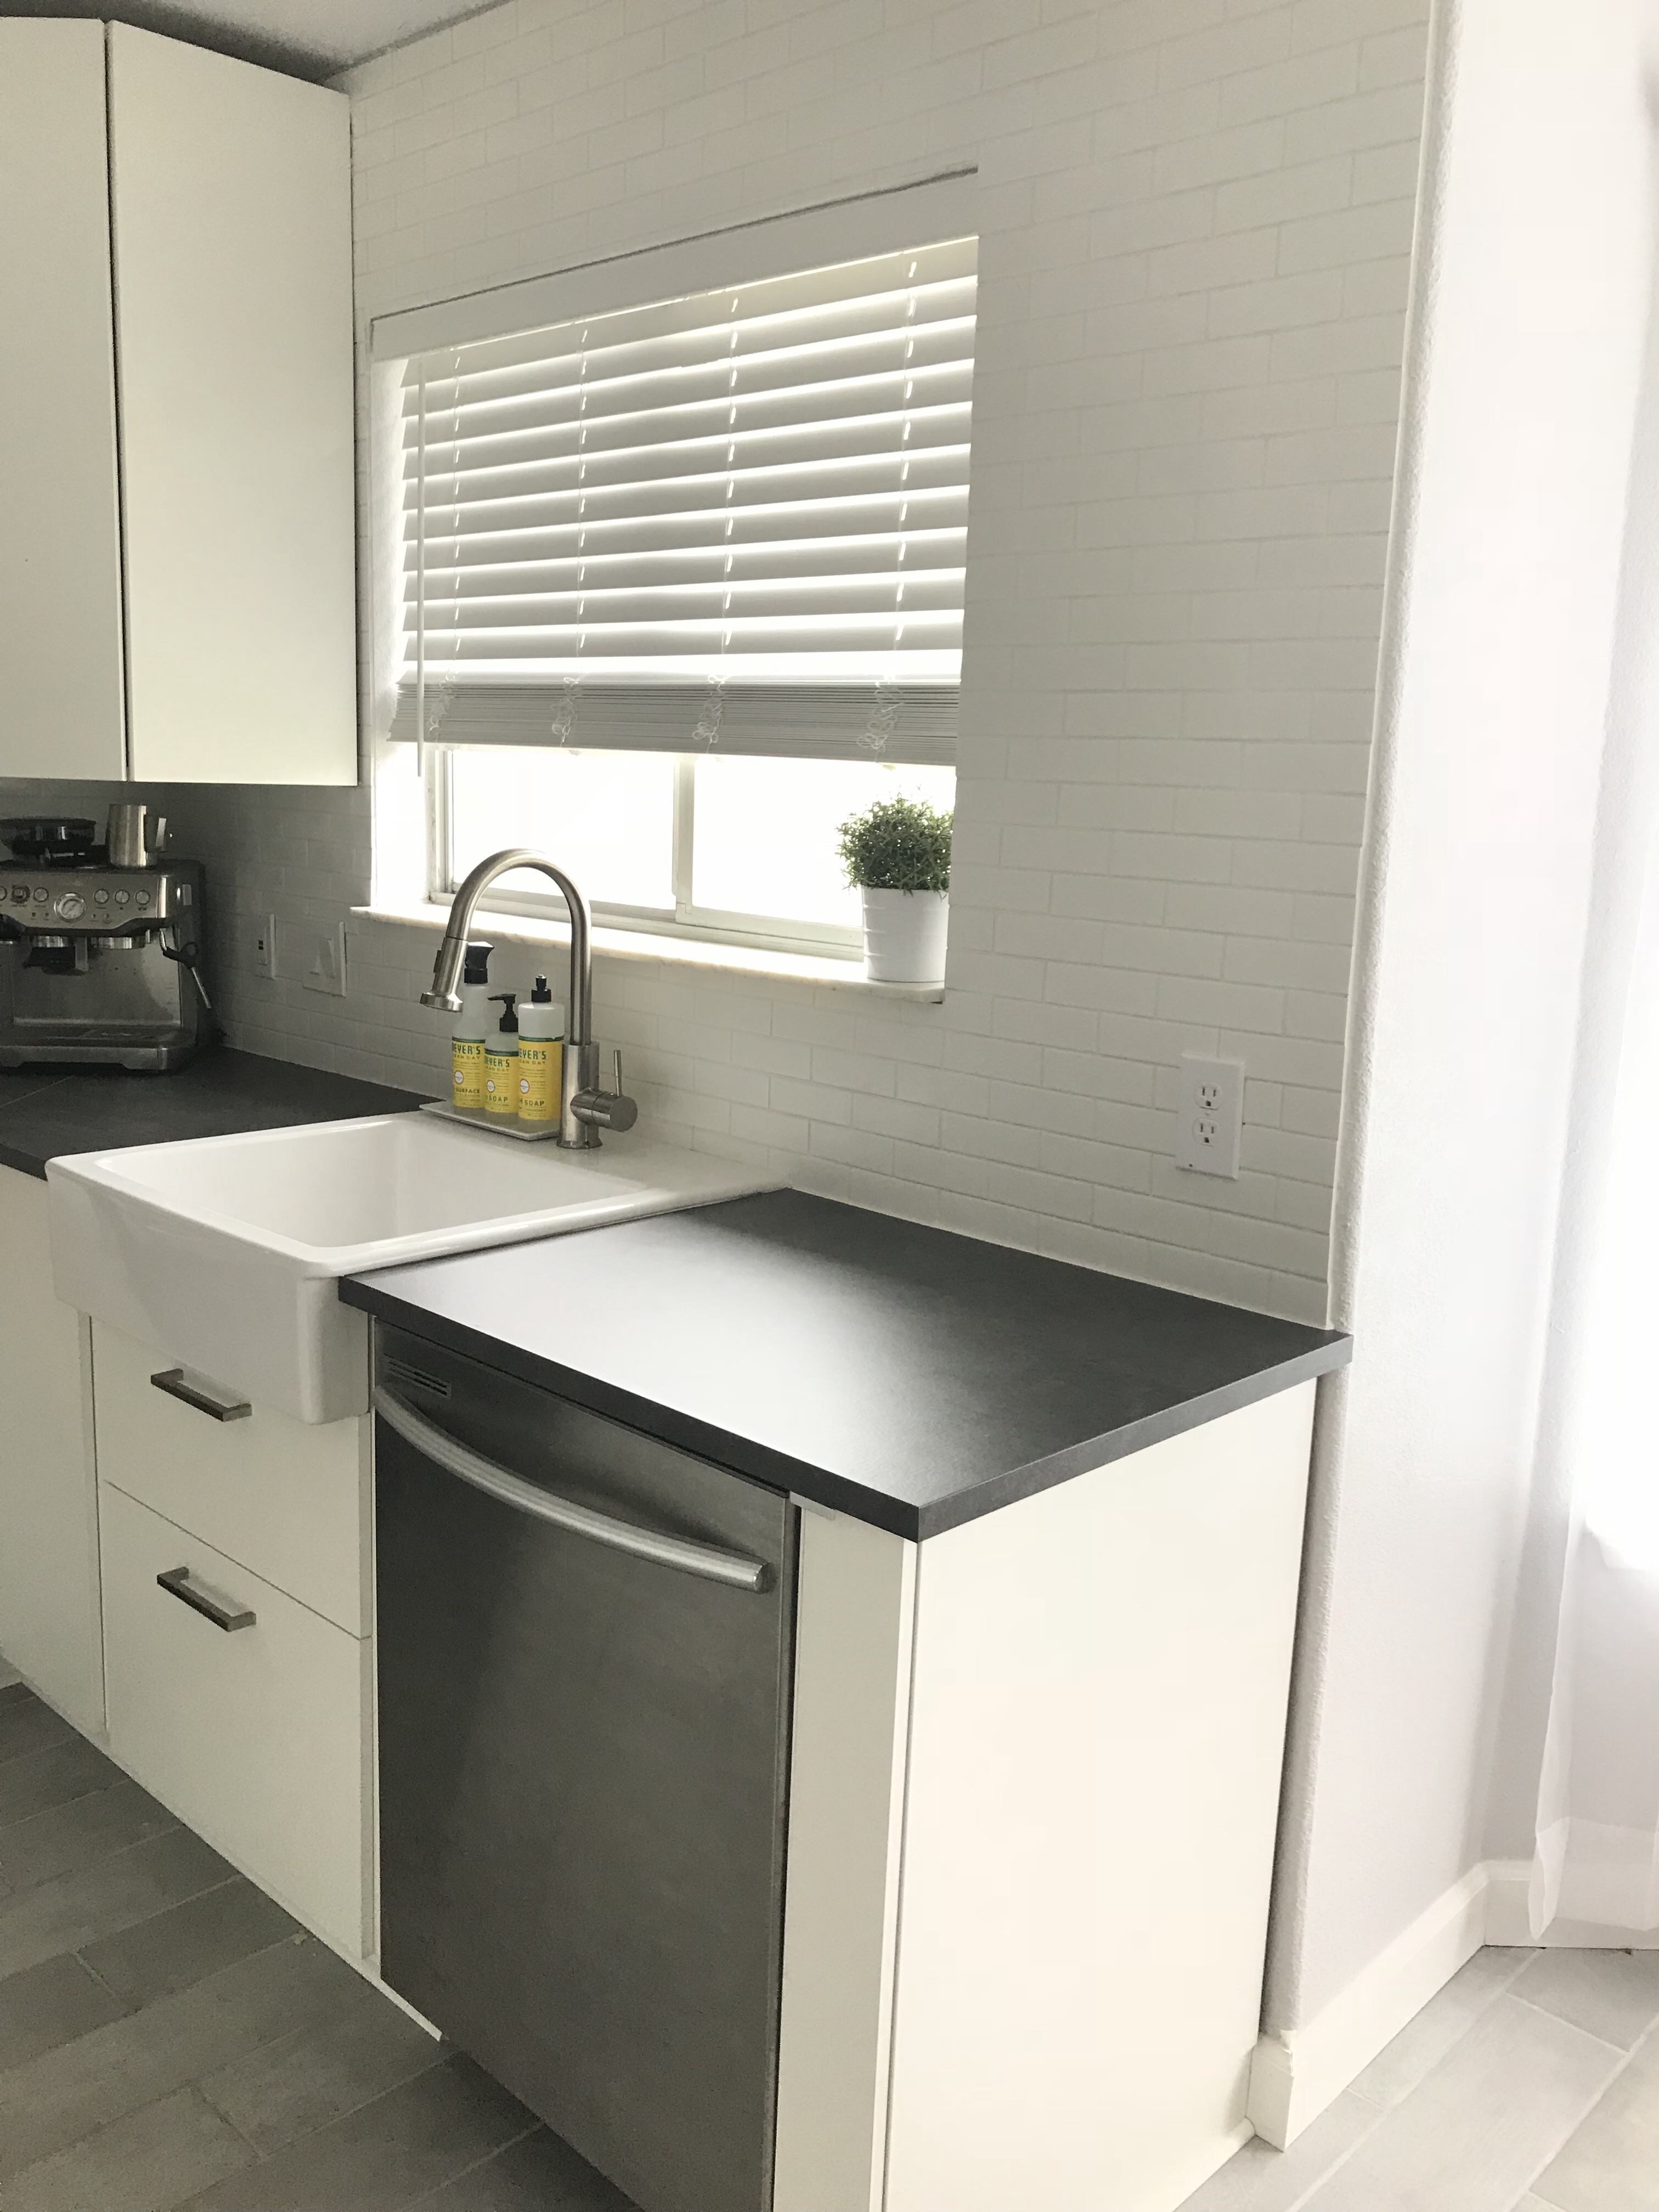
 This last side by side photo might be my favorite part of the kitchen. Normally when a dishwasher is at the end of a cabinet row, they just use a filler panel, but I knew if we could get a SUPER skinny cabinet in there then it could store cutting boards and wire racks beautifully. Obviously IKEA doesn’t sell super skinny cabinets but Josh figured out how to cut down a 12″ cabinet and shelf so I could have my storage. But we both wanted it to look like a filler panel so we used this hidden drawer pull that IKEA sells and you often see used on flat front cabinet doors. You have to know it’s there to know it’s there and it’s just the cutest little thing. There are a bunch of tutorials on YouTube on how to cut down IKEA cabinets and we used those to get this little cutie in place.
 There’s this one record store in the heart of SoCo. If you don’t know it’s there you might miss it, you have to go behind the building it’s in and enter from the alley, but if you’re the record collecting kind (as Josh and I are) then this is a place you want to go. It’s called